Improve
Updates for Rock 17.0
Below is a summary of the updates for this version.
- Peer Networks measure connection between group members.
- When merging records, rows with matching data are initially hidden, to highlight differences
- Attributes can be configured to stop value changes from being recorded to the History log
Updates for Rock 1.0
No updates made.Updates for Rock 2.0
No updates made.Updates for Rock 3.0
Below is a summary of the updates for this version.
- Updated the location of the 'Photo Request' page to
its new home under 'Admin Tools > Communicatons'.
- Detailed Rock's new international friendly School Grades.
Updates for Rock 4.0
Below is a summary of the updates for this version.
- Added detail information on Tag security.
- Added new chapter My Pages which covers the My Settings and My Dashboard pages.
- Documented the move of the following page from under People to My Settings.
- Expanded the Following chapter to including sections on engaging and configuring following,
as well as following suggestions.
- Added details on the new merge requests feature.
- Described Rock's new 'Possible Duplicates' check when adding a family.
- Documented the new Geofenced By Group badge.
- Discussed the new 'Alert Note' badge.
- Updated details on the Bio Bar where phone numbers with SMS enabled
will display a small icon next to the phone number. Also, when
the page is loaded on a mobile device the phone numbers will
display as links to enable 'Click-To-Call'.
Updates for Rock 5.0
Below is a summary of the updates for this version.
- Updated new capabilities added to the My Dashboard page.
- Added new chapter on the Person and Family Analytics tools.
- Added new section to the Person Attributes chapter about configuring the Person Attribute Forms block
- Documented the new 'auto-follow' feature on following suggestions.
Updates for Rock 6.0
Below is a summary of the updates for this version.
- Added new information on the new Directory feature.
- Documented the new Family Attributes feature.
- Added information on the new external profile editor.
- Updated "liquid" to "Lava" in Badges section
- Clarified calculating eRA as 'Weekend Service' in Person & Family Analytics chapter.
- Added Reset Login Confirmation documentation to Duplicates chapter.
- Added Foster Families note to Strategies for Blended Families chapter.
- Updated Suggestion Type documentation in Following chapter to include "In Followed Group" option.
- Corrected block settings information in the Directory chapter.
- Updated Bio Bar screenshot and updated edit button information.
- Clarified the Directory screen shot block settings explanation.
- Fixed reversed callouts/typo in Following Suggestions screenshot in Following chapter.
Updates for Rock 7.0
Below is a summary of the updates for this version.
- Added new 'In Data View' badge type.
- Added add/delete security roles from person profile page.
- Added tip on how to extend the bio bar block settings to create a dynamic profile page.
- Added 'Pending' to possible Connection Status badges in Bio Bar.
- Added Merging Documents and Family Attributes tip to Duplicates section.
- Changed "liquid" to "Lava" in the Badges section
- Added Person History Following Event documentation and screenshot to Following chapter.
- Added Search by Birth date subsection to Searching chapter
- Added Add Family Block Settings subsection in Adding a Family chapter, including screenshot and callouts.
- Updated Person Profile screenshots to include updated Actions menu.
- Updated Actions callout in Person Profile section to include information on downloading a person's vCard.
- Updated Bulk Updates screenshot and callouts to include information on workflows in bulk updates.
- Updated Tags chapter to include updated tag security information.
- Updated Suggestion Type documentation in Following chapter to include "In Followed Group" option.
- Updated incorrect edit link information in Bio Bar documentation.
Updates for Rock 8.0
Below is a summary of the updates for this version.
- Updated Person Profile and Bio Bar screenshots to include social media icons.
- Added Social Media section to the Extended Attributes section of the Person Profil Page chapter.
- Added Process Adult Children Job note/section in the Reccomendations for Life Events chapter.
- Updated Merge Screen screenshot in the Duplicates chapter.
- Updated Merging Records and Family Attributes note in the Duplicates chapter to include information about the Family Values and Family Attribute Values sections of the Merge People screen.
- Added How Rock Handles People and Families chapter.
- Added information to the Editing an Individual chapter about the Lock as Child option available in the Edit Person screen.
- Added Personal Devices badge to Badges chapter.
- Updated Person Profile Page chapter to include Signals section of the Security tab.
- Updated Individual Identifers documentation in Editing an Individual chapter.
- Added Person Signal Types chapter.
Updates for Rock 9.0
Below is a summary of the updates for this version.
- Added "Schedule Toolbox" to the Group Tab
- Updated Badge Bar with new assessment badges
- Updated Badge chapter with assessments mention
- Removed "DISC Personality Assessment" chapter (replaced by Assessments book)
Updates for Rock 10.0
Below is a summary of the updates for this version.
- Added details to describe single-campus behavior
- Added ability to configure badges for any entity
- Added option to select which address to keep when merging records
- Added Documents and Assessments to History tab in Person Profile
Updates for Rock 11.0
Below is a summary of the updates for this version.
- Added Documents tab to Person Profile page
- Individual parts of Addresses can be made optional or required
Updates for Rock 12.0
Below is a summary of the updates for this version.
- The external My Account page has a cleaner look and
feel and new block settings, including a Lava template to
control the view mode
- Updates to Connection Requests can be viewed from the
Person Profile page under Person History
- Personal Links let you bookmark pages in Rock, allowing
for fast navigation to the pages you choose
Updates for Rock 13.0
Below is a summary of the updates for this version.
- A new Following Event Type was added for when a person you're following has a person note added
- New Account Protection Profile features restrict merges in order to reduce the possibility of an account hijack
attempt
- Some changes related to Steps items are now tracked in the Person History
- The Family Pre-Registration block allows for launching a workflow for each parent and a workflow for each
child
- The Communication History block on the History tab of the Person Profile has been updated to provide additional details about communications sent to the person
Updates for Rock 14.0
Below is a summary of the updates for this version.
- The Person Profile pages have been given a new look and feel
- New security settings allow you to hide account protection profile information on Person Profile pages
Updates for Rock 15.0
Below is a summary of the updates for this version.
- Race and ethnicity can optionally be tracked for individuals (off by default)
- The Reminders feature will alert you about events and tasks, helping you stay informed and engaged in ministry
Updates for Rock 16.0
Below is a summary of the updates for this version.
- Person notes can be pinned to the top of the list
- Certain Person Profile documents can be viewed in the browser without downloading
Welcome
Welcome to the Rock field guide for managing people. Individuals and families are at the core
of what we do. In this guide we'll look at the people-managing tools you'll find in Rock. We'll
also dig a little deeper to give you a glimpse into how Rock stores information about individuals
to help you best use Rock in your organization.
We Are Family
Every person in the database belongs to a specific
group type called
Family. It’s impossible to add a person to the system without either creating a new family
or adding them to an existing family. However, an individual isn’t limited to membership
in a single family. They can belong to many families, but they will always have at least
one. Below we look at some of the other unique things about the family.
Addresses
Addresses are tied to the family, not the individual. There are several
different types of addresses defined in Rock, and you can add more if you’d
like. The ones that are available out-of-the-box include:
Adding an Address Type
If you'd like to add a new address type, follow these steps:
- Add a new group location type under:
Admin Tools > Settings > General > Defined Types > Group | Location Type.
Be sure you select the Group | Location Type
as there's also a Location | Location Type.
- Add your new group location type to the Family group type under:
Admin Tools > Settings > General > Group Types.
From this screen select the Family
group type and add the new address type to the
Location Types list in the General section.
Configuring Address Fields
If needed, you can make specific parts of an address required, optional or hidden.
Navigate to Admin Tools > Settings > General > Defined Types > Countries
and edit the entry for your country according to your needs.
Campus
If you’re a part of a multi-site organization, the campus is also tied to
the family. Interestingly, if a person is a member of two families that
attend separate campuses, the individual will be tied to two different
campuses as well. This is a powerful pattern for blended families to use.
If you’re not a multi-site organization then the campus is still tied to
the family, but it’s done behind the scenes. This is needed just in case
a new campus is ever added.
Portrait of a Person
What Makes a Person
Before we start diving into the features, let's look at what makes up a
person in Rock.
There are two main sources of data when looking at a person's record. First are
the common data elements that are "hard-coded" into the system. These include
basic fields like First Name,
Last Name,
Email, etc.
These fields are common to all organizations, so they have been provided from the
beginning of Rock and can't be removed.
Field Limitations on Rock
When a person enters their name into a Rock profile, they will receive a warning message if they use any unsupported characters. Unsupported items in the name fields include special fonts, emojis and the following characters: ( , { , [ , ) , } ,] or ".
Second, since every organization is different, Rock also allows you to add new
data items to a person. We call these
Person Attributes.
You can add as many as you like, selecting a data type for each one. Common data types include:
- Text
- Date
- Number
- Dropdown of provided values (think of an attribute of T-Shirt Size with the values of S, M, L, XL)
- Boolean (aka, True/False, Yes/No)
- Document
While there are quite a few other data types you can use, those are the common
ones.
Over time, your list of added attributes can become quite large. To help with this,
we've provided the ability to group them into categories. You'll see these attribute
categories later when we look at the
Person Profile page.
Note
See your administrator to help define new person attributes and categorize them into groups.
Adding a Person
As you’re getting started, one of the first things you’ll want to do is add someone
(perhaps yourself) to the database. While it might be intuitive to look for a menu
item labeled "Add Person", you won’t find one. Because people are members of families,
you must start with adding a family. You’ll find that under:
People > New Family.
Deleting a Person
While it might seem like a natural thing to do, deleting a person is not allowed
in Rock. Why? The history of a person must be maintained for historical
records to be accurate. Think about giving and check-in. If a person was deleted,
you would lose their contributions and attendance information. Instead of deleting
people, you can inactivate them in the database (more on how to do this later).
Let's look at some common situations where you might want to delete a record, and how to handle them in Rock.
Scenario: John Doe no longer attends and has asked to be removed from the database.
In Rock: You can consider John removed when he has been marked inactive. This should remove
him from all future emails.
Note
When writing custom reports, be careful not to include inactive records.
Scenario: You added a duplicate record and want to delete the new one.
In Rock: Instead of deleting the record you'll need to merge it with the existing record.
See the Duplicates section below on how to do this.
Scenario: You added a test record and now want to delete it.
In Rock: It would be best not to add test records to your production environment. You might
consider creating a test environment that you can treat as a sandbox. If you
added a sample record to your database, you have two options. The first option is to inactivate
it like it was a normal person. The second would be to merge the record with an
existing record.
Searching
Searching By Name
To find someone in the database, start by using the
Smart Search
tool found at the top of every page. This tool can be used to search several different types of
data, but it defaults to searching for individuals by name.
Smart Search Tool
When searching by name, it's important to know some tricks to improve the quality
of your search and to save time. Keep in mind that you don't need to type a person's
full name to search. You can type fragments of the name. Say, for instance,
we're looking for Ted Decker. Here are several suggested ways we can search for
him:
t decker
te dec
decker
Notice that none of these suggestions included "Ted Decker." That would be a waste
of key presses. (Useless fact: the average key on a keyboard has a life cycle
of only five million presses.) Because you make fewer spelling mistakes if you
press fewer keys, it's always a good idea to shorten searches.
Also, notice in our samples above that we never searched for just "Ted." If you provide
only one name, Rock assumes you're searching by last name.
But I'd Like to Search by Only First Name...
If searching by only the first name works for your organization, no problem. We have you covered. To enable
searching both first and last names when only one term is provided go to:
Admin Tools > Settings > System > Search Services > Person Name
and set Allow Search by Only First Name
to "Yes".
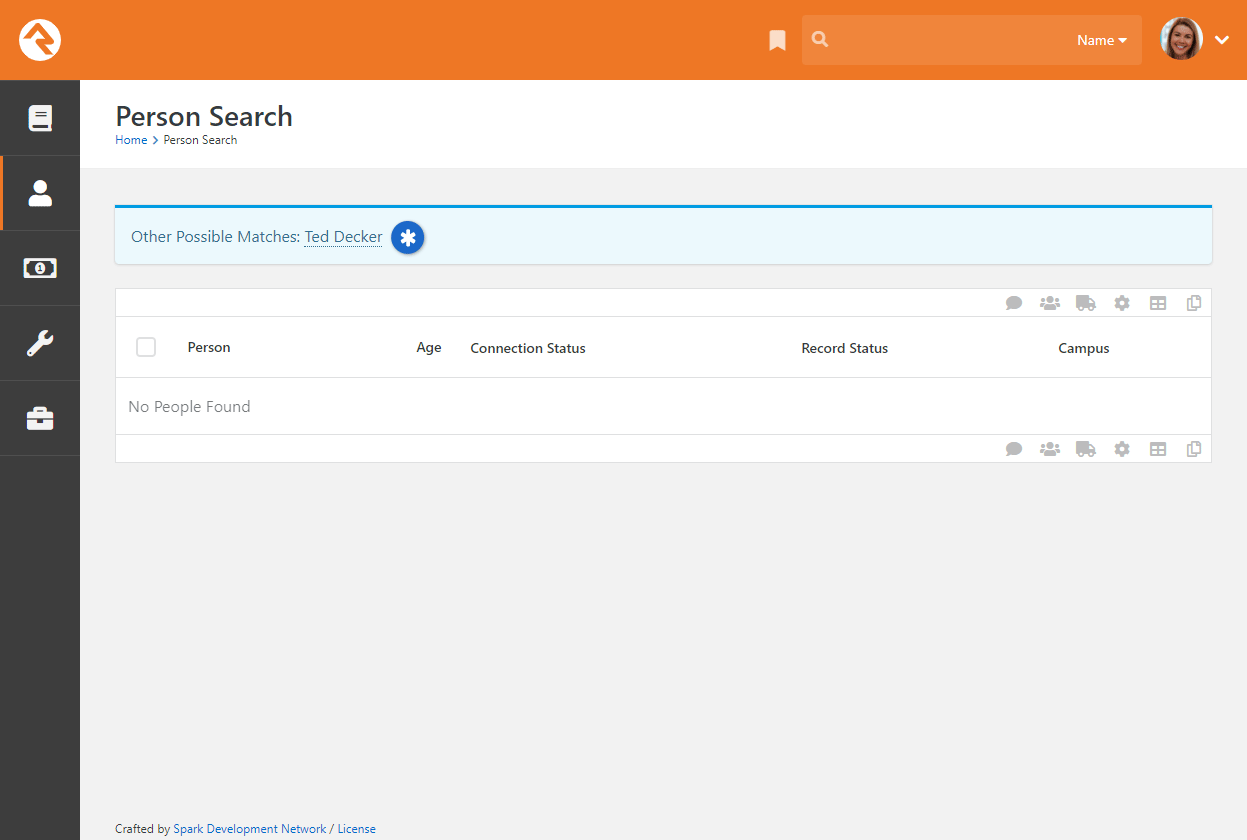
Once you submit your search, you'll see one of two possible screens. If only
one person matches your search, you'll be taken straight to the
Person Profile
page for that person. However, if more than one person is returned,
you'll see a list of individuals. Select the correct one, and you'll
be taken to their Person Profile
page.
Search Results for 'Decker'
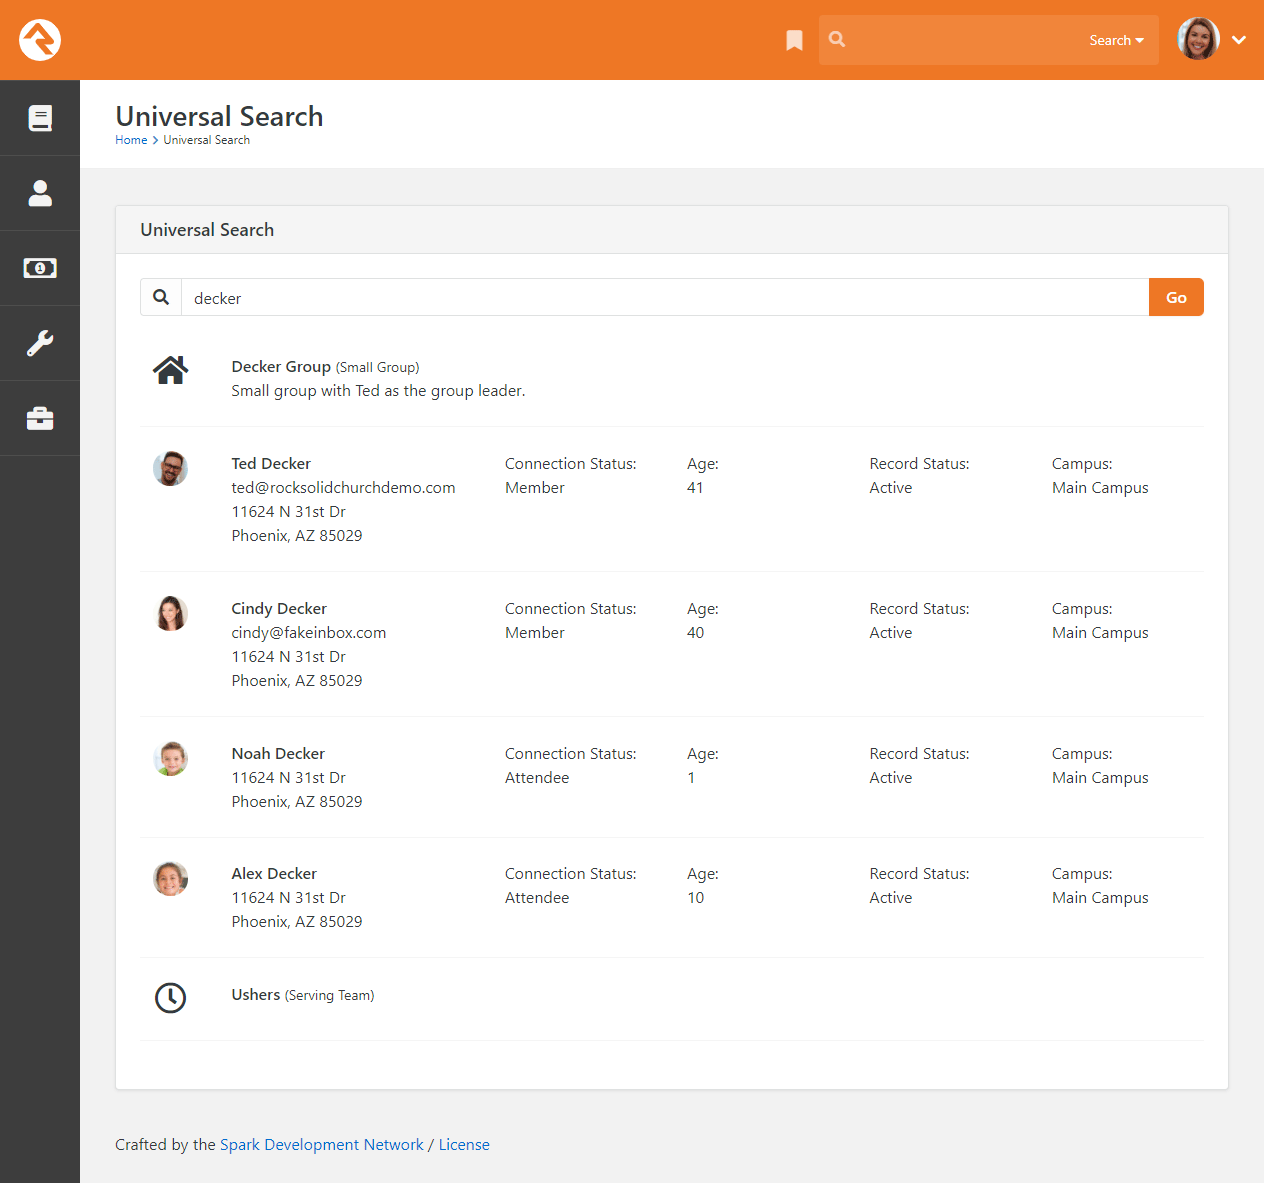
Rock has a sophisticated algorithm that helps you find names even if you can't spel theem corectlly. You
may often see other possible matches at the top of your search results.
Other Recommended Results
- Other Recommended Results
Searching by Phone
While not as common as searching by name, sometimes you may want to search for a person using
a phone number. The Smart Search
tool can also search by phone. Simply select the Phone
option and type in the number.
Just like searching by name, you don't need to enter the full phone number to get
results. You can enter any part of the phone number. (This is great for people
who leave voicemails with rushed return numbers). If you were searching for the
person with the phone number (623) 555-3322 (Ted Decker in our sample database),
you could use any of the searches below to find him:
(623) 555-33
62355533
3322
555 3322
Note
The phone search will strip out any characters that aren't numbers before
running the search.
Searching by Email
Yep, you guessed it: Rock can search by email using the
Smart Search
tool, too. Partial searches are supported. We're sure you've got it by now, so
we won't repeat the search details here.
Searching by Address
The address search is also similar to the other search types. Keep in mind, though,
that it only operates on the street address portion (first line) of the address.
Sample searches for Ted Decker would be:
11624 N 31st Dr
11624
31st Dr
Searching by Birthdate
You can also search for a person by birthdate. For this option to be
available, it must first be enabled and configured in
Admin Tools > Settings > System > Search Services.
Searching by Group Name
Much like searching by name, you can also search by Group Name using the
Smart Search
tool. You can type a specific name to locate a particular group (e.g., "Alisha
Marble's Small Group"), or use a general term, such as "student", to display a list
of all groups with that term in the name.
Searching by Business
You can search by business name using the Smart Search
tool as well. Partial searches are supported.
Universal Search
The Smart Search
capability in Rock is quite powerful, but sometimes you may need more. That's where
Universal Search comes in.
Universal Search allows you to search multiple types of data at once in a full-text manner. In a sense, it's like Google for Rock.
To learn the ins and outs of Universal Search, check out the
Universal Search
guide.
I Still Haven't Found What I'm Looking For
The Smart Search and
Universal Search features
should meet your needs in almost every case. If you need
to search with even finer detail, you can write a quick
Data View
to find the person. See the Taking Off With Reporting
guide to learn more.
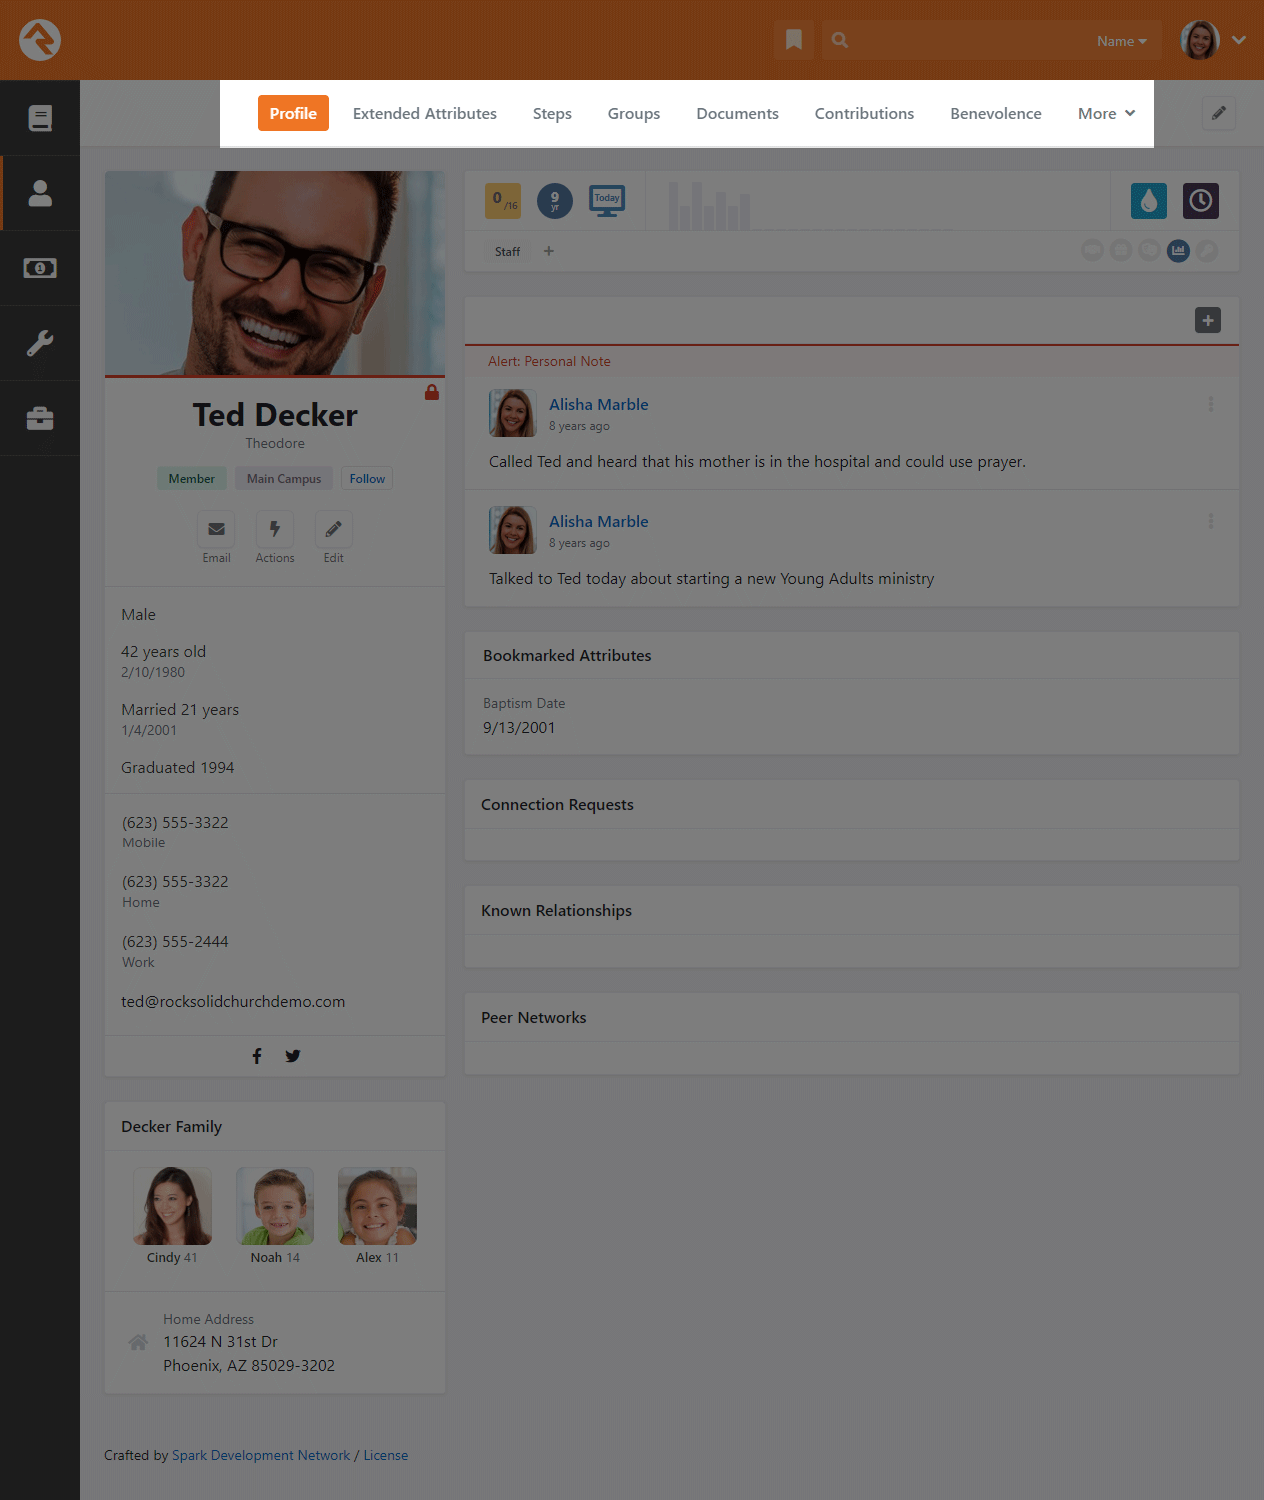
Person Profile Page
The Person Profile
page is by far the most used and powerful page in Rock. This one page gives you
a detailed picture of a person's involvement in your organization and the relationships
between people.
Person Profile Page
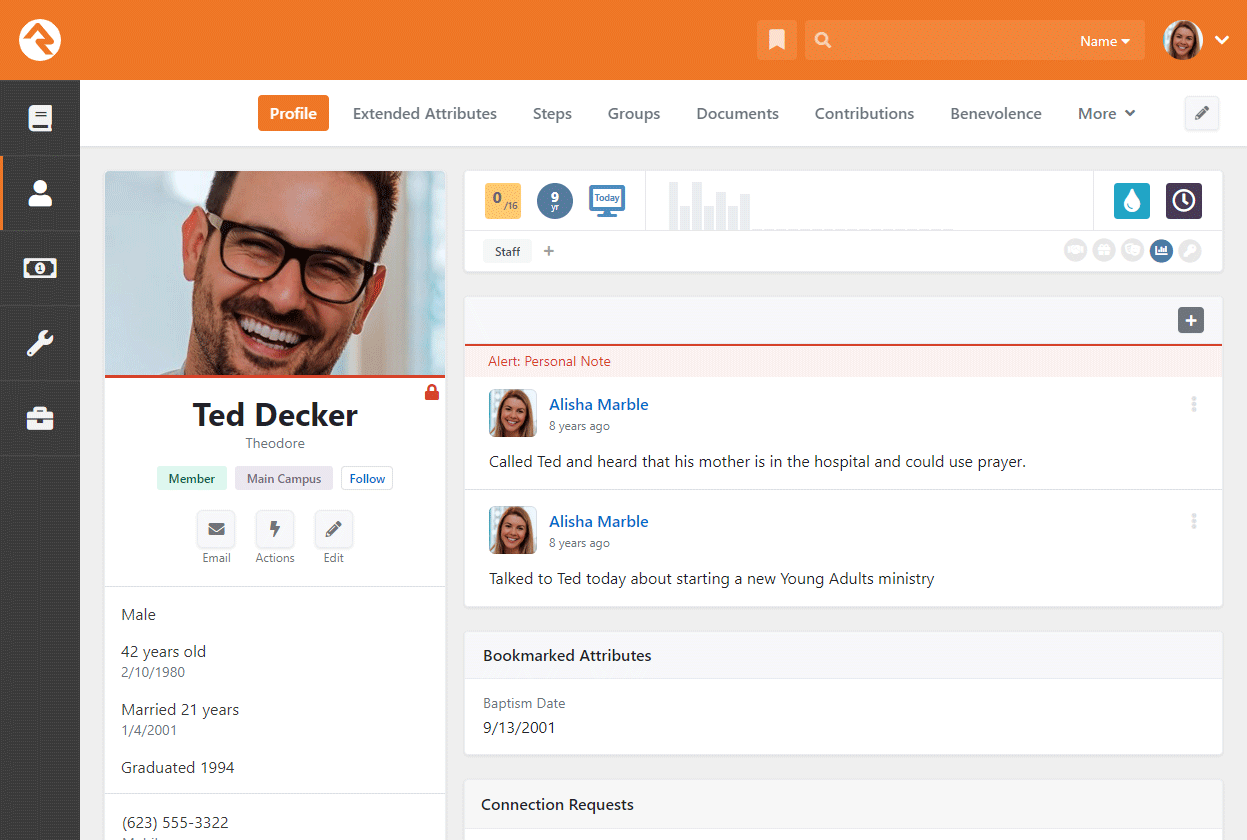
The page can be broken down into four main areas, which we'll discuss in detail below.
Person Bio
The Person Bio gives you
details and contact information about the individual. Here's a breakdown of this section.
Bio Section
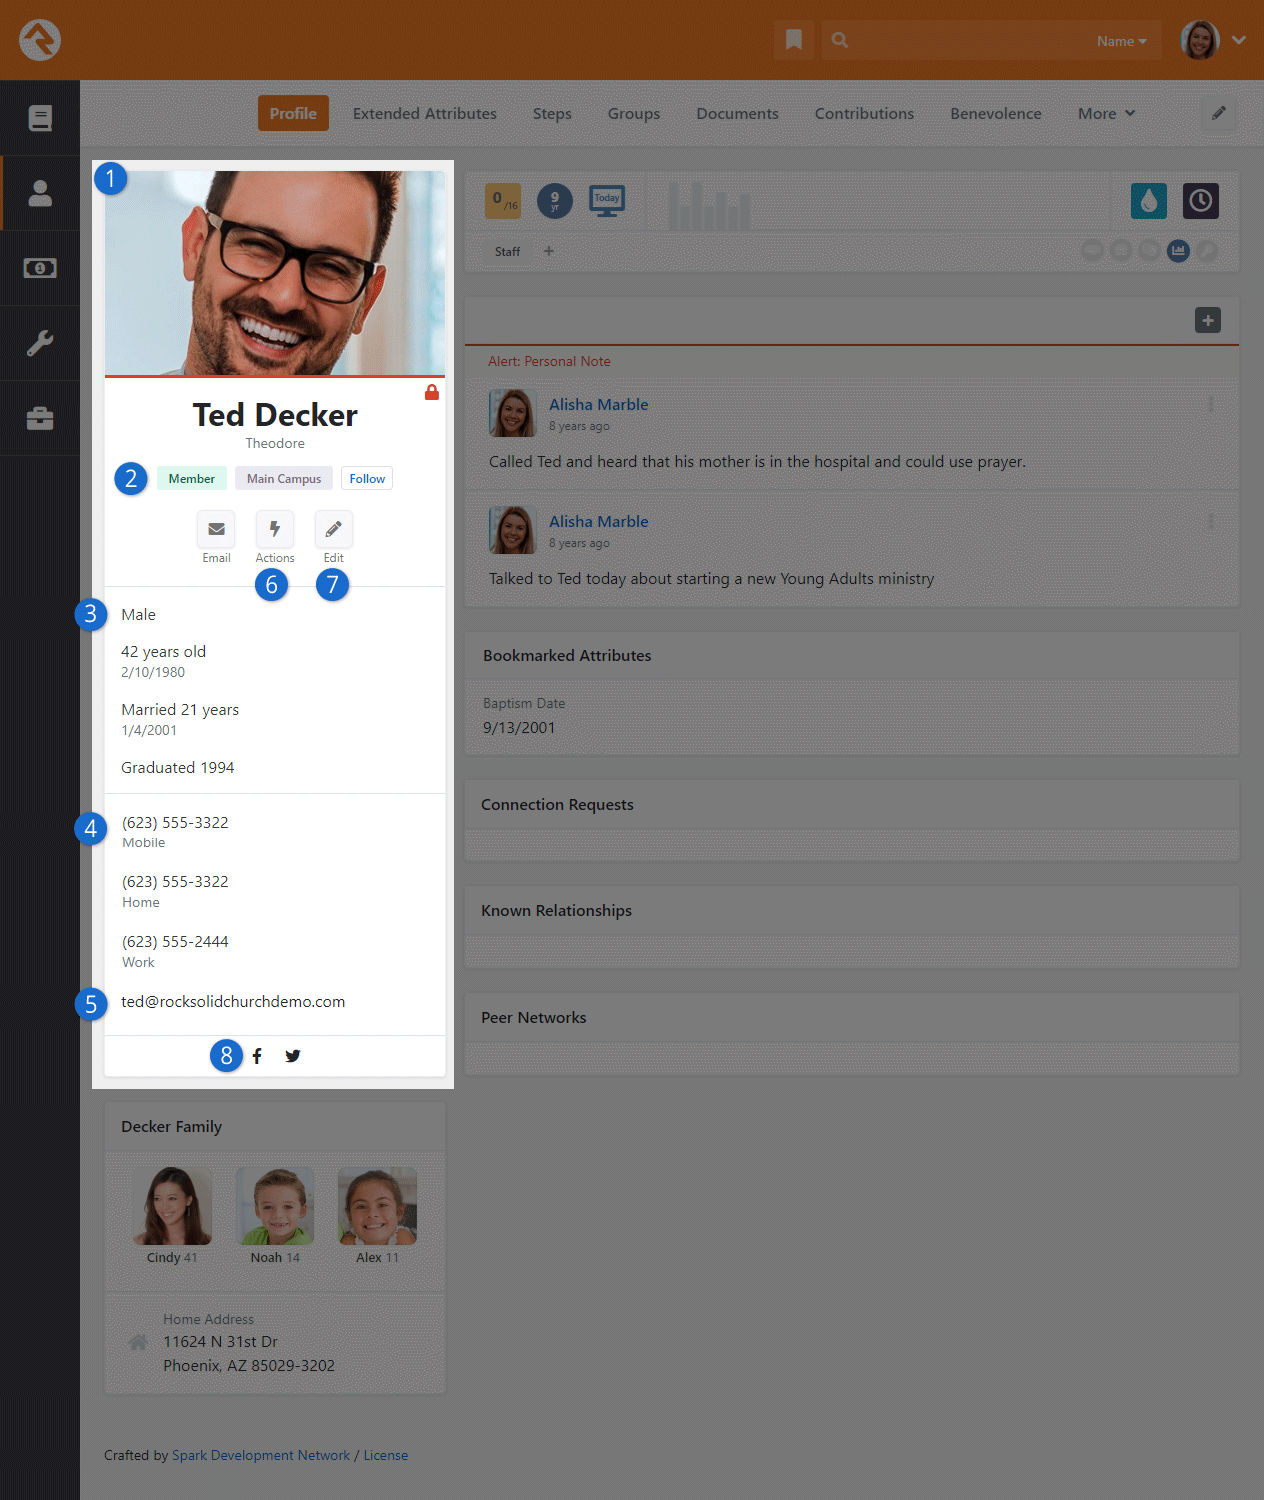
- 1 Photo
- If a photo is available, it's shown here. If no photo is available, a
gender/age appropriate silhouette image is shown.
- 2 Labels
- Labels are a quick way of categorizing a person's involvement. After
installation the following labels will be active on the page, but you can add custom labels.
- 3 Demographic Information
- This includes age, gender and marital status.
- 4 Contact Information
- This section contains phone numbers and the person's email address. Note that if
the phone number has SMS enabled, you'll see a speech bubble icon. Also, if this page
is loaded on a mobile device, the phone numbers will appear as links to enable 'Click-To-Call'.
- 5 Email Address
- Clicking the email address will launch a new communication to the individual. You may also see icons next to the
address noting the individual's email preferences. If they have asked not to receive bulk emails, you'll see a
. If they have asked
not to receive any emails the address will not be a link and the
icon will be displayed.
- 6 Actions
- The action list allows you to launch workflows for the individual. See
the
Blasting Off With Workflows manual for details on creating custom actions for your organization. More details
on the Photo Request action can be found
in the Photo Requests
section below. This list is also where you can download a person's vCard, or virtual business card, to store on another device,
such as the contacts on your cell phone. Rock automatically generates a person's vCard based on the contact information provided on their profile.
- 7 Edit Link
- The edit button allows you to edit the person's personal and contact information and gives you the
advanced option of combining their giving with another person's. In the Edit Person block, there is an setting that allows you to set a person's SMS opt-in preferences.
This drop down determines if the SMS checkbox should be automatically checked when a new mobile phone number is entered. Please make sure your organization has consent to send SMS messages when making this change.
- 8 Social Media Icons
- The icons of any social media accounts that have been configured in the person attributes and completed for the individual will appear
below the photo. For more information about configuring and editing a person's social media information, see the
Extended Attributes Tab section below.
Note About Emails and SMS Phone Numbers
You are limited to entering only a single email and SMS phone number for an individual.
Extending the Person Bio
There are a lot of options available in the Person Bio block settings that allow you to customize the
Person Profile page. For example,
you can use the Additional Custom Actions field to add buttons, link to workflows or add personalized content, or the
Custom Content field to add almost any content you wish that is not in the core Bio block.
NOTE: When using the Custom Content area, you need special "context" syntax. For example, to display a Person Attribute here, you would use {{ Context.Person | Attribute:'AttributeKey' }}
The possibilities are endless. Be sure to explore these powerful options and consider how you might use them to create
a unique profile page that meets the needs of your organization.
Badge Bar
The next section is what we call the Badge Bar,
with icons (i.e., badges) indicating a person's activity. While Rock comes preconfigured with several badges,
you can add more. For more information on badges, including how to create new ones, see the
Badges chapter below.
Badge Bar
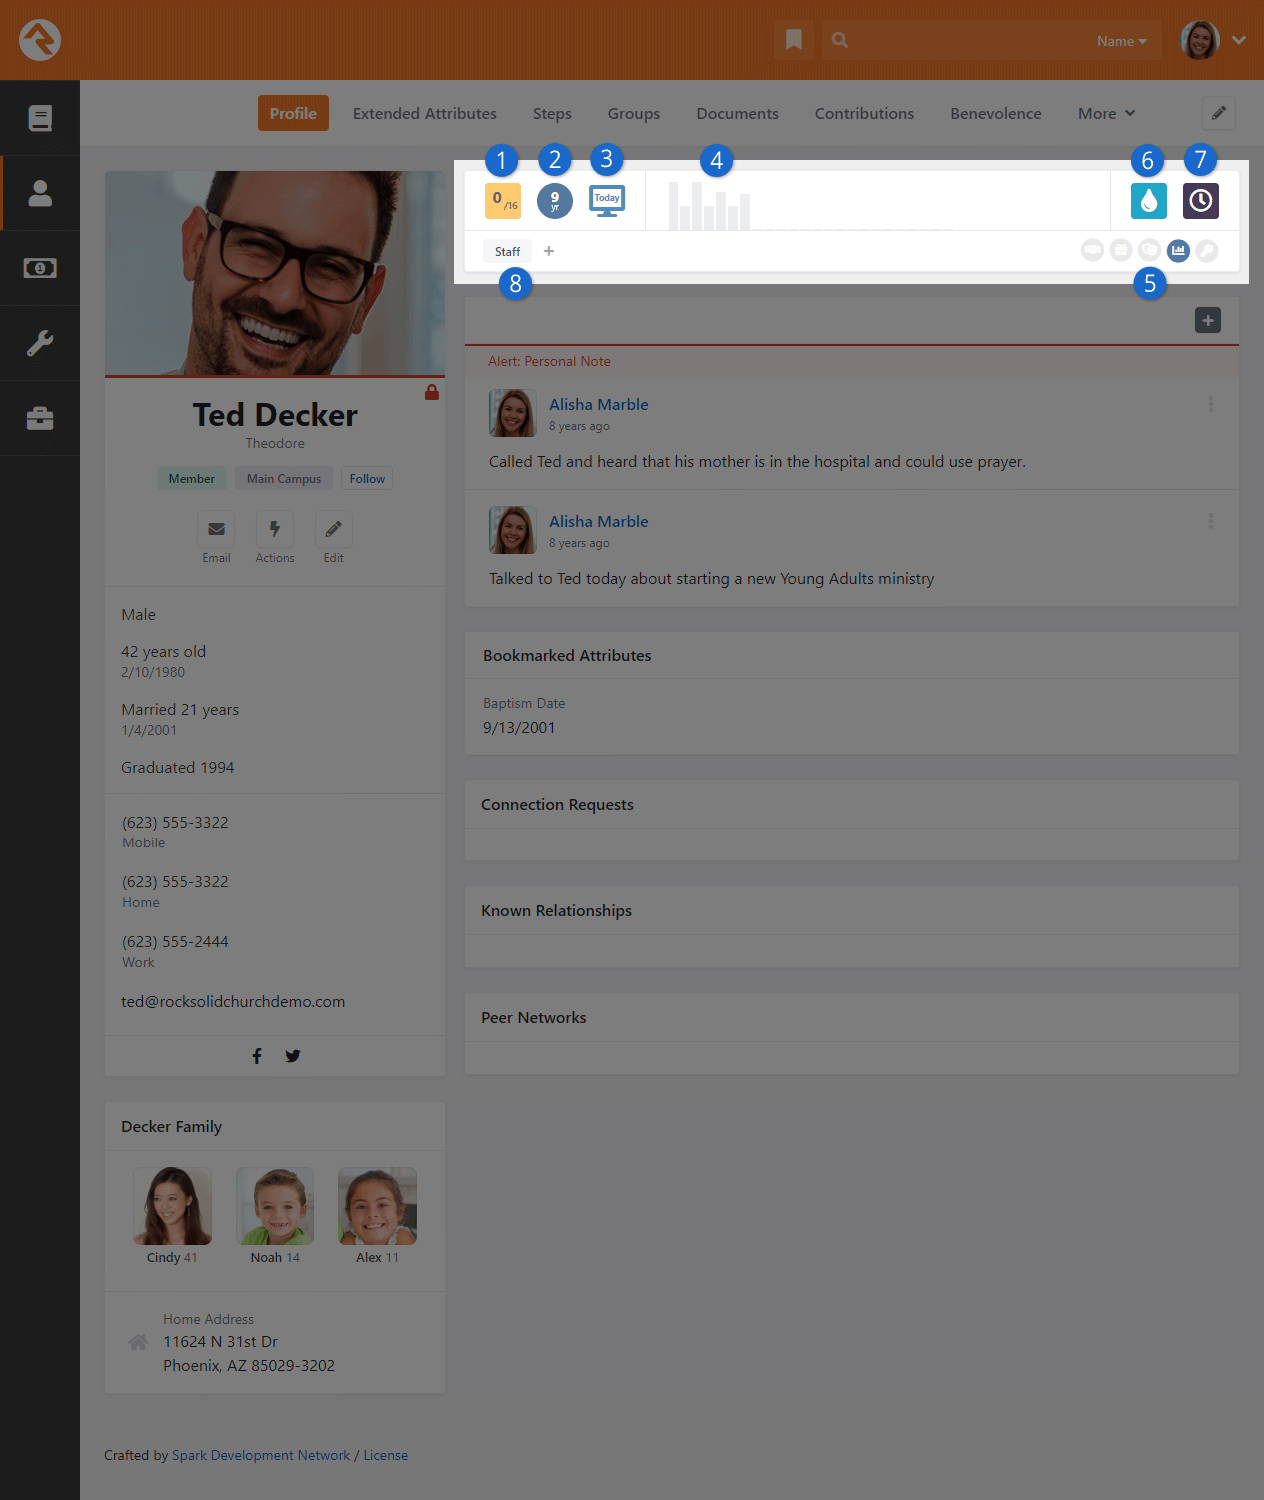
- 3 16 Week Attendance
- The 16 Week Attendance
badge will show how many times the family has attended (e.g., checked in children, serving
team participation) over the past 16 weeks.
- 2 Attending Duration
- The Attending Duration
badge shows you how long the individual has been a part of the organization.
- 3 Last Visit on External Site
- This badge shows you how long it's been since the person last visited your external website.
- 4 Family Attendance
- This chart gives you a wider picture of the attendance patterns over the last 24 months.
Each bar represents one month. The taller the bar, the more often the family attended that month.
This badge can be edited to show an individual's attendance.
- 5 Assessments
- If the person has completed any assessments the results can be seen here.
For more information, see the Assessments guide.
- 6 Baptism Badge
- The Baptism Badge shows if the individual has been baptized.
- 7 Serving Badge
- The Serving Badge shows if the person is a member of a serving team.
- 8 Tags
- Tags are a handy tool for creating simple groups of people. Tags are so
useful that they have their own chapter.
Family Section
The next section outlines the individual's family or families. The Family Section
lists each family member's name, age and Person Profile
page link, along with an address and editing link for each family.
Family Section
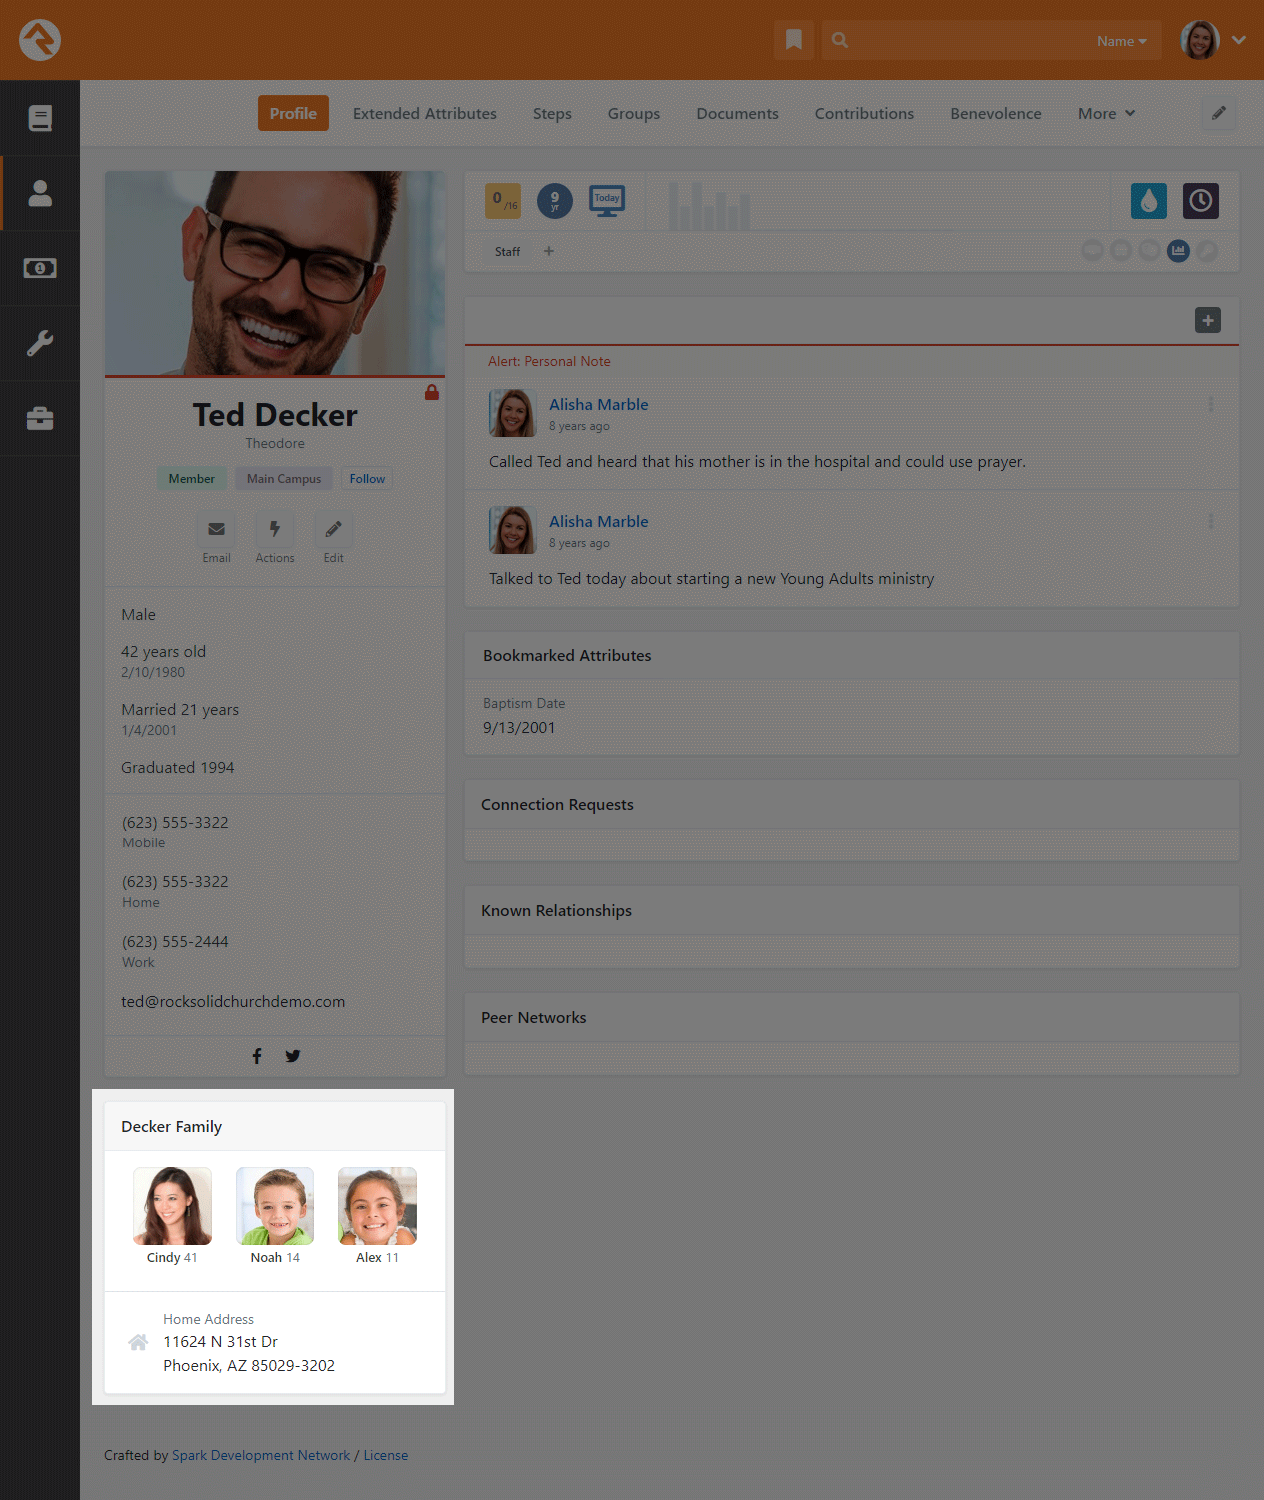
The address section of the family area has a couple of interesting features. Clicking on the
to the left
of the address will bring up an interactive map. Also, when you roll over the address a
will appear to the right.
This icon will standardize and geocode the address when clicked. Lastly, you can click the
icon to edit the address and its configuration.
Note
In Rock, an individual can be in more than one family. In these cases,
both families will be shown in the family section. Behind the scenes one family is
classified as the Primary Family, but for the
most part each family is treated as an equal.
Tabs Bar
The lower area of the page is devoted to subsections, with tabs that are visible
according to your security level. We'll talk about each one below.
Subsections Bar - Person Profile
Peer Networks
The Peer Networks feature provides a method to measure the relationship between two people in your database.
Think about the connections we make in life. You sit in a small group with someone, sharing stories and prayers.
Years later, you run into them at a coffee shop, and it's like no time has passed--you pick up right where you left off.
Peer Networks understand how relationships grow and decay, supplying you with a number that reflects the relationship two members share.
Head to any Person Profile page. If this person has ties with others through a
Follow or their groups,
the Peer Networks block will display those relationships.
These connections, like bread dough, grow over time
when nurtured, rising. When ignored, they fade, returning to their original, flat state.
Person Profile Peer Networks Block
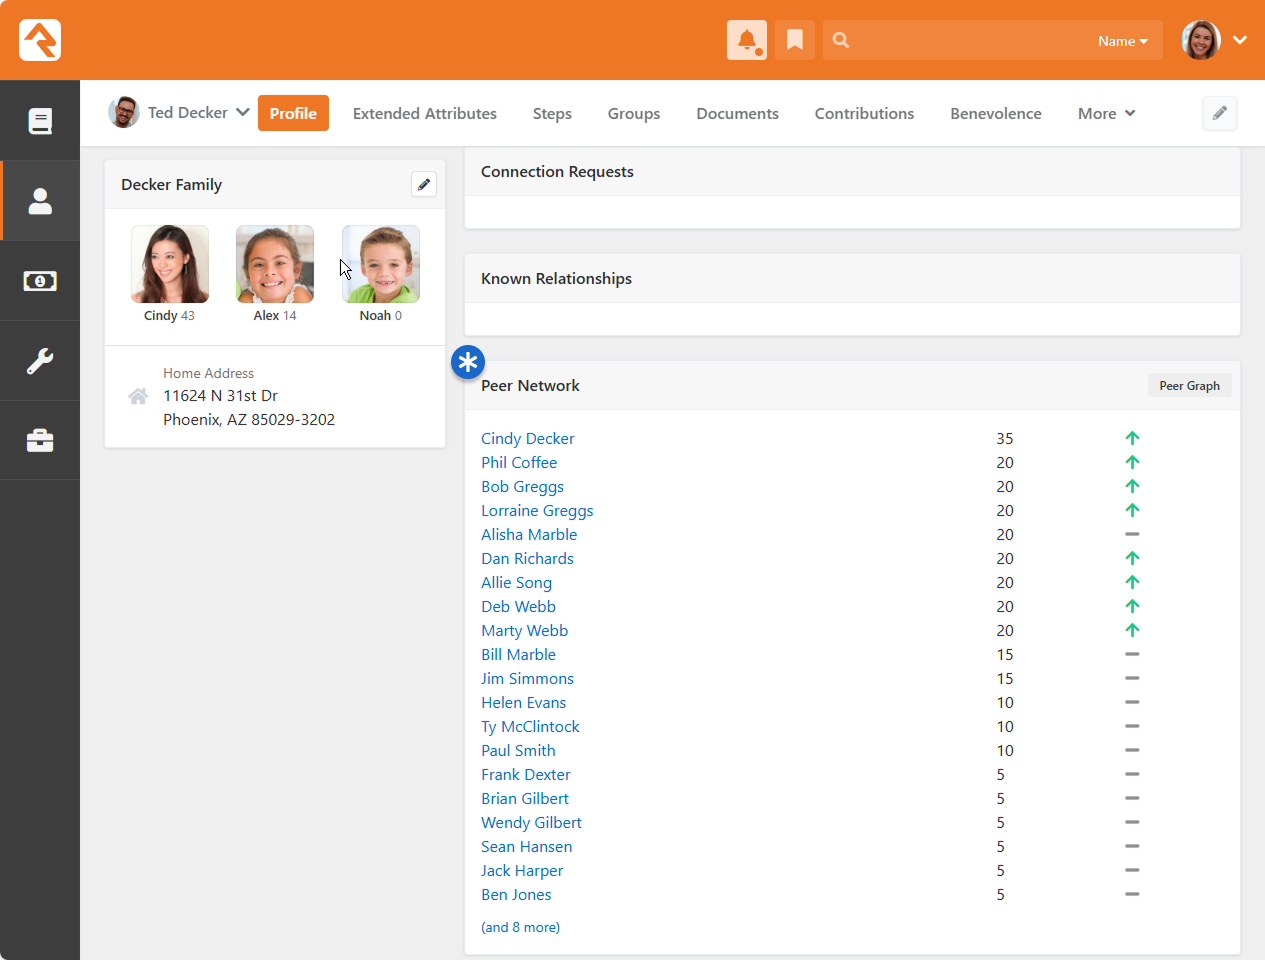
Trendlines indicate the direction a relationship is heading. If you are in a group that has Enable Relationship Growth Over
Time checked, your relationship score with members will rise over time . If you recently left a long-term
commitment to a group, the relationship score will decay over time . If the connection is through a follow,
the trend will be flat .
The Peer Graph maps relationships in a network-style view, showing how a person is linked to others across different groups.
Peer Graph
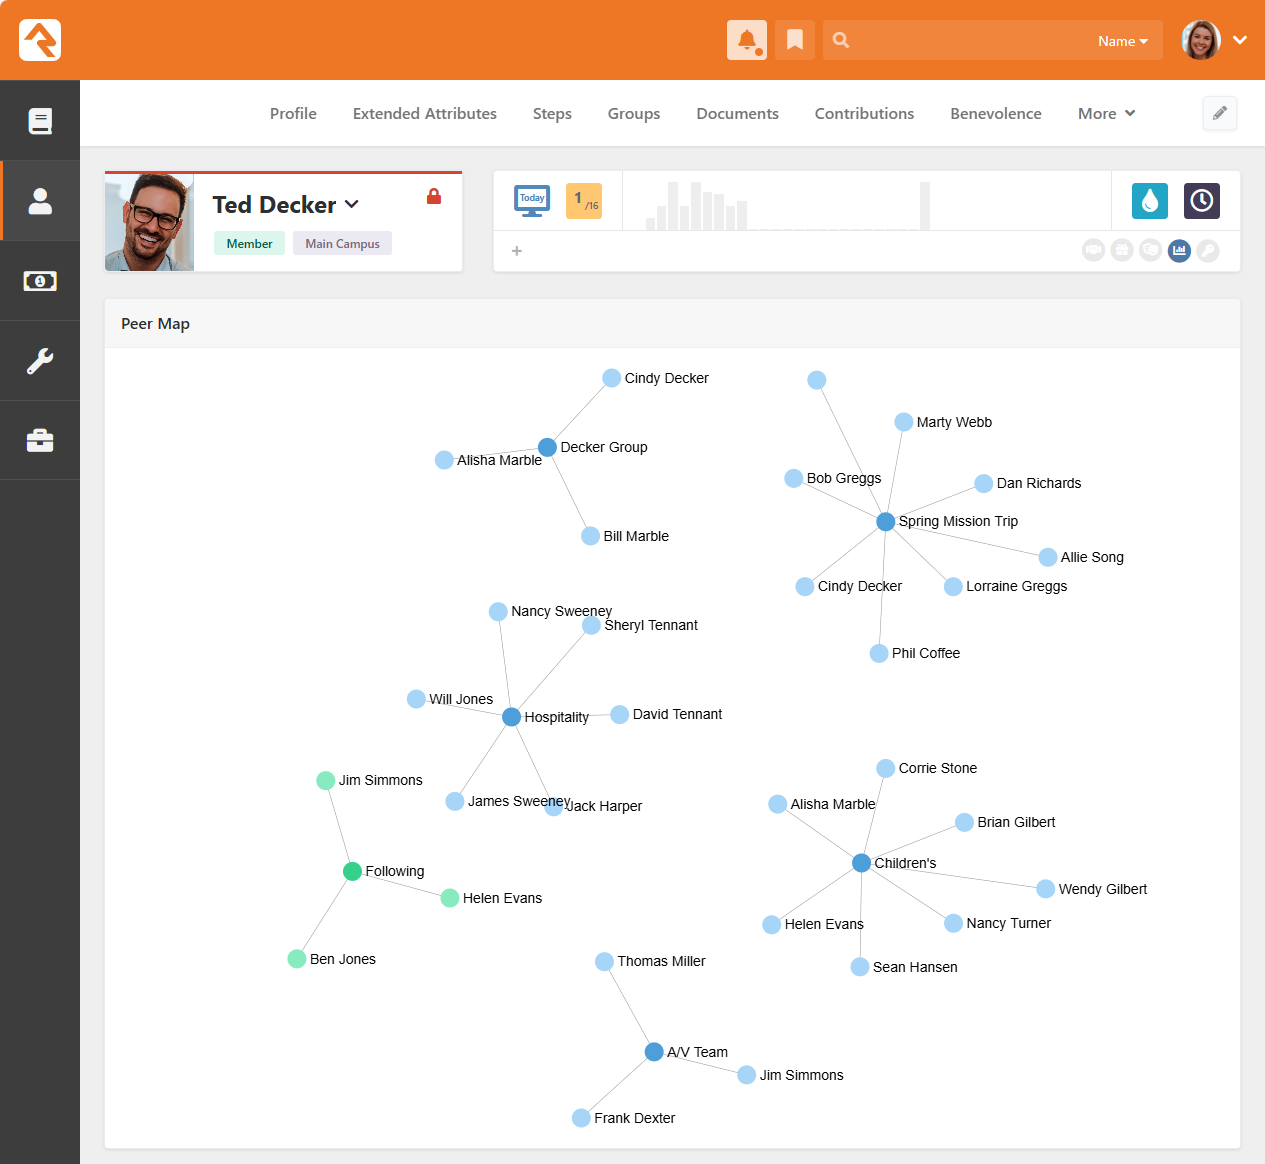
Dynamic Graph
If you want a closer view, try ctrl+scroll on the peer map.
When Peer Networks Bring Great Value:
- Launching a mentorship program? Pair mentees with mentors they already know and trust.
- Messaging a volunteer after a tragedy? Have the staff member who knows them best make contact.
- Hiring a new team member? Consult with those who know the applicant well..
When should I enable Peer Networks?
Attending the same conference as a peer doesn't guarantee a shared conversation. When
group participation doesn't correlate to personal connection, the Peer Networks feature may indicate a
false connection. Not all groups benefit from enabling Peer Networks. More on configuring relationships later.
Enabling Peer Networks in Groups
Settings > General > Group Types
Peer Network Group Type Detail
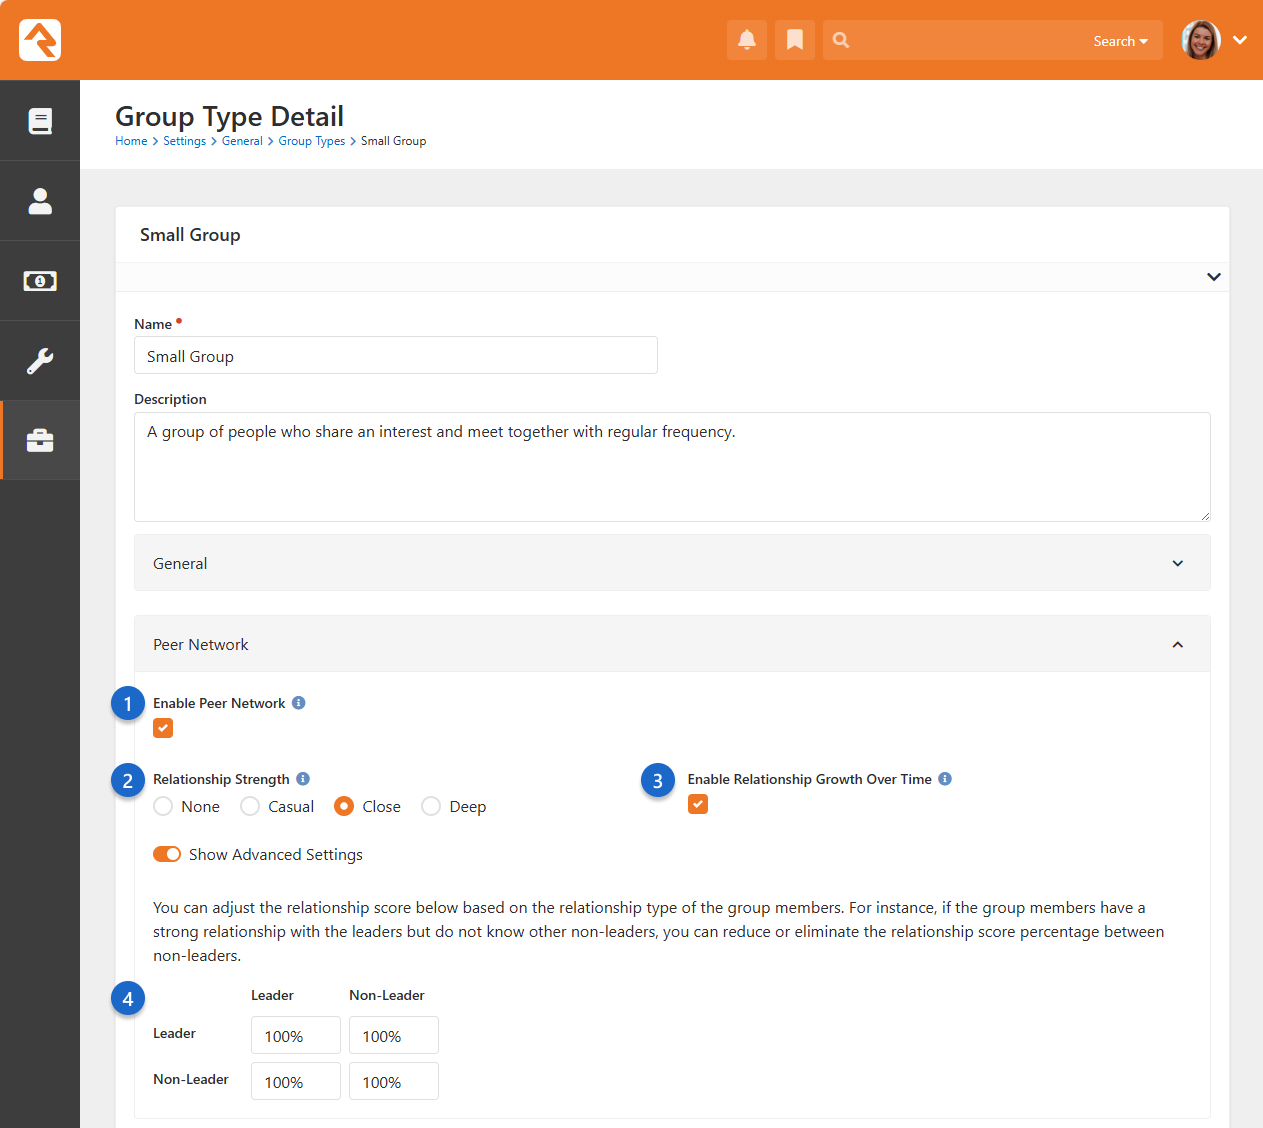
- 1 Enable Peer Network
- If enabled, Peer Network scores
will be tracked for this Group Type.
- 2 Relationship Strength
- Sets the strength of relationship between group members. Don't worry if relationship varies by individual small group,
you can override this setting (details below).
- 3 Enable Relationship Growth Over Time
- When enabled, relationship scores grow as long as an individual stays in a group (details below).
- 4 Relationship Score Table
- Table values, shown as percentages, are used to alter the score accrued between
different group roles (explained further below).
Once your Group Type settings have been configured, overriding the score for a single Group is easy.
Go to People>Group Viewer and Edit
Group Viewer Peer Networks
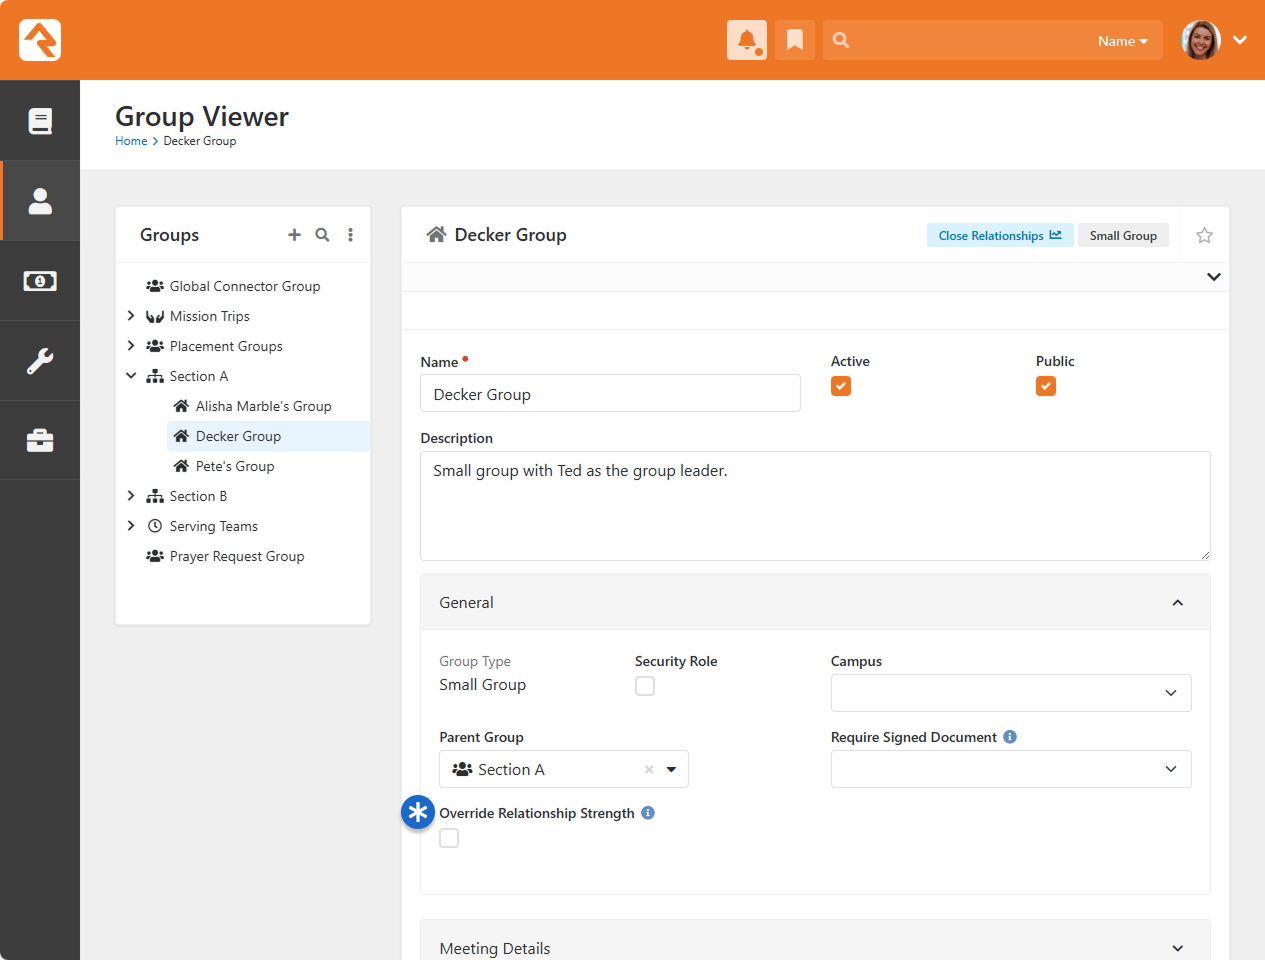
Some groups naturally foster deeper connections. For example, an accountability group requires strong bonds (select "Deep" relationship strength).
On the other hand, an online prayer group may not create close relationships (select "Casual" or "None").
If a group's connection differs from its default Group Type settings, you can override its relationship strength.
Leaving a Group
In the top right of the Group Viewer, notes when Relationship Strength has been overridden.
indicates when Enable Relationship Growth is on.
Peer Networks Score Calculation
You might be wondering, "A score for relationships? How does that work?".
Don't worry—we’re taking you behind the scenes to show you exactly how this score is calculated.
Simple Explanation:
- Attending the same Bible Study? Your score goes up the longer you're in a group.
- Following a friend? Up, but the score doesn't increase over time.
- Left a group? Down.
Leaving a Group
Relationship scores don’t disappear the moment someone leaves a group. Think of it like a star player leaving your
favorite sports team—your memories of them don’t vanish overnight, and neither do their relationship scores.
Nerdy Explanation:
Were you looking for a bit more math, less words? The full breakdown on how relationships are scored is below.
Relationship Strength Base Scores
- None = 0, Casual = 5, Close = 10, Deep = 20
- Adjusted by Connection Score table position (e.g., if a 'Close' relationship score is weighted at 50% in the table, it becomes 5 points)
- Following a friend = 5 points (score does not change over time)
Growth & Decay
- Relationship scores naturally grow over time if maintained (+10% per month), it declines rapidly (-20% per month)
until it disappears. Once a score reaches 0 the relationship is removed from your Peer Network list. It is recalculated
once a month, on the first day of the month.
- Peer Networks Formula: Base Score x (1+(Growth/Decay Percentage))^month
Relationship Score Table
Group dynamics determine how often different roles interact. Some roles connect frequently, while others rarely engage.
In this table model, a 100% connection means constant interaction, while 0% means none.
For example, in a large greeting team, leaders may not interact with each other (0%) but occasionally connect with their team members (50%).
On the security team, non-leaders often work alone but take direction from leaders. As a result, their connection with other non-leaders is
non-existent (0%), while their interaction with leaders is common (100%).
Connection Score Table
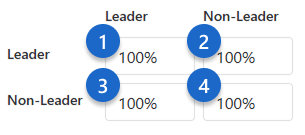
Interaction Levels
- Leader to Leader: How often group leaders connect.
- Leader to Non-Leader: How much leaders interact with their teams..
- Non-Leader to Leader: How often a non-leader engages with a leader.
- Non-Leader to Non-Leader: Host often non-leaders interact with each other.
Default Table Numbers
Many group types don't require a change to their table numbers. If each member works hand in hand, the default settings will do.
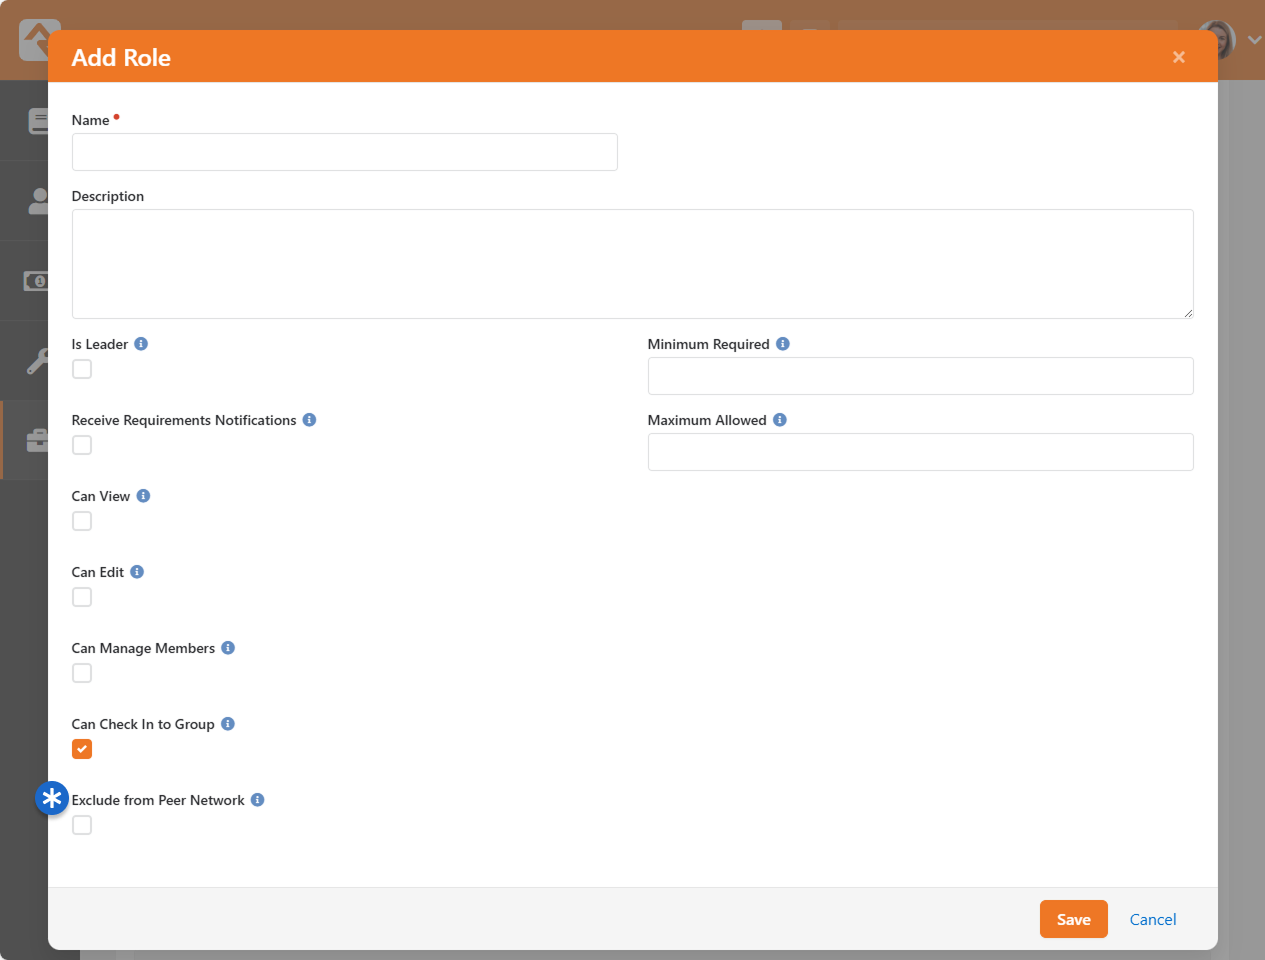
Exclude Group Roles From Peer Networks
If a group has a role such as administrator, someone who neither leads nor participates in group operations,
they can be excluded from Peer Networks calculation.
To remove a role from calculation, enable Exclude from Peer Network
when editing a role in Settings > General > Group Types under the Roles section.
Group Viewer Peer Networks
Peer Networks Calculation Job
In Admin Tools > Settings > Jobs Administration the Scheduled Job Calculate Peer Network
runs once a month, on the first day of the month. If you're feeling impatient, refresh the connection sooner by clicking the button.
Person Profile Tab
The first tab is the
Person Profile, with notes and key attributes. Let's break each of these areas
down.
Timeline
The Timeline shows notes about a person, some of which are system-generated whenever
the individual completes certain actions like joining a group. Most of them, however,
are entered by staff and key volunteers. Notes are an important part of Rock
and we've devoted an entire chapter to their usage below.
Bookmarked Attributes
As we discussed earlier, person attributes are an important part of Rock. Over time, your
list of attributes will grow according to your organization’s needs. Each staff member,
however, only works with a limited set of attributes, depending on their position. To help
simplify this, we’ve added a Bookmarked Attributes section. Each staff member can choose a
list of person attributes they want to display in this box. Every time they visit a
Person Profile
page, their chosen attributes will be displayed.
You can configure which attributes are displayed in this section by selecting the
button in
the header. You can also edit the values of the attributes by clicking the
button.
Each person can adjust the order of the attributes on their bookmark list by clicking the
button,
then dragging the attributes into the desired order.
Connection Requests
This section shows a list of Connection Requests that have been made by the individual. This block’s
settings let you change the detail page that’s viewed when a request is clicked, and lets you hide
Connection Requests in specified States. You can read more
about Connection Requests in the
Engagement
manual.
Known Relationships
Just like in real life, relationships describe connections between two people.
Some of the known relationship types provided are:
- Grandparent
- Parent
- Child
- Invited by
- Allow check-in by
To add a new relationship, click the
button on the Known Relationships header. Select the relationship type you want to add from the dropdown, then select the
person who matches the relationship you're trying to build.
Many of these relationships have an inverse relationship (e.g., Grandparent to Grandchild).
When adding one of these relationships, the system will automatically add the
inverse relationship for you. What a timesaver!
You can add custom relationship types if you want. In fact, we have a
whole chapter on how to manage known relationships.
Peer Networks
Some relationships are known, but others are implied through the data. For example,
if two people are in the same group, we can imply a relationship. Rock highlights
these kinds of relationships in the Peer Networks area.
Note
The Peer Networks feature will get more powerful with time as we add more
and more capabilities to Rock.
Extended Attributes Tab
The next subsection of the
Person Profile
page contains all the added attributes, grouped by category. Only attributes
with values are displayed. To add or edit the value of an attribute, just click the
button in the category header.
Extended Attributes Subsection
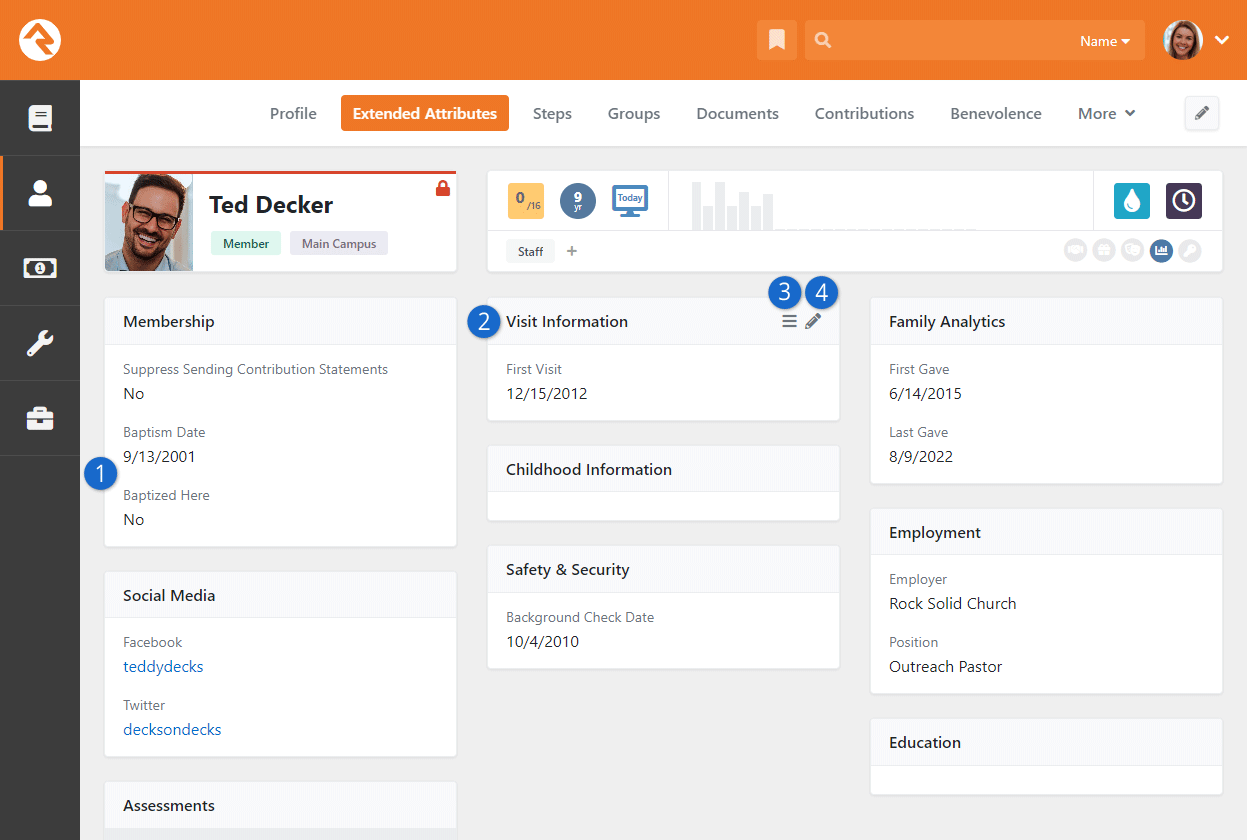
- 1 Category
- Attributes are grouped into categories to help order and manage them. The attributes we see here,
like for Baptism, are in the Membership category.
- 2 Category Header
- Each category has a header with a name (e.g., Visit Information, Education) and optional icon.
- 3 Reorder Button
- Those with 'Administrate' access to the attribute block can re-order attributes by clicking the
button, then dragging the attributes into the desired order.
- 4 Edit Button
- To edit the values of the attributes in a category click
the button in the header.
As you create new groups of person attributes, you'll want to be sure you keep this
page updated. See your administrator for help.
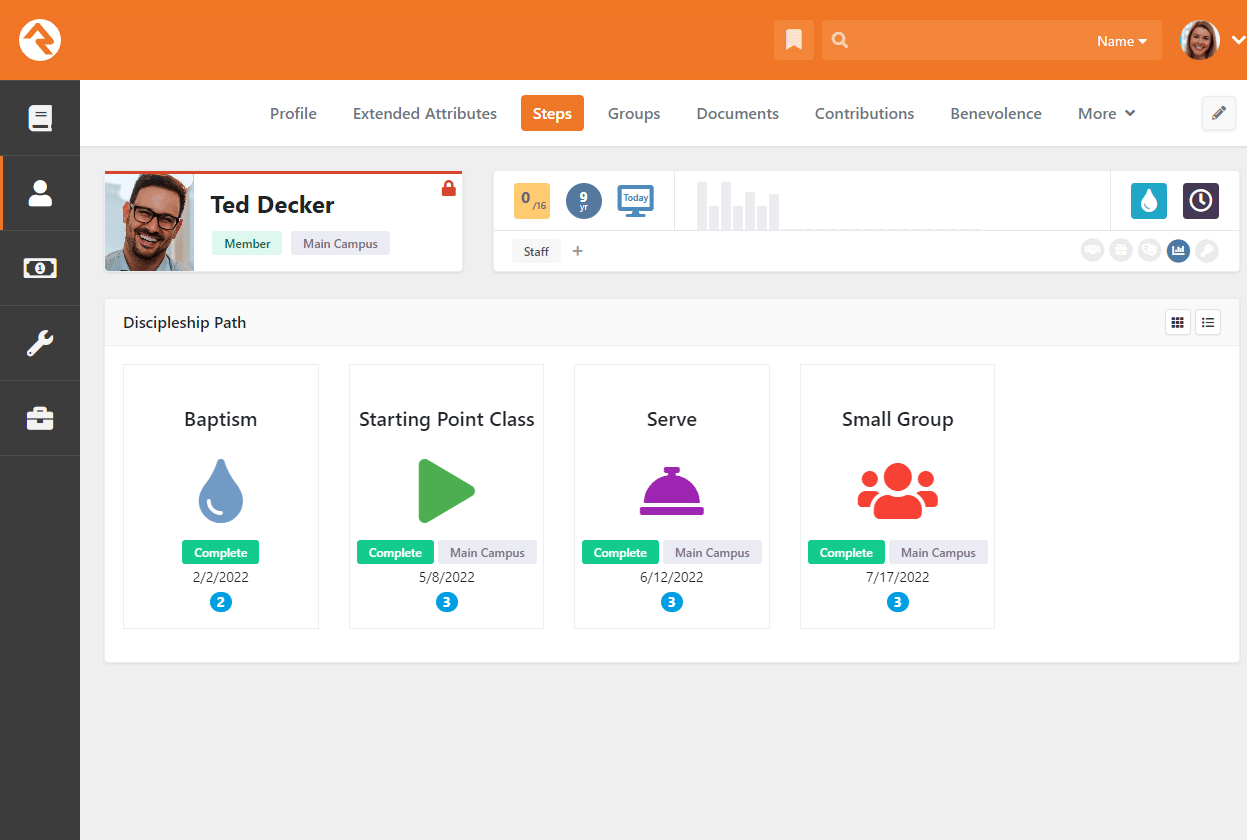
Steps Tab
The Steps subsection
lets you view and manage steps for the person. For full details on Steps, check out our
Engagement
guide.
Steps Subsection
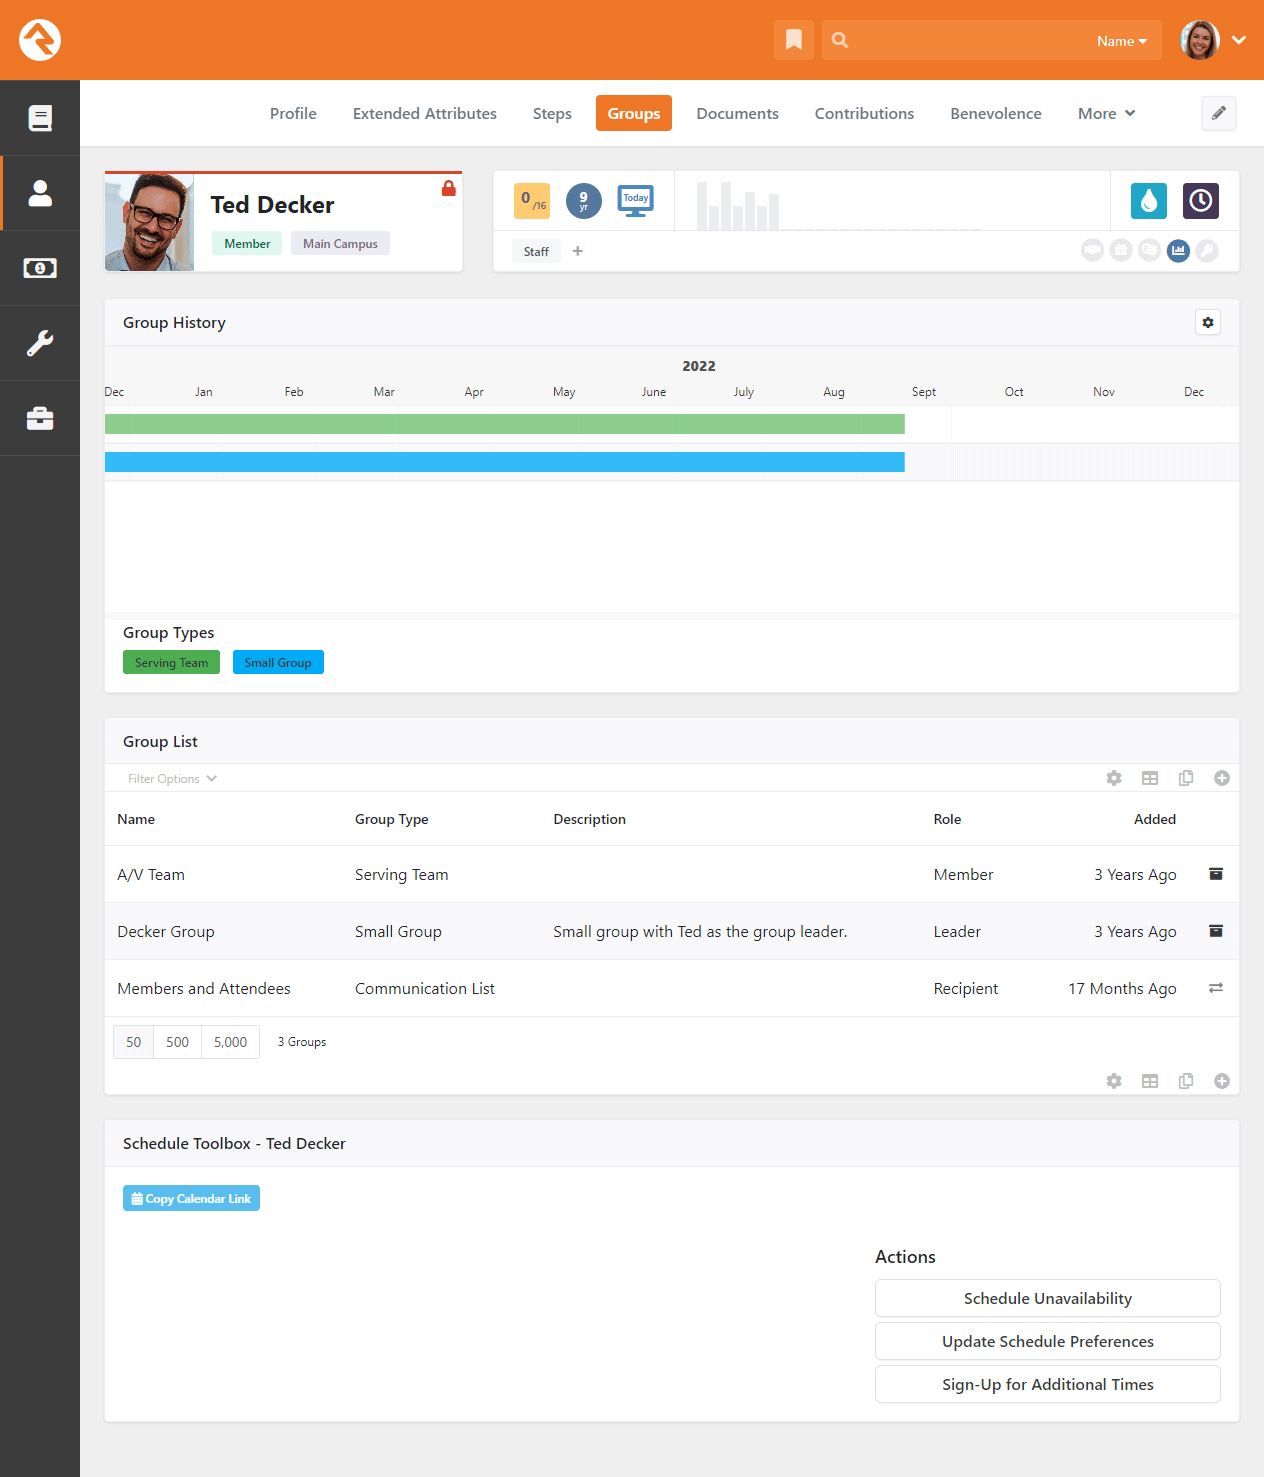
Groups Tab
The Groups subsection displays a timeline of the person's history
with groups, as well as a grid view of all the groups the person is involved with. The grid lists important facts like the type of
group, the individual's role in the group and the date they were added to the group.
Groups Subsection
Documents Tab
The Documents tab lets you view and
manage person documents.
Person Profile Documents Tab
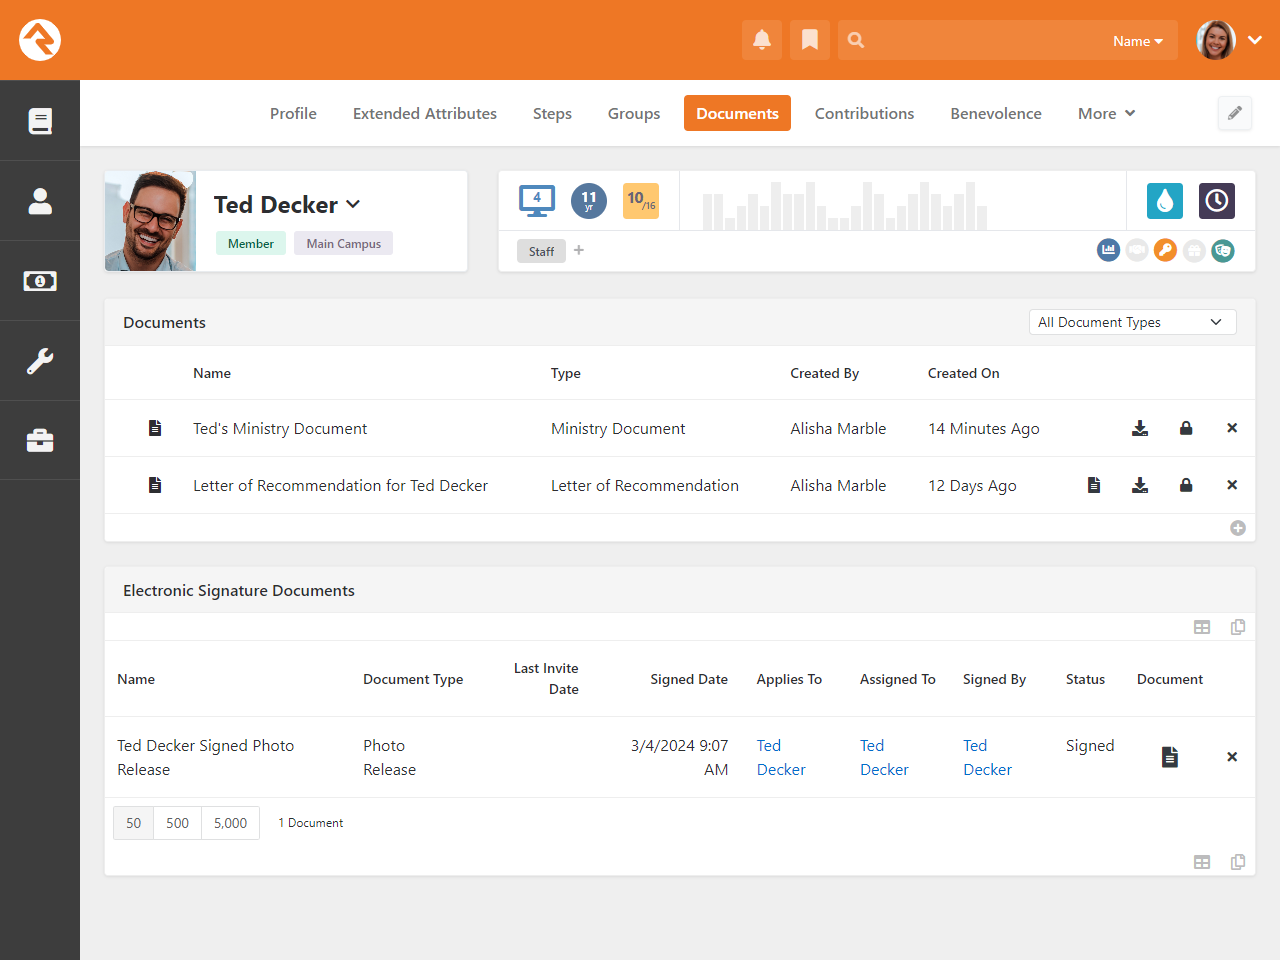
At the top of the panel pictured above you can see a summary of the documents associated with the person.
At the bottom is a list of all the signature documents associated with the person. For details on signature
documents, check out the
Rock Admin Hero Guide.
For now, let's focus on the Documents block.
For each document in the Documents block, the icons to
the right allow you to view the document’s description as well as download, secure or delete the document.
Some types of documents (PDF, PNG, JPG or GIF) can also be viewed directly from the browser.
Click on any row to manage details about the document or click the button
to add a new document.
Person Profile Add New Document
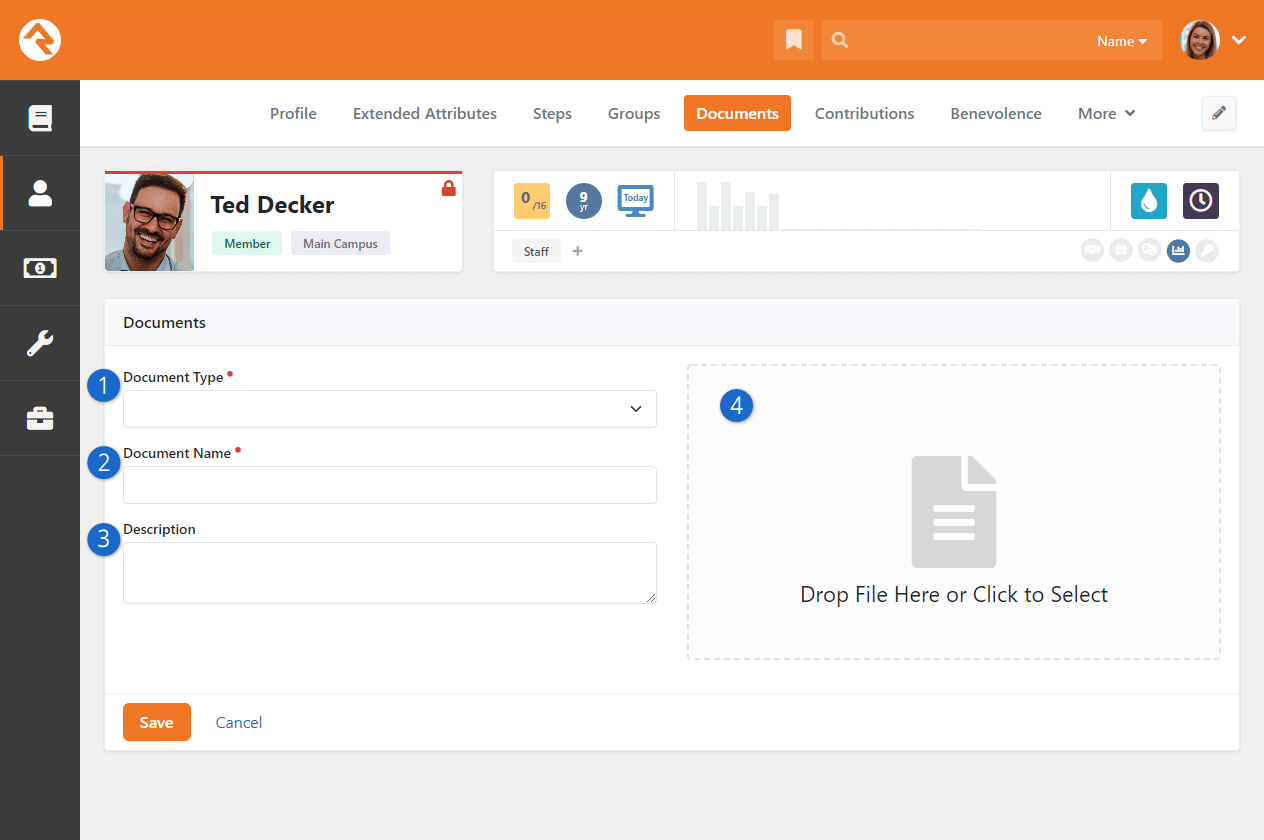
- 1 Document Type
-
Select the type of document that you want to add. The available items are controlled by the document
type’s configuration and by block settings.
- 2 Document Name
-
If configured for the document type, a default name may be pre-populated here. Otherwise, it will
be blank. You can provide your own name or edit the default name.
- 3 Description
-
You can optionally add a description to provide specific details related to this person's document.
- 4 Add Document
-
This is where you'll attach the actual document related to this entry.
Entity Documents
Documents can be added to any entity, not just people. To see how documents can be used with other entity types, see the
Entity Documents
section of the
Rock Admin Hero Guide.
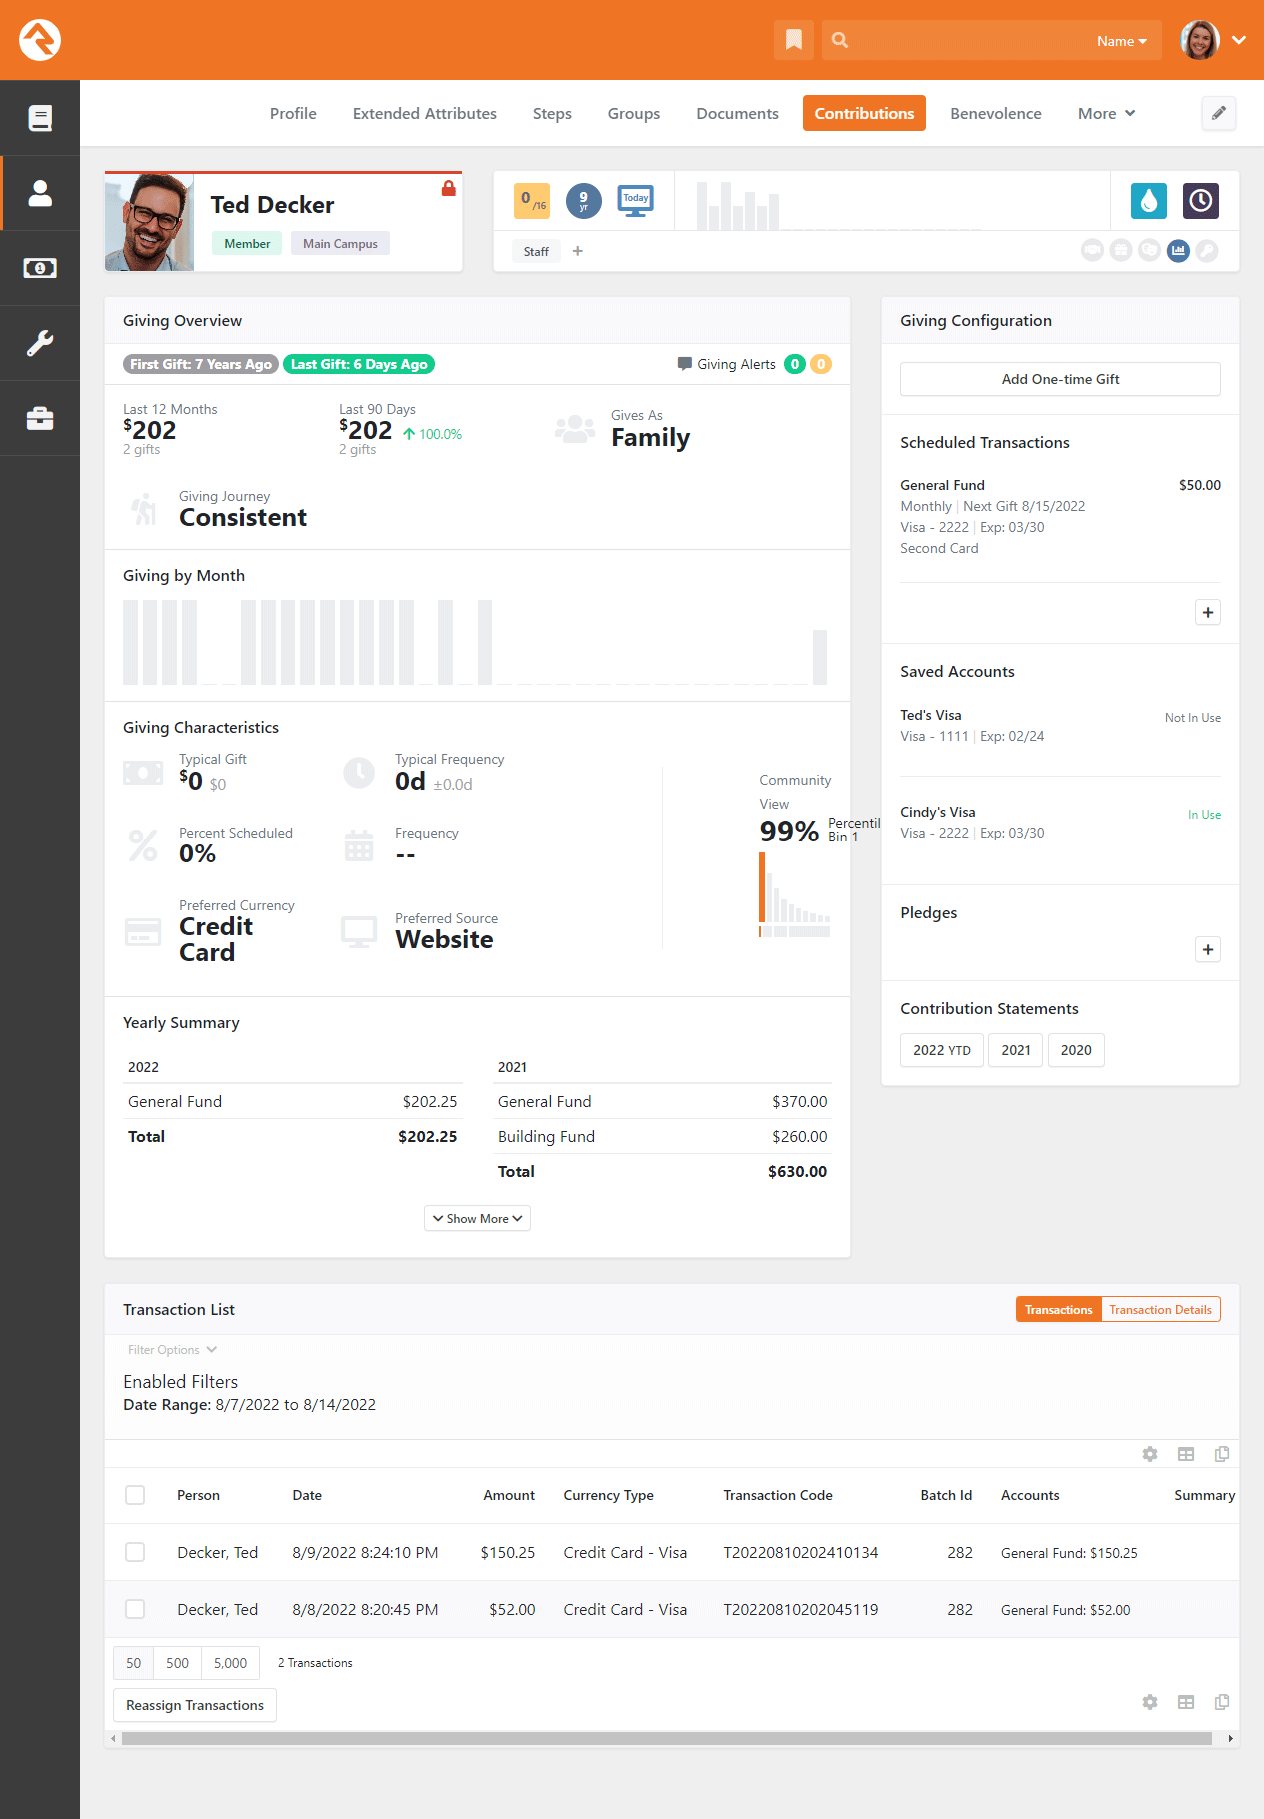
Contributions Tab
This subsection shows the contributions made by the individual (or family, if combined as a family) and any
repeating giving profiles that they have. Staff members can be granted access to create new recurring giving
profiles or edit existing ones from this page. The
Giving Overview
section provides details and analysis of the person's giving.
Contributions Subsection
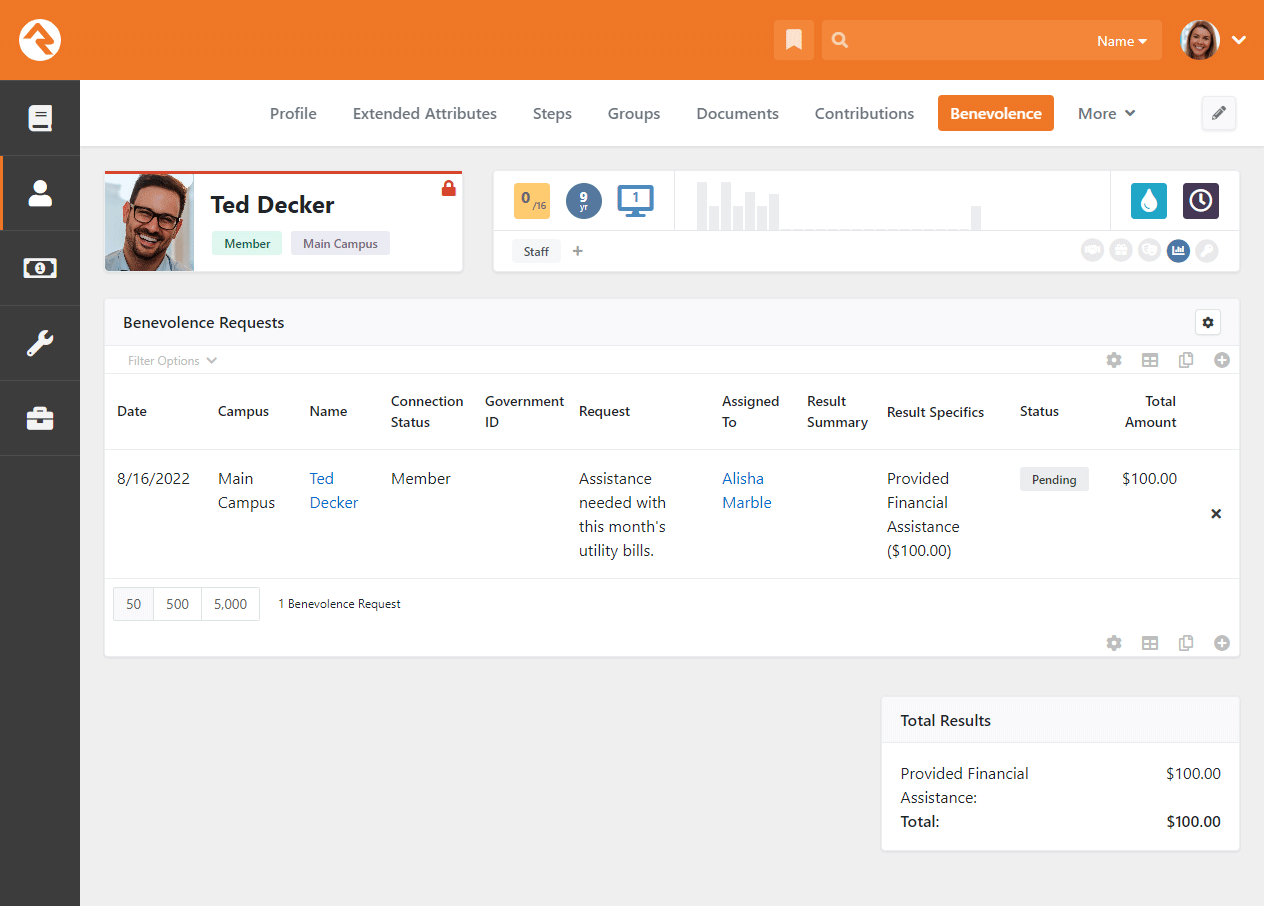
Benevolence Tab
Those with access to view benevolence information will see a
Benevolence tab
on the Person Profile
page. The requests shown here are summarized for the entire family.
Benevolence Tab
For additional details related to benevolence, see the
Rock Solid Finances
guide.
Security Tab
Rock takes security very seriously and offers several ways to protect both information and people.
The Security tab is one location
where you can view and access Rock's security settings and data.
Security Subsection
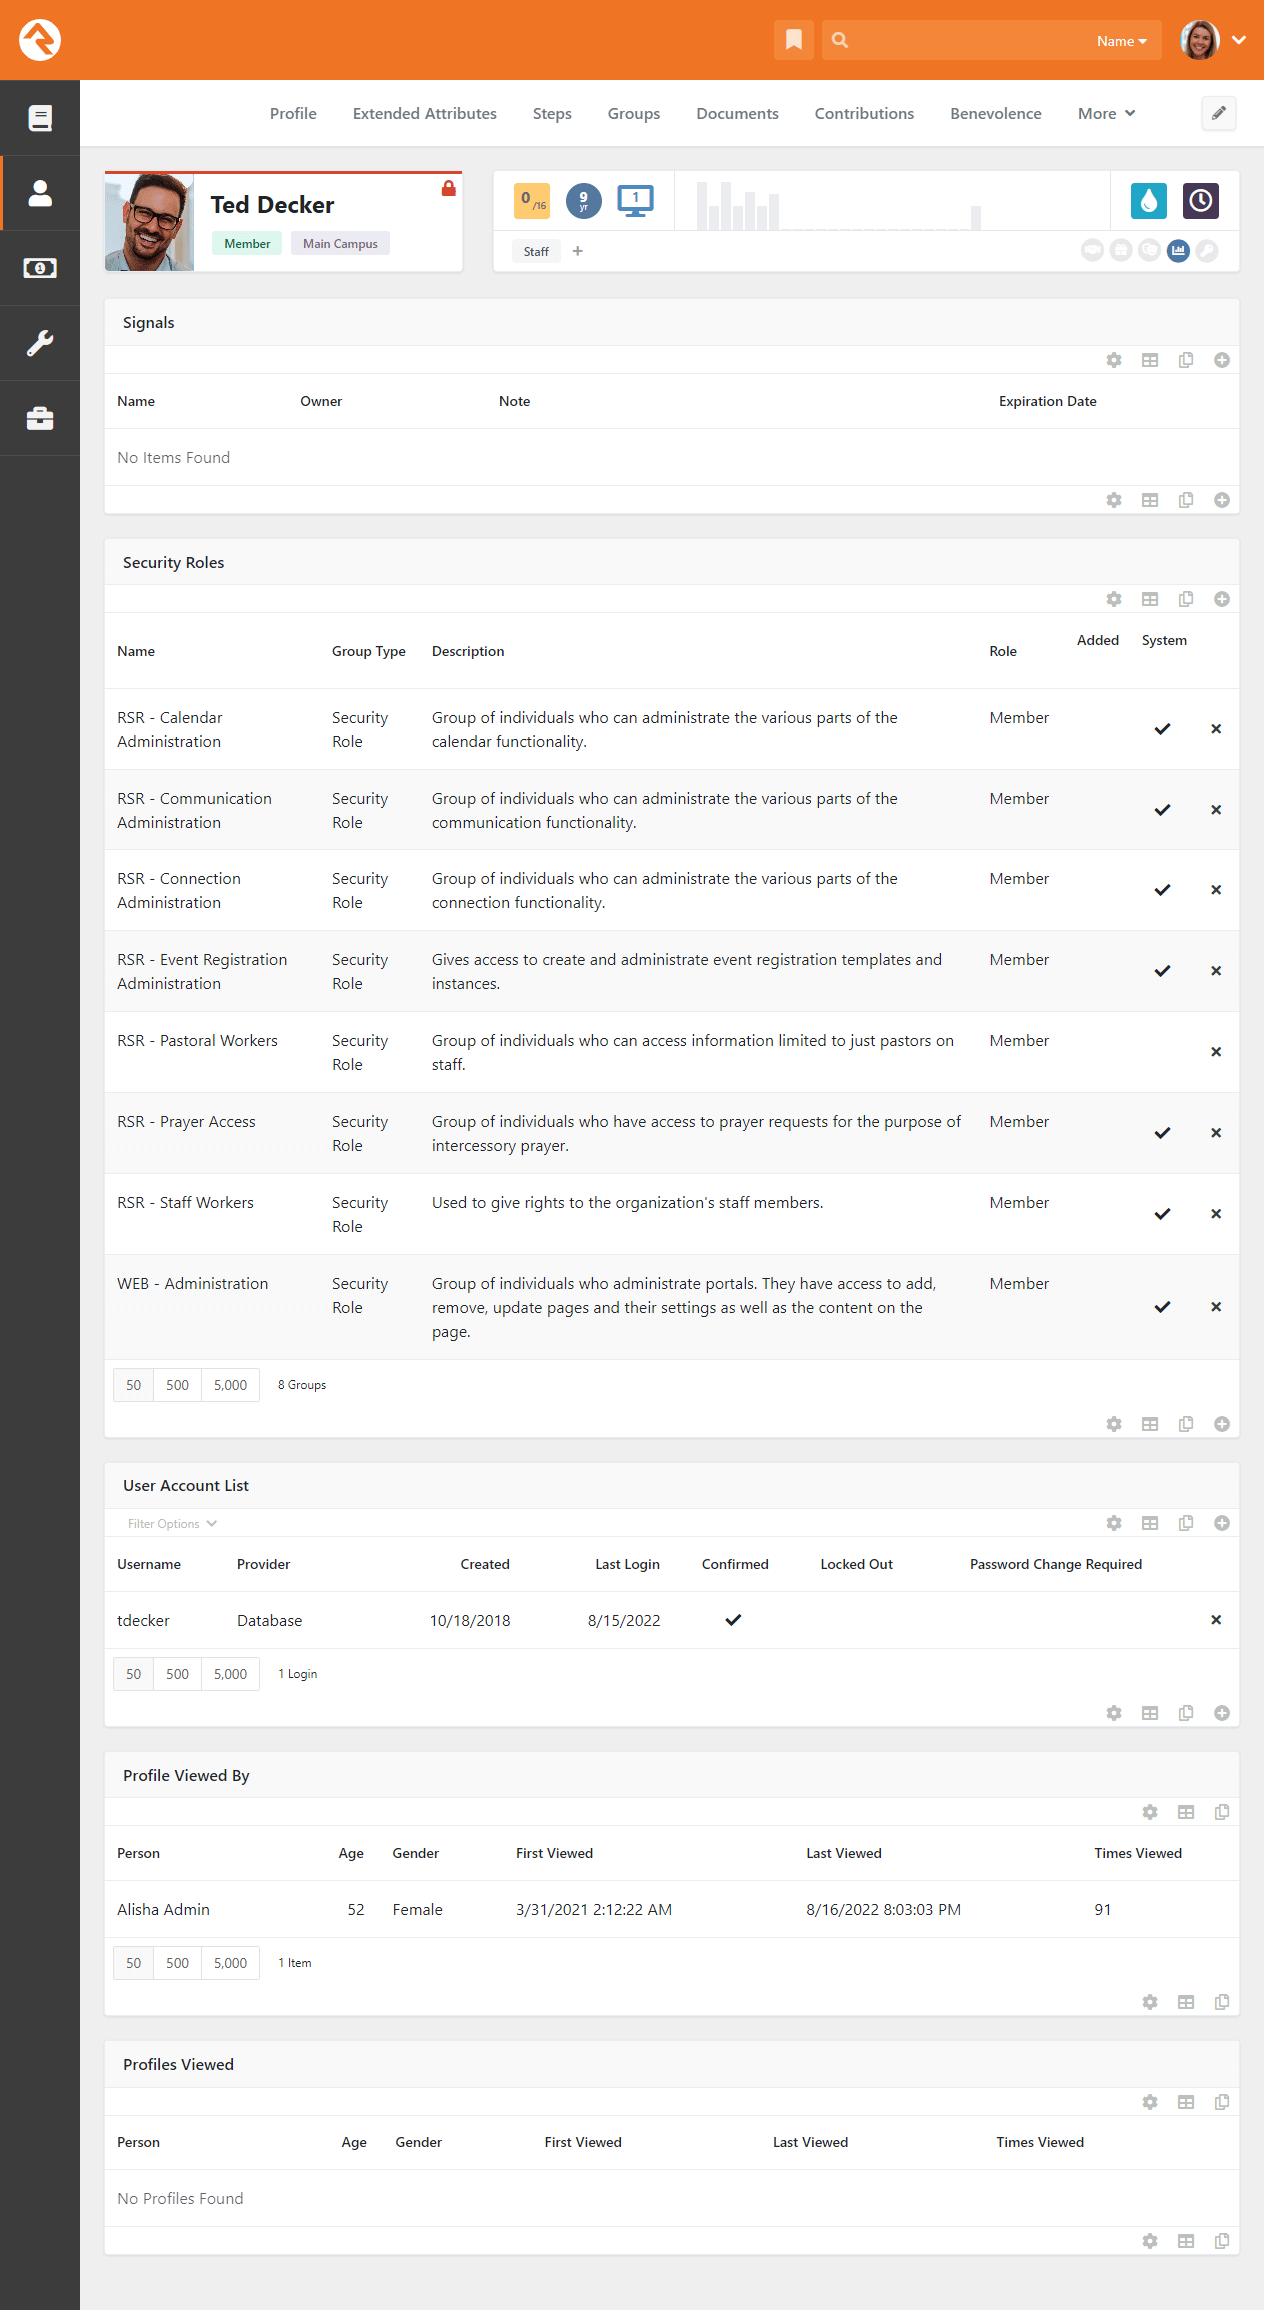
Signals
Signals are discreet flags that can be assigned to a person to bring attention to something.
They can be used to flag anything from security concerns to high-level lay leads and everything
in between. Click the
button to add a new signal. Click the
button to delete an existing one.
Security Roles
In the Security Roles section, you can view, add
and delete the person’s security roles. The
Rock Admin Hero Guide
has all the details you’ll need for understanding these roles and their meanings.
User Account List
Each account (i.e., username) associated with a person is listed here. Over time a person can obtain multiple
accounts if they forget one and re-register on the website. You can manage accounts in this section.
For more information on user accounts and logging in, check out the
Rock Admin Hero Guide.
Profile Viewed By
The Profile Viewed By section contains a
record of people who have viewed this person's profile. The information in this section can't be modified, but
it can be exported into an Excel report if needed.
Profiles Viewed
The Profiles Viewed section contains a record
of the profiles this person has viewed. The information in this section can't be modified, but it can be exported
into an Excel report if needed.
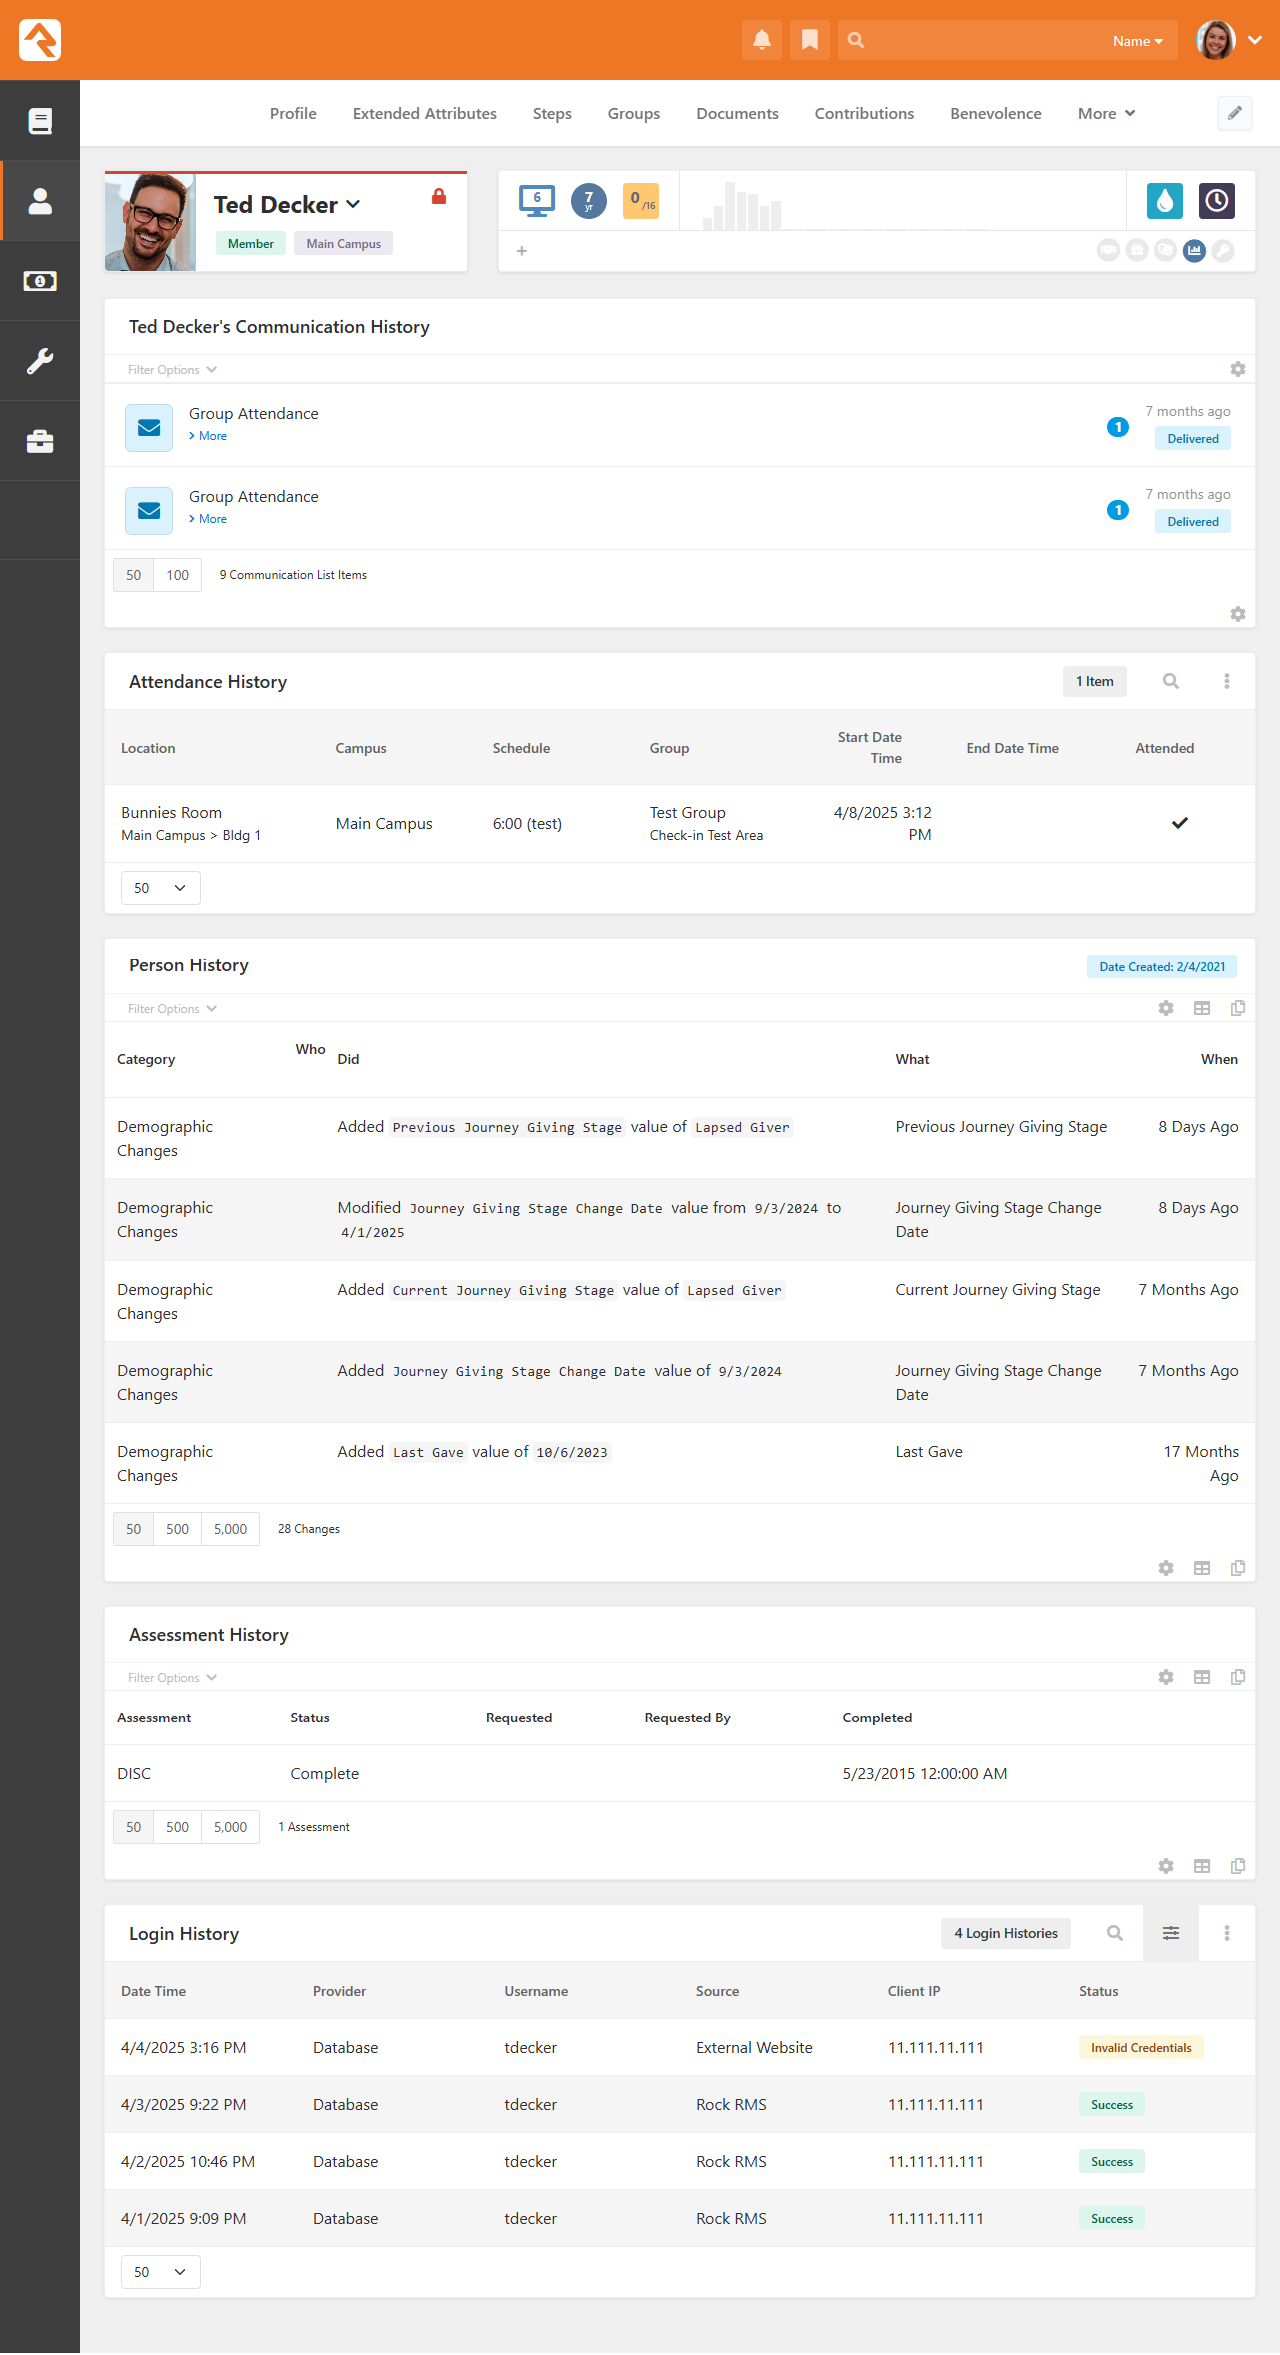
History Tab
The History tab includes such things as:
- Communication History - A list of all the communications of any type that have been sent to the individual, with full details of each communication available to view.
- Attendance History - A list of all the events and services the person has attended.
- Person History - A list of all the changes that have been made on the individual's
record, including
Connection Request and Steps updates. This area is helpful for identifying what was changed and who made the changes.
- Assessment History - A history of assessments that have been taken and/or requested.
- Login History - A list of recent login attempts, showing whether each was successful or failed. This helps troubleshoot login issues more efficiently.
History Subsection
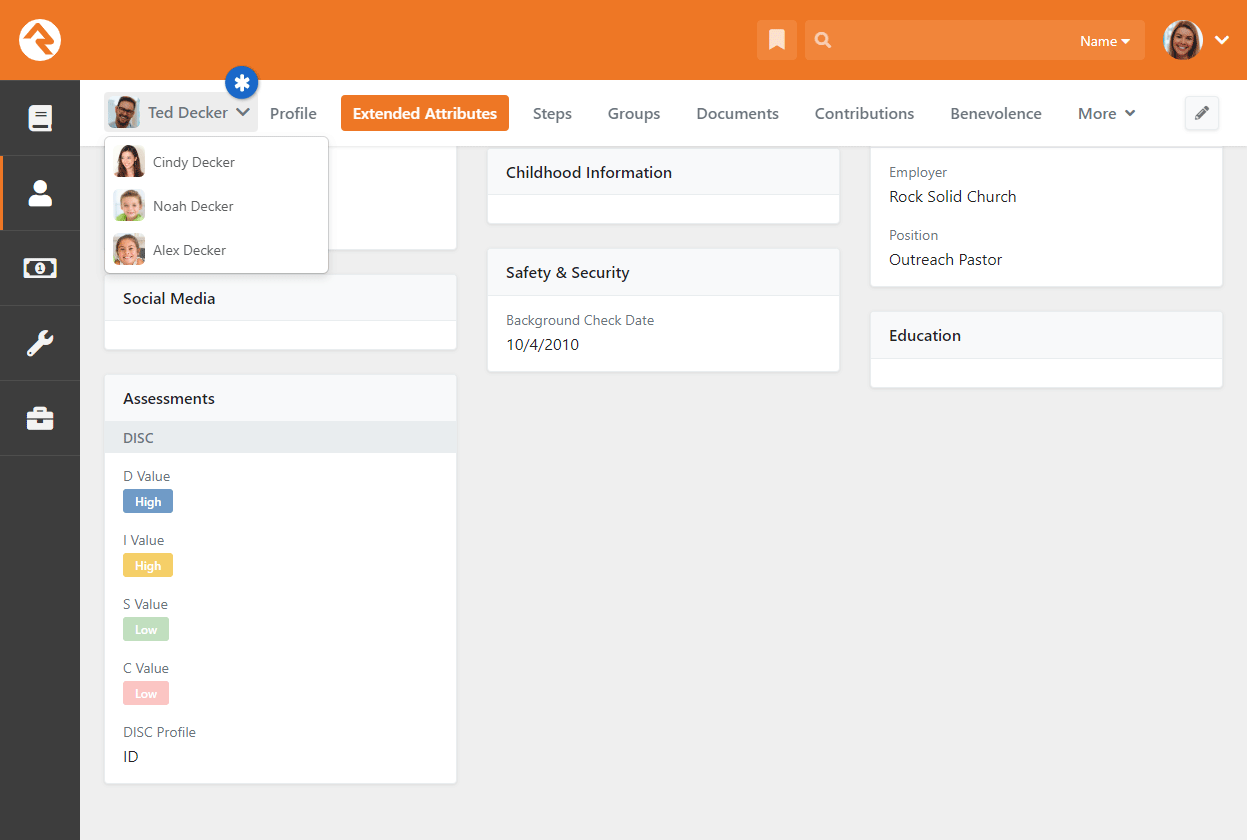
Don't forget, you can easily switch between family members. When you scroll down on any of the pages
described above, you'll notice a drop-down menu near the top left of the screen where you can select
other family members to view.
Select Family Member
Editing an Individual
To edit the bio and contact information for an individual, click the
button in the upper-right corner of the
Person Profile page.
Rock will display the edit screen for that person's profile.
Edit An Individual
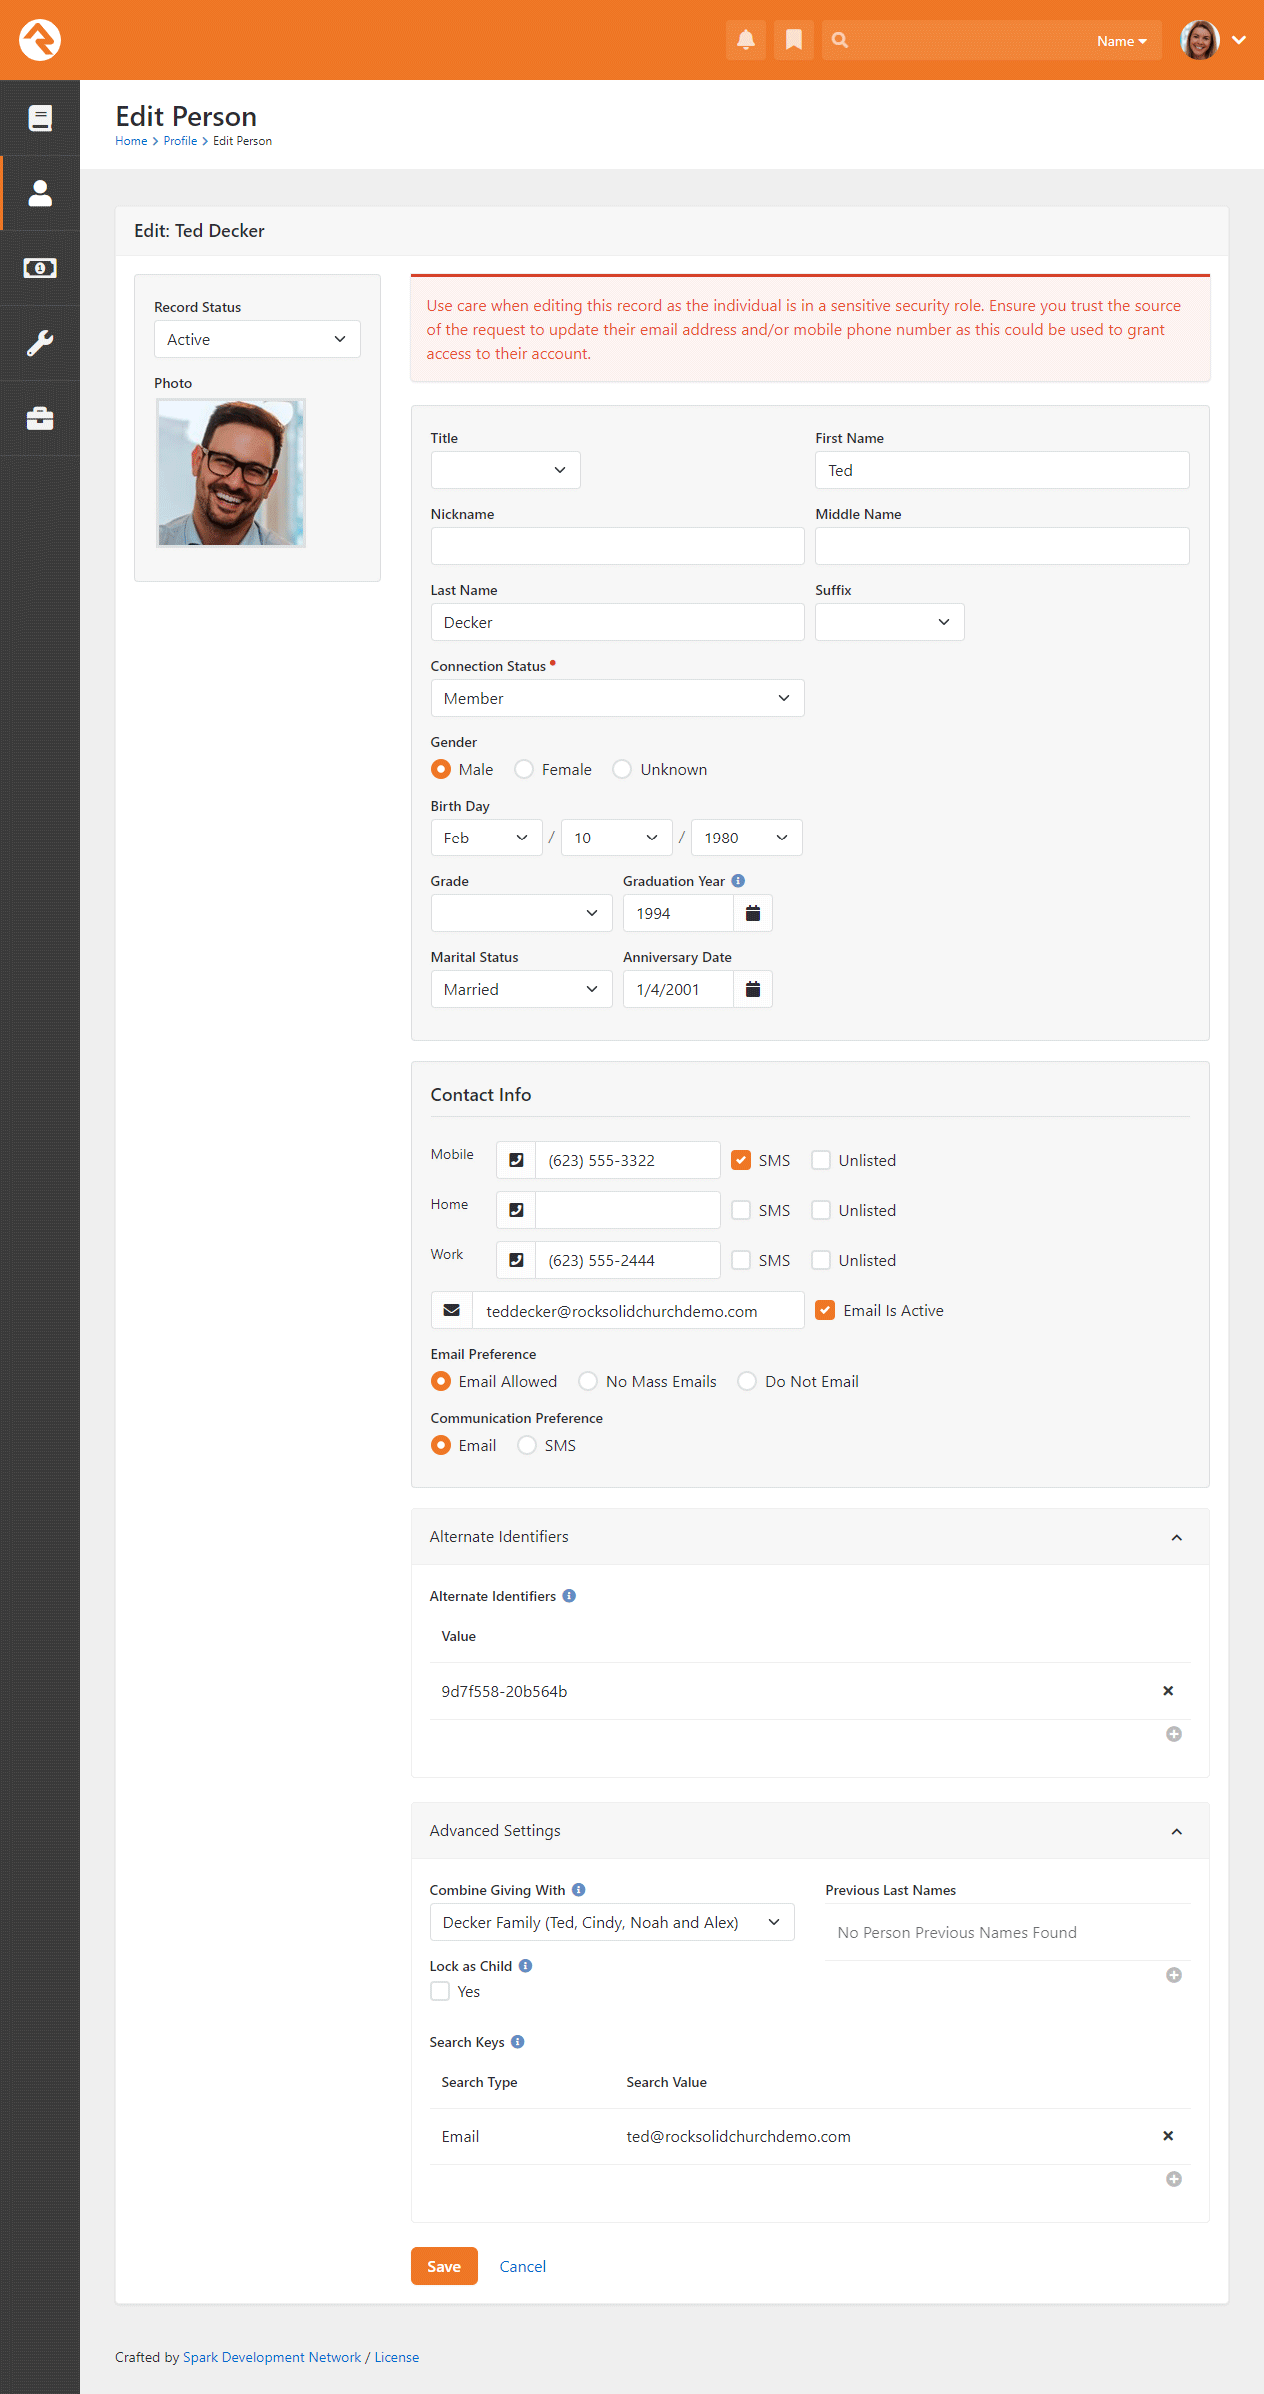
Most of this screen should be pretty simple, but we have a few helpful tips to share.
When you mark an individual
Inactive, you’ll be asked to
provide a Reason and a Note. This information helps the organization understand why groups of people
are leaving and it helps the next person who looks at the record understand why this change was
made.
Near the top of the screen, you'll notice a warning indicating that changes to this
record should be made with caution. This is due to the person's account protection profile level.
You can control who can see this warning by editing the block's security settings.
Near the bottom of the screen is the
Alternate Identifiers section,
where you can assign an individual an alternate identifier to use during check-in to speed up the
process. Alternate identifiers may include barcode or fingerprint IDs, or any other text you care to
use. The
Checking-out Check-in
manual has more information about this process.
Before Now
In previous versions of Rock, these identifiers were assigned at the family level. Now they are
assigned to individuals, and any previous identifiers you may have created have been moved to
the family's "head of household", which is typically the oldest male. Rock runs a job every
night to find anyone who hasn’t been assigned an Alternate Identifier and assigns them one. So,
you can count on the fact that everyone in Rock will have at least one alternate identifier
within a day of when their record is created. You can create any number of alternate
identifiers, and you can
use Lava
to look up a person record by any of their alternate IDs, so you can do all kinds of fun things
with them!
In the Advanced Settings section,
you'll find the
Combine Giving With field. This
helps describe how the individual would like their contributions tracked. In most cases individuals
would like to have the contributions tracked as a family (the default option). If someone wants
contributions to be tracked separately, just select the blank option.
Here you'll also see an option to
Lock as Child. This overrides
the automated process of updating a person to an adult when they turn 18. By default, individuals in
Rock are considered adults when they turn 18 or are designated an adult in a family. The
Lock as Child option may be
useful for situations where, although an individual is 18, it's best for Rock to continue to
consider them a child in a family. This setting will also keep the "Move Adult Children" part of the
Data Automation job
from reclassifying them within their family automatically.
Finally, there's a Search Keys
section you'll want to note. Rock is configured to support additional email addresses in this area.
These could be outdated email addresses or simply alternate email addresses. Rock will consider
these alternate email addresses when looking for matching person records but will not use
these alternate addresses for communications. This helps prevent some duplicate records from getting
created.
Adding a Family
Important
Before adding a new family be sure to search the database first.
No matter how certain you are that they are new, you should always double check.
To add a family to the database, click People > New Family
from the main menu. Rock will display the New Family screen.
Add A Family
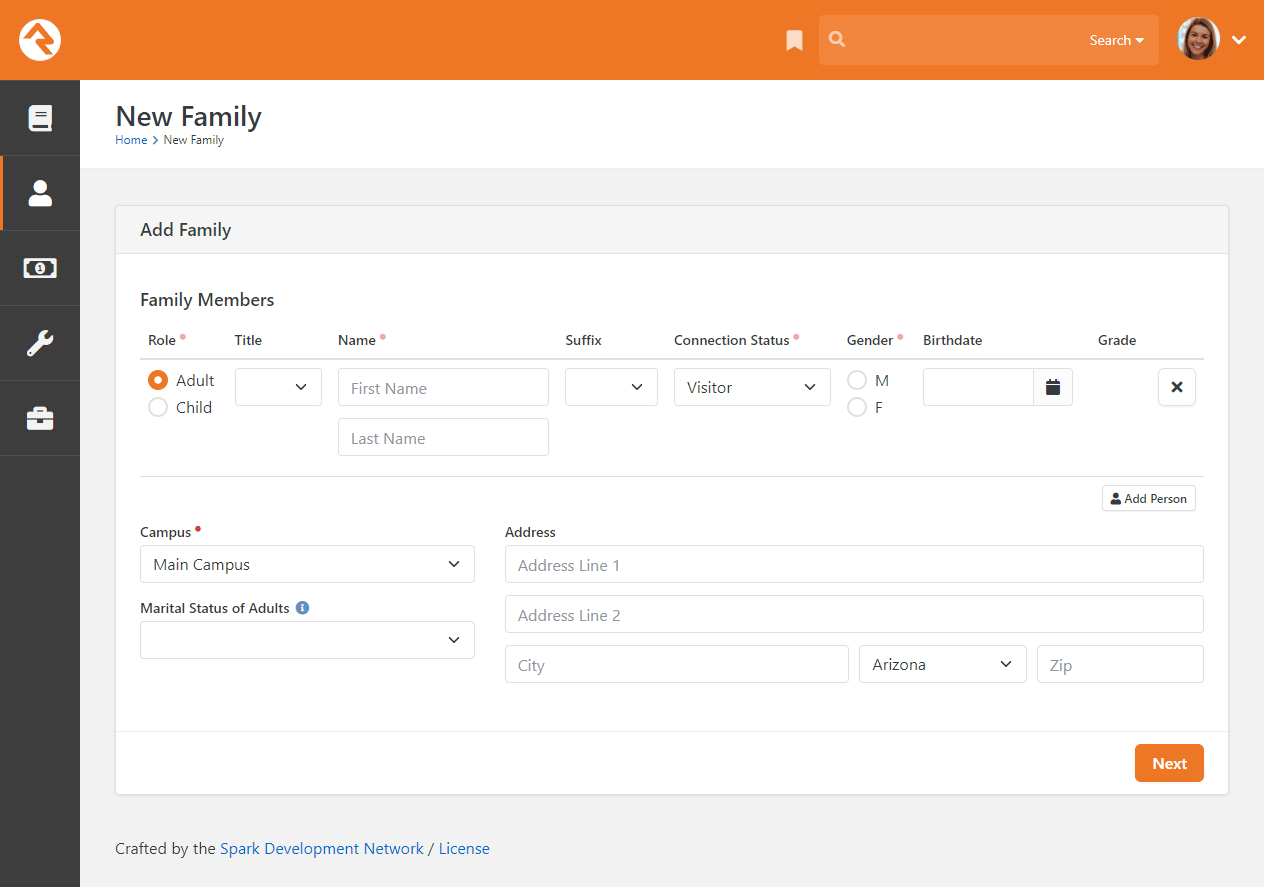
Family Members
First, add the individuals to the family. Completing this section should be fairly easy,
but remember these points:
- Only use these fields to add individuals to the family who are not
already in the database. If you know that one or more of the individuals
are already in the system, just add those who are not. After the family is saved,
you can then edit the family and add the existing members.
- Note the marital status selection below the list of family members. This
allows you to set the marital relationship of the adults in the family. These
options are
Defined Values so you can rename them or add additional options. You can read more
about editing
Defined Values in the
Rock Admin Hero Guide.
- The Grade field will only be shown when you're adding a child.
- Additional addresses (work, previous) can be added after saving the family.
Campus and Address
The final step in adding a family is to select their campus and add their home address.
Additional addresses can be added to the family after it has been saved.
Note
The Campus field
will be hidden if there's only one campus set up in your system. If a campus value is
required by your
Add Family
block settings (see next section) then the only available campus is automatically
applied to the family's record behind the scenes.
Add Family Block Settings
You can customize which options you want to display in the Add Family block by customizing the block settings.
Add Family Block Settings
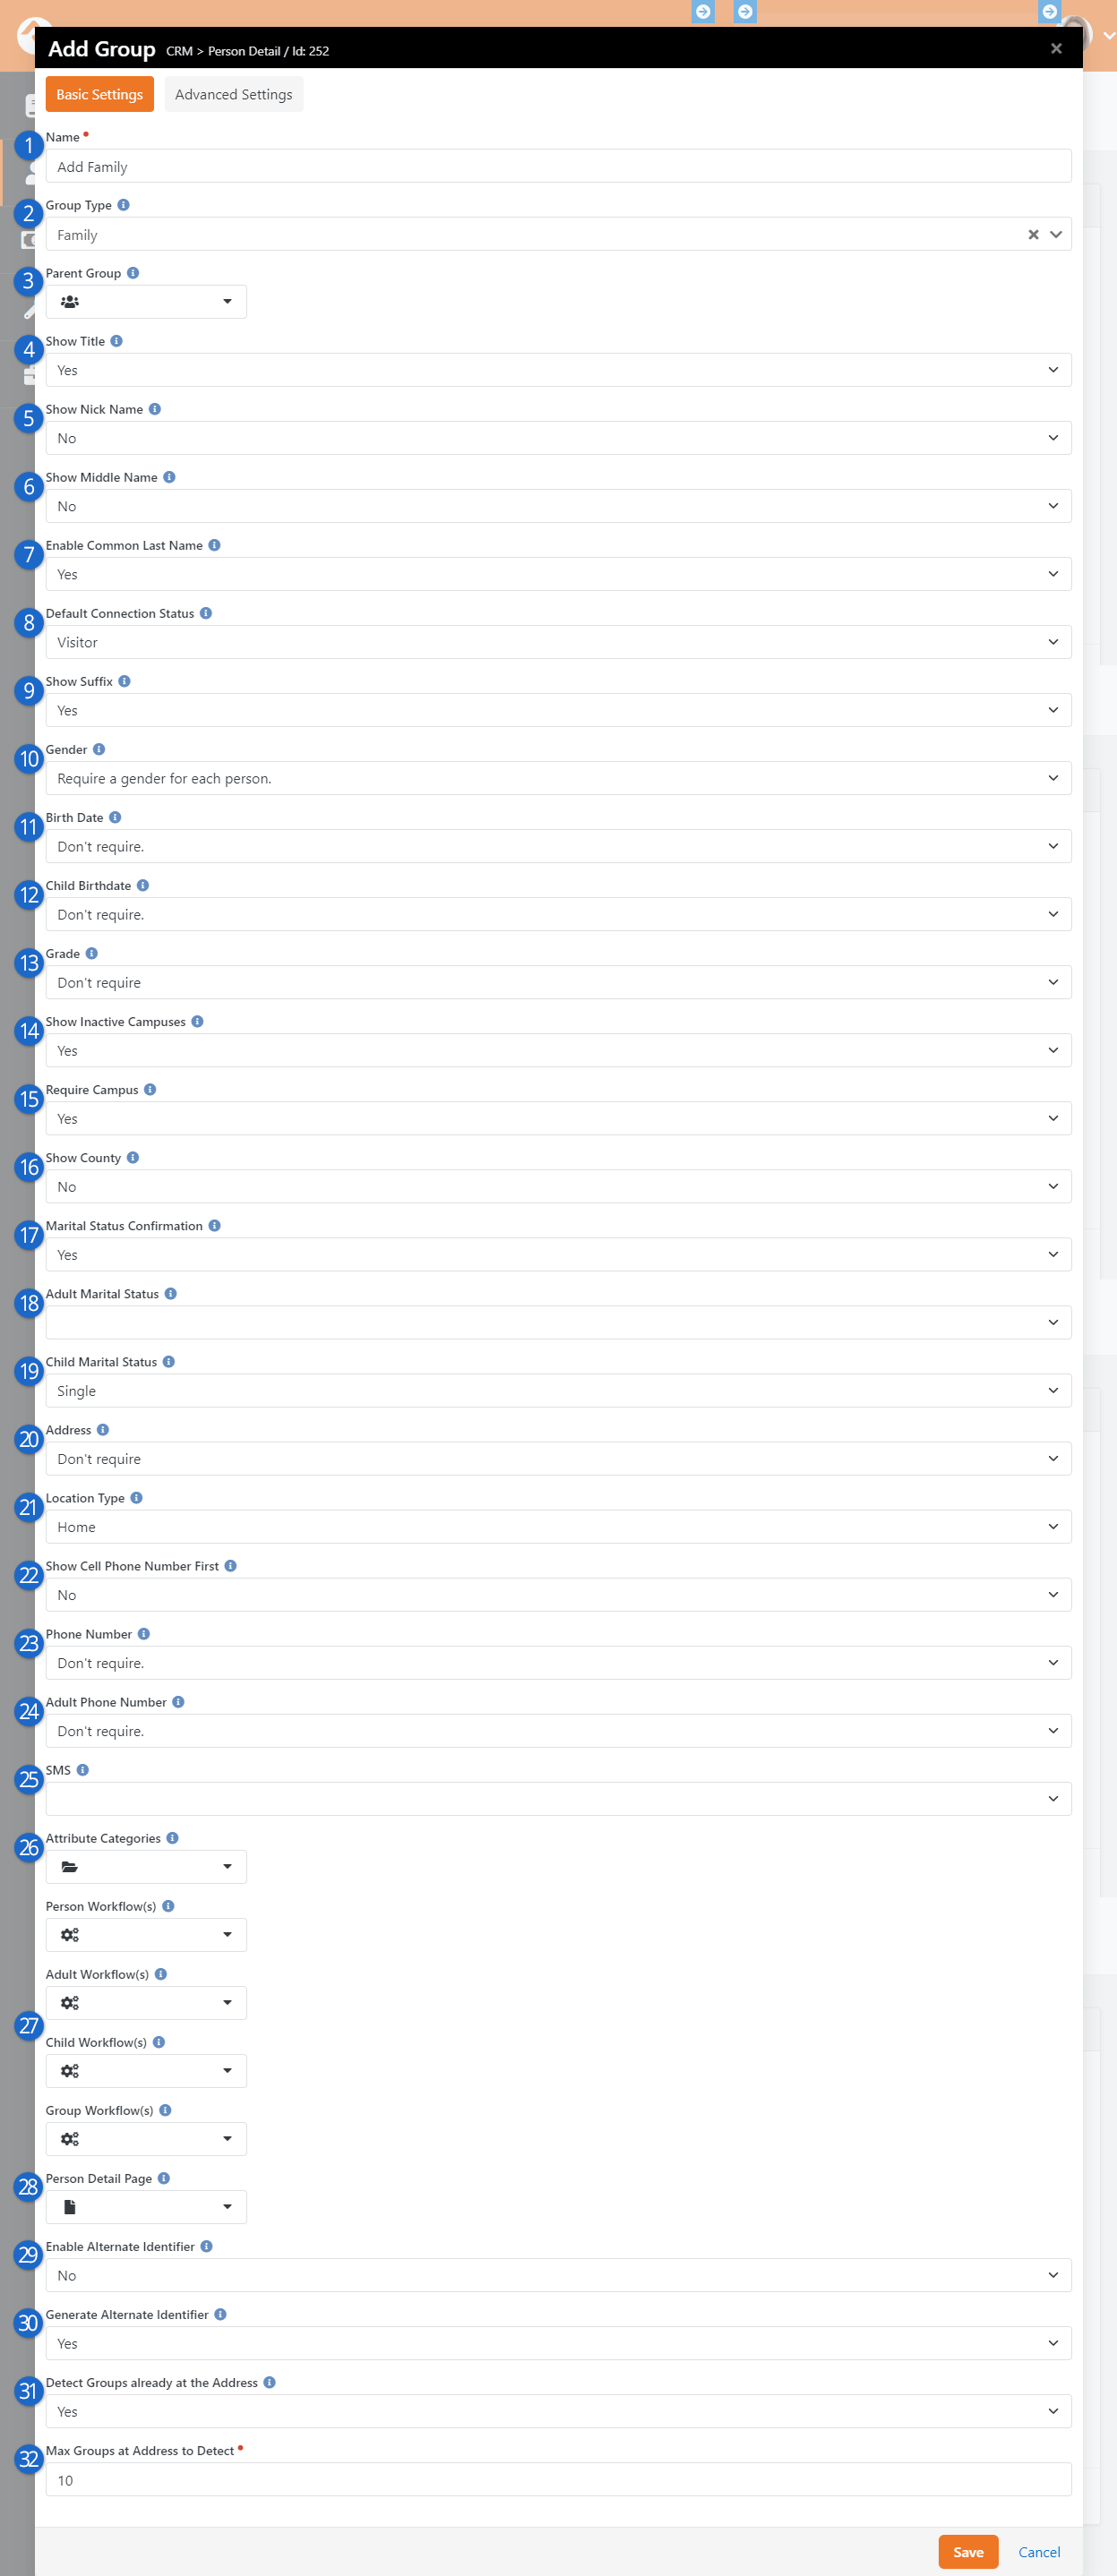
- 1 Name
- Enter the name you want to give the block. The default is 'Add Family'.
- 2 Group Type
- Select the group type to display groups for. The default is 'Family'.
- 3 Parent Group
- Select the parent group to add the new group to. The default is 'None'.
- 4 Show Title
- Select 'Yes' to display a dropdown menu of titles.
- 5 Show Nick Name
- Select 'Yes' to show an edit box for Nick Name.
- 6 Show Middle Name
- Select 'Yes' to display an edit box for Middle Name.
- 7 Enable Common Last Name
- Select 'Yes' to autofill the last name field when adding a new group member with the last name of the first group member.
Remember, families are groups, and the individuals in the family are group members.
- 8 Default Connection Status
- Select the default connection status. If this is not set, the new family member will
inherit the same status as the family member who is adding them.
- 9 Show Suffix
- Select 'Yes' to display the person suffix field.
- 10 Gender
- Select whether gender should be required for each person added.
- 11 Birth Date
- Select whether a birth date should be required for each person added.
- 12 Child Birthdate
- Select whether a birth date should be required for each child added.
- 13 Grade
- Select whether a grade should be required for each child added when the group type is Family.
- 14 Show Inactive Campuses
- Select whether inactive campuses should be shown.
- 15 Require Campus
- Select 'Yes' to make a campus required.
- 16 Show County
- Select 'Yes' to provide a County field in the address.
- 17 Marital Status Confirmation
- Select whether a confirmation message should be displayed when saving an adult without a marital status and the group type is Family.
- 18 Adult Marital Status
- Select the default marital status for adults when the group type is Family.
- 19 Child Marital Status
- Select the default marital status for children when the group type is Family.
- 20 Address
- Select whether to require an address for the family.
- 21 Location Type
- Select the type of location that should be used for the address.
- 22 Show Cell Phone Number First
- Select whether the cell phone number should be listed first before the home phone number.
- 23 Phone Number
- Select whether a phone number should be required for at least one person in the family.
- 24 Adult Phone Number
- Select whether a phone number should be required for each adult added.
- 25 SMS
- Select whether SMS should be enabled for cell phone numbers by default.
- 26 Attribute Categories
- Select the Person Attribute Categories to display attributes from. The next section
below talks about how this setting is used.
- 27 Workflows
- Which workflows to launch when a family is added.
- 28 Person Detail Page
- Select the page to navigate to after the family has been added. {GroupId} and
{PersonId} can be included in the route. Leave blank to go to the default page
of ~/Person/{PersonId}.
- 29 Enable Alternate Identifier
- If set to "Yes" you can manually enter a custom identifier for each person when adding the family.
- 30 Generate Alternate Identifier
- When this is set to "Yes" an alternate identifier will be generated automatically for each person.
- 31 Detect Groups already at the Address
- If there is already a family (i.e., group) at the address provided, then you can have the system detect it and
alert you. You will then be able to use an existing group instead of creating a new one.
- 32 Max Groups at Address to Detect
- Use this feature to reduce the number of existing groups you'll be presented with when adding a new family to an
address in use by other groups.
Select which options and default settings you want to display and click
Save.
Default Connection Status
As noted above, if a
Default Connection Status
has not been set, then the new family member will be assigned the same status as the family member
who is adding them. For instance, a new child will be added with a status of 'Member' if the
parent's status is 'Member'. If you have requirements for certain statuses, be sure to
set a
Default Connection Status
to ensure people aren't assigned statuses for which they do not qualify.
Want Even More Info?
For many, the family entry screen will be just what the doctor ordered. Some organizations, however, may want to capture additional
information about the family. The good news is you can have both!
The block settings of the Family Entry
block include a setting for configuring attribute
categories. After filling out the family, phone number and email
information and selecting Next, you'll see an entry form for the first
attribute category you selected. Completing this form and pressing
Next
takes you to the next attribute category. This
will continue until you've entered information for each attribute category. On the last screen, you’ll see the
Finish button.
The following example shows this process with the Education
and Visitor Information attribute categories set.
Adding Additional Attributes
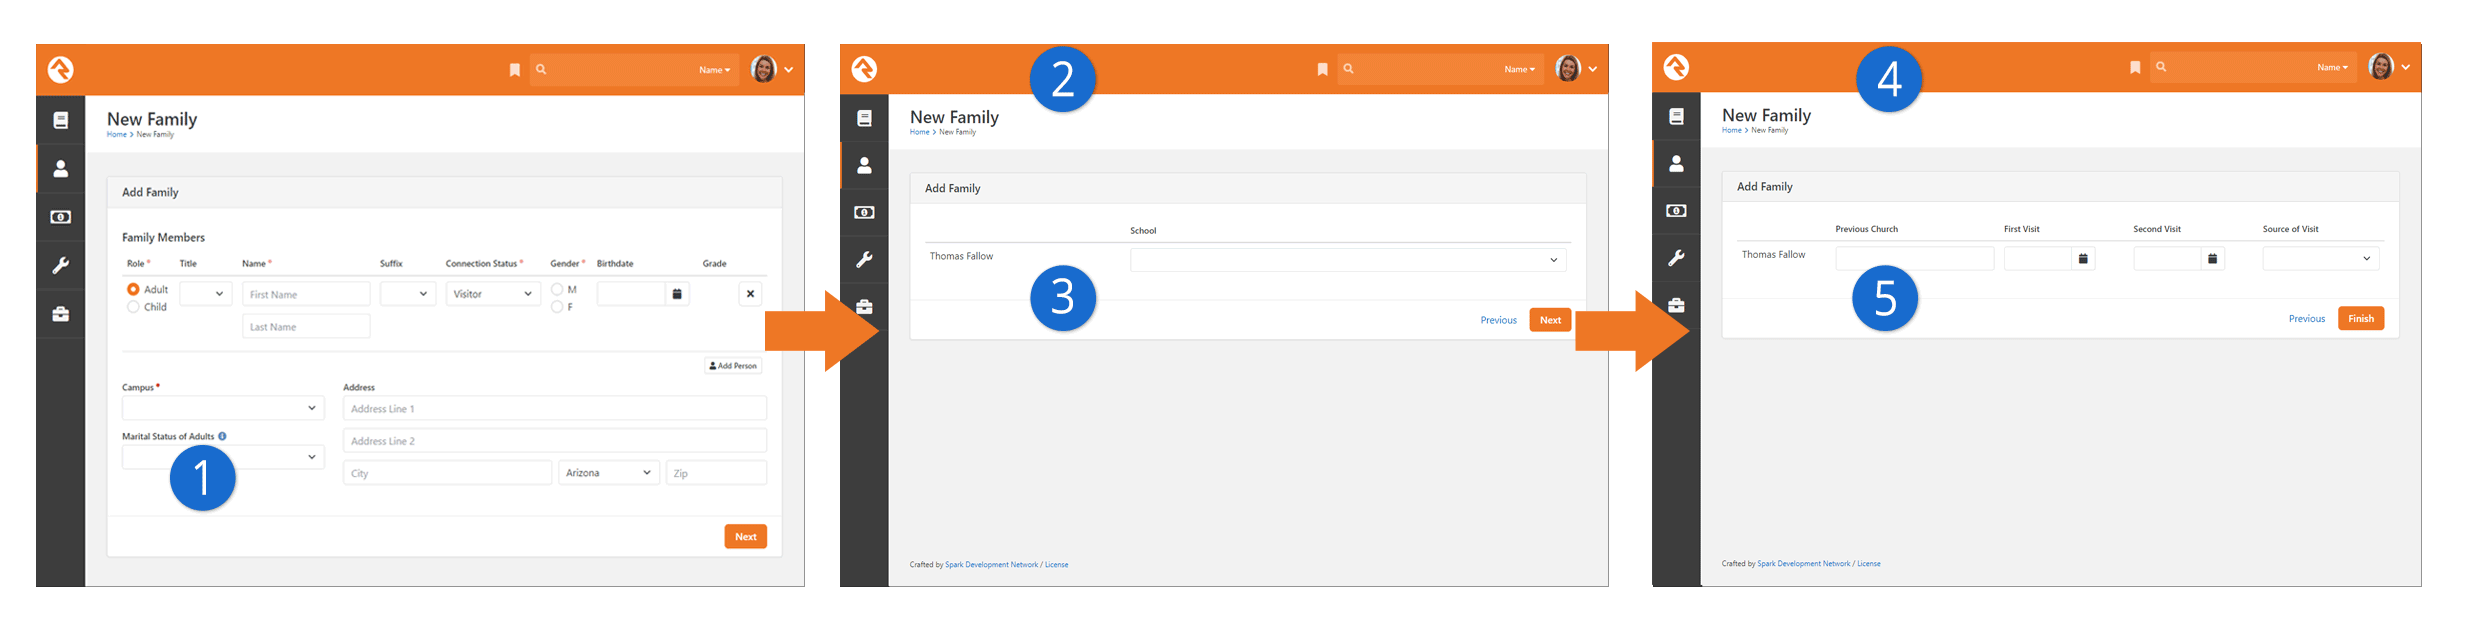
- 1Next
- With the additional attribute categories added, the Finish
button on the phone number and email page (not pictured) is renamed to Next. Clicking
Next will take you to the first attribute you’ve added to
the block settings.
- 2First Category
- After clicking Next from the phone number/email page,
the first attribute category, Education, is displayed.
- 3Next or Previous
- Navigation buttons are present to step either forward or backward.
- 4More Information
- The remaining attribute category, Visitor Information,
is displayed next.
- 5Finish
- Since this is the final attribute category, the Finish
button is back.
Useful Tips
Below are a few tips to help you use this feature to its fullest:
- Remember that attributes can belong to more than one attribute category. This allows you to create
custom attribute categories with the sole purpose of being used on the
Family Entry screen.
-
If you configured the attribute to be required, it will also be required on these entry forms. Keep in mind that
it will be required when it's edited on the
Person Profile page, too.
Duplicates Happen
To help reduce the number of duplicate records, Rock will display a listing of possible duplicates for
individuals added to the family.
Possible Duplicates
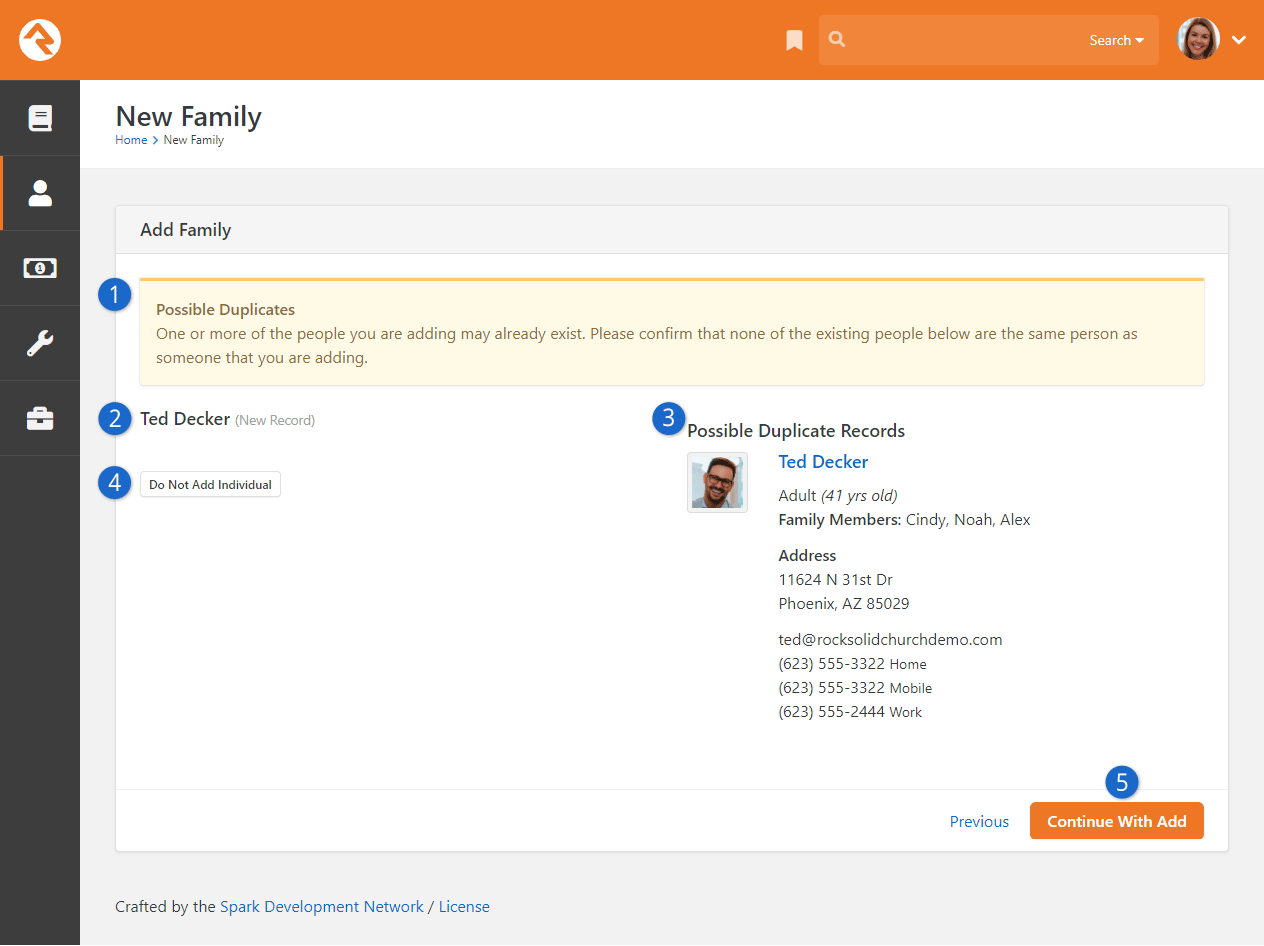
- 1 Possible Duplicates
- You'll see a warning message indicating that you may be adding a duplicate record
into the system. This page is skipped if no duplicates are detected, or if the
existing record's Account Protection Profile is
configured to skip duplicate checking based on your
Security Settings.
- 2 New Record
- The "New Record" is listed to the left, for comparison against existing
records on the right.
- 3 Possible Duplicate Records
- Existing records that may be duplicates of what you're trying to add are listed here.
This allows you to view details related to the existing record, to determine whether you
should proceed.
- 4 Do Not Add Individual
- Click this button if you've determined that the record you're trying to add already
exists and should not be added.
- 5 Continue With Add
- If you've determined the record you're adding is not a duplicate and should be
added to the system, then you can proceed by clicking this button.
For more information about duplicates in general, check out the Duplicates chapter below.
Editing a Family
To edit a family, click the
button
in the upper-right corner of the
Family section of the
Person Profile. This will take
you to the screen pictured below.
Editing A Family
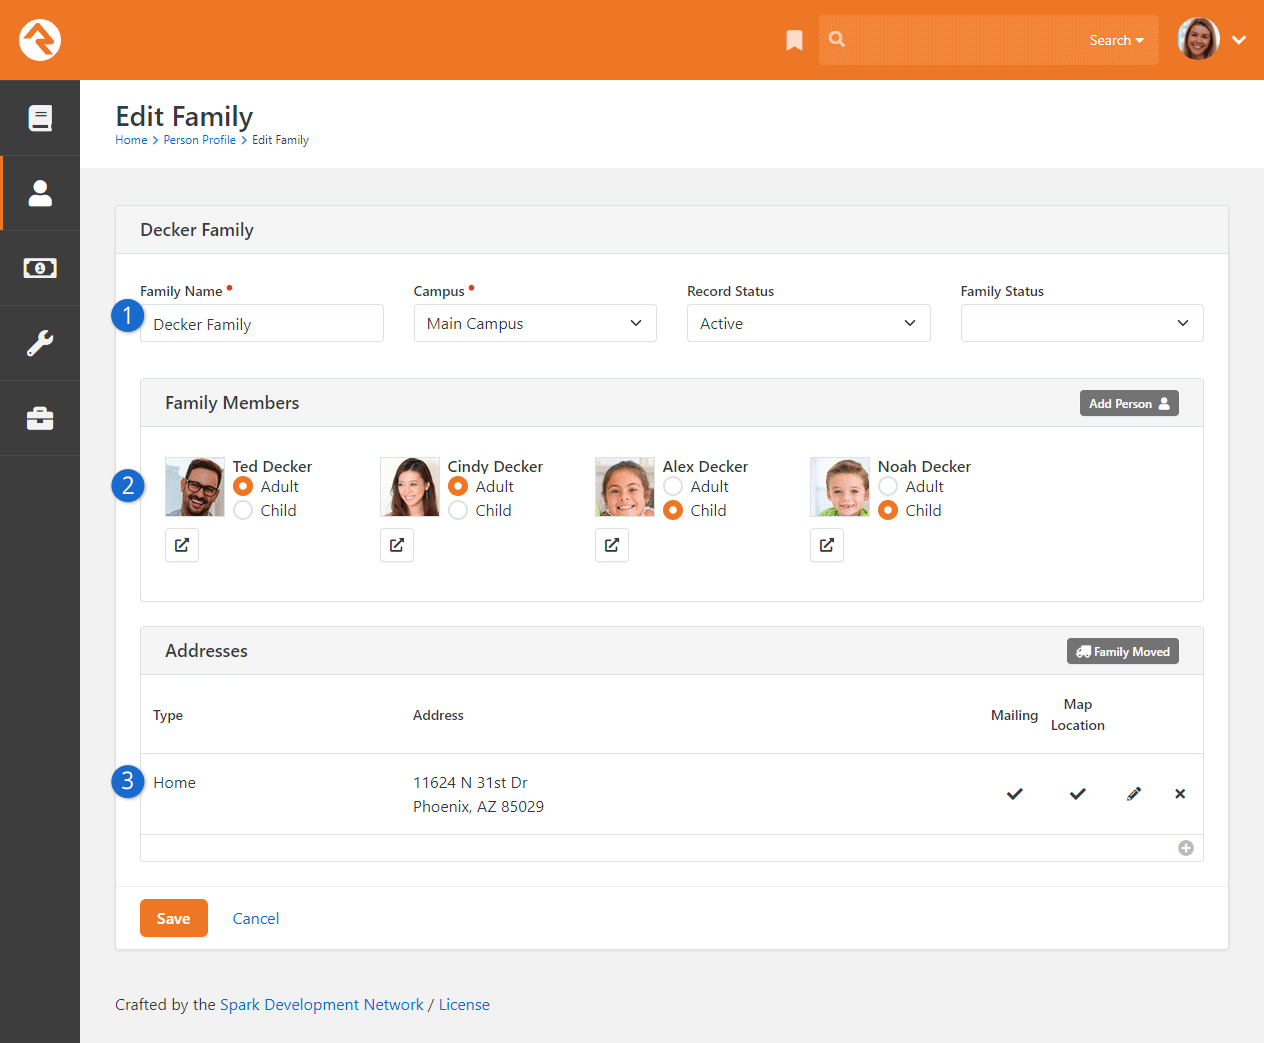
- 1 Overview Section
- You can edit high-level information about the family here.
- 2 Family Members
- From here you can add people to the family (e.g., a new child is born) or maintain
each person’s Role (Adult or Child) in the family. You can also click the
icon to move the individual to a new
family.
- 3 Addresses
- Here you can maintain the family’s address information or begin the process of
indicating the family has moved.
Each of the areas noted above are discussed in greater detail below.
Overview Section
The top section of the page allows you to edit the family's name, campus and
record status. The family name is used as a title for the family.
Since a person is tied to a campus through the family unit, this is where
you would change the campus for all members of a family. If you only have
one campus, then the Campus
field won't be visible.
Note
If a person is in two different families, each tied to a different campus,
they will be counted and reported in both campuses.
While the Record Status
is typically set on a specific person, we know you’ll sometimes need to change it for
a whole family at once. When you mark the family
Inactive, you’ll be asked
to provide a reason. Like inactivating an individual, this helps the organization understand
why groups of people are leaving and helps the next person who looks at this specific record
understand why this change was made.
Keep in mind that marking the family Inactive
will also inactivate each member of the family. The individuals in the family will also be made
Inactive in any groups to which they belong.
Addresses Section
This final section lists all the current and past addresses for a family. Several
different address types can be attached to a family. Ask your administrator for
help with adding new address types if needed.
When a family moves, it may be tempting to simply change the home address
and save the record. Instead, you should click the
Family Moved
button. This will automatically move the home address to a previous address
and start a new home address for you. Having a previous address is very
helpful. When someone moves there’s a period of transition when both addresses
could be floating around (online form submissions, checks, etc.) Having both
addresses in the system helps staff understand the transition. This also helps
reduce the chance that someone would change the new address back to the old.
Trust us, it happens!
Map Location
Rock requires that one (and only one) address be used for showing on the map. The
Map Location
flag indicates which address is being used for this purpose. The flag doesn't
necessarily mean that the location can be mapped. For instance, if a family has
only one address in the system, that address will always be tagged as the
Map Location
because there is no other location to reference.
Important
Please keep in mind that none of your changes on the
Family Edit screen
are actually saved until you click the
Save
button. This includes actions like
Move to New Family
and Add Person.
Family Pre-Registration
Available on the external website under
Connect, the
Family Pre-Registration page is often
where people are directed to create a new record in Rock. Having a place
where people can add themselves to Rock saves your staff and volunteers from having to manually create
new people and families. The form is simple and easy to use, as shown below.
Family Pre-Registration Entry
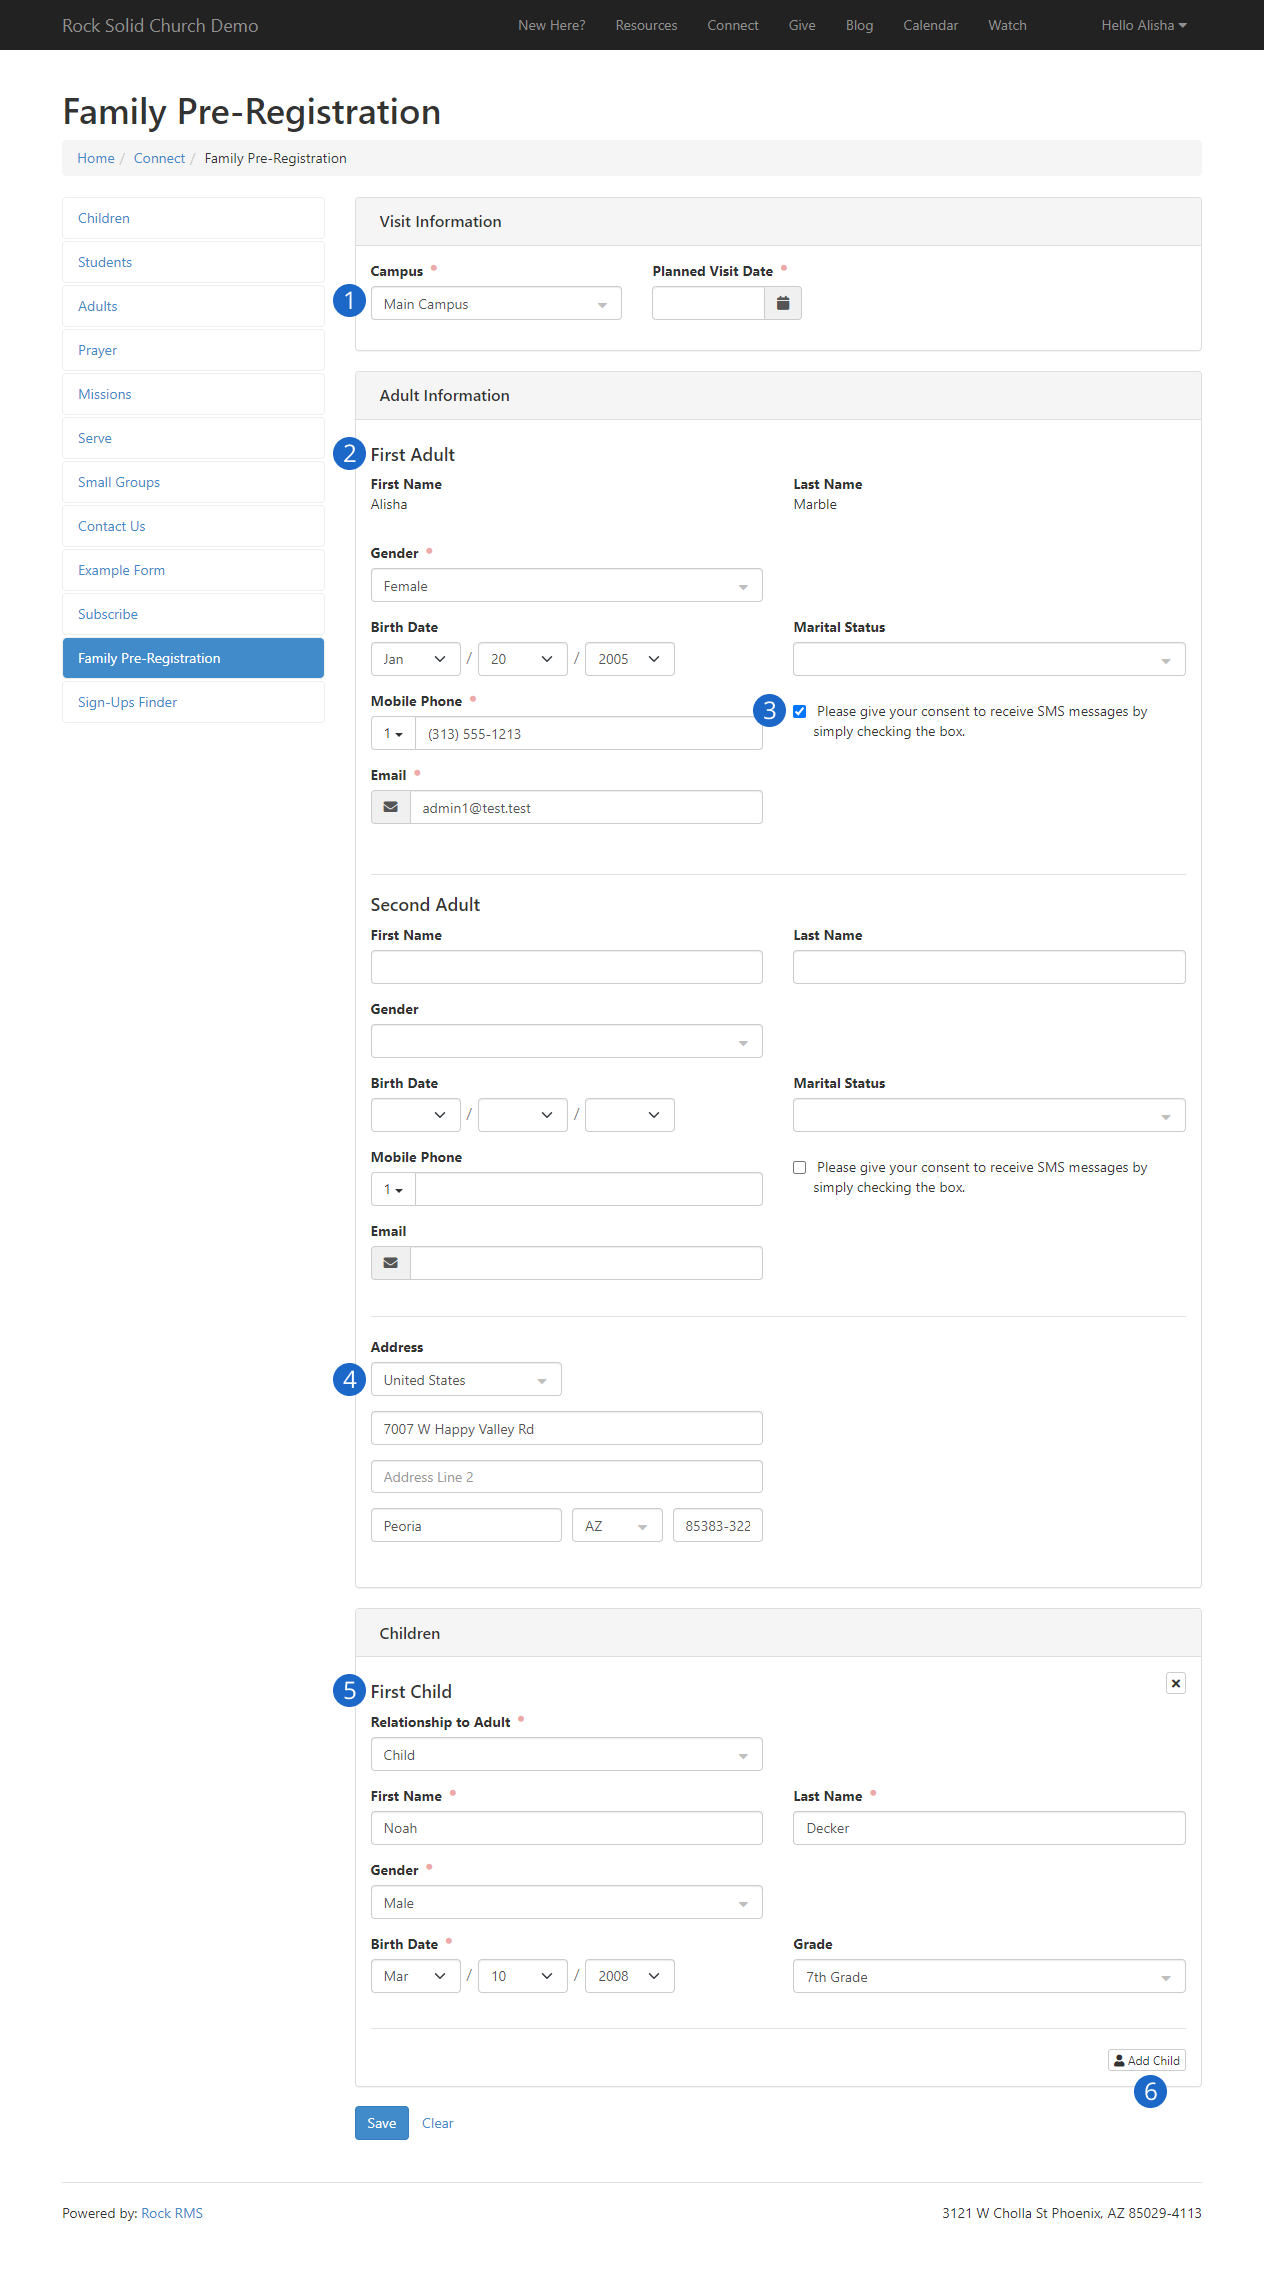
- 1 Campus and Planned Visit Date
- Capturing this information lets you know where the person might be planning to attend a service
or event, and when. This information is typically only used if you’re launching a workflow as
part of the pre-registration process. The Campus field will not be shown if you have only one
campus.
- 2 Adult Information
- Adults will fill out this portion of the form for themselves. The block’s settings control which
fields are optional or required. First and Last Name are always required at a minimum.
- 3 SMS Opt-In
- Allows the person to choose whether they would like to receive text messages on their mobile number.
The options for this field may be hidden, only shown for first adult, shown for all adults or shown for
adults and children.
- 4 Address
- The same address will be applied to all adults and any children entered on the form. This will
be stored as a Home address.
- 5 Child Information
- The block’s settings let you control which questions to ask children. These are configured
separately from the questions that are asked of adults. In both cases, attribute categories can
be added in the block settings to allow entry for things like Allergies or Legal Notes.
- 6 Add Child
- Click this button to add the first child, or additional children after the first.
After everyone’s information is entered, all the person needs to do is click
Save to complete the process.
Family Pre-Registration Confirmation
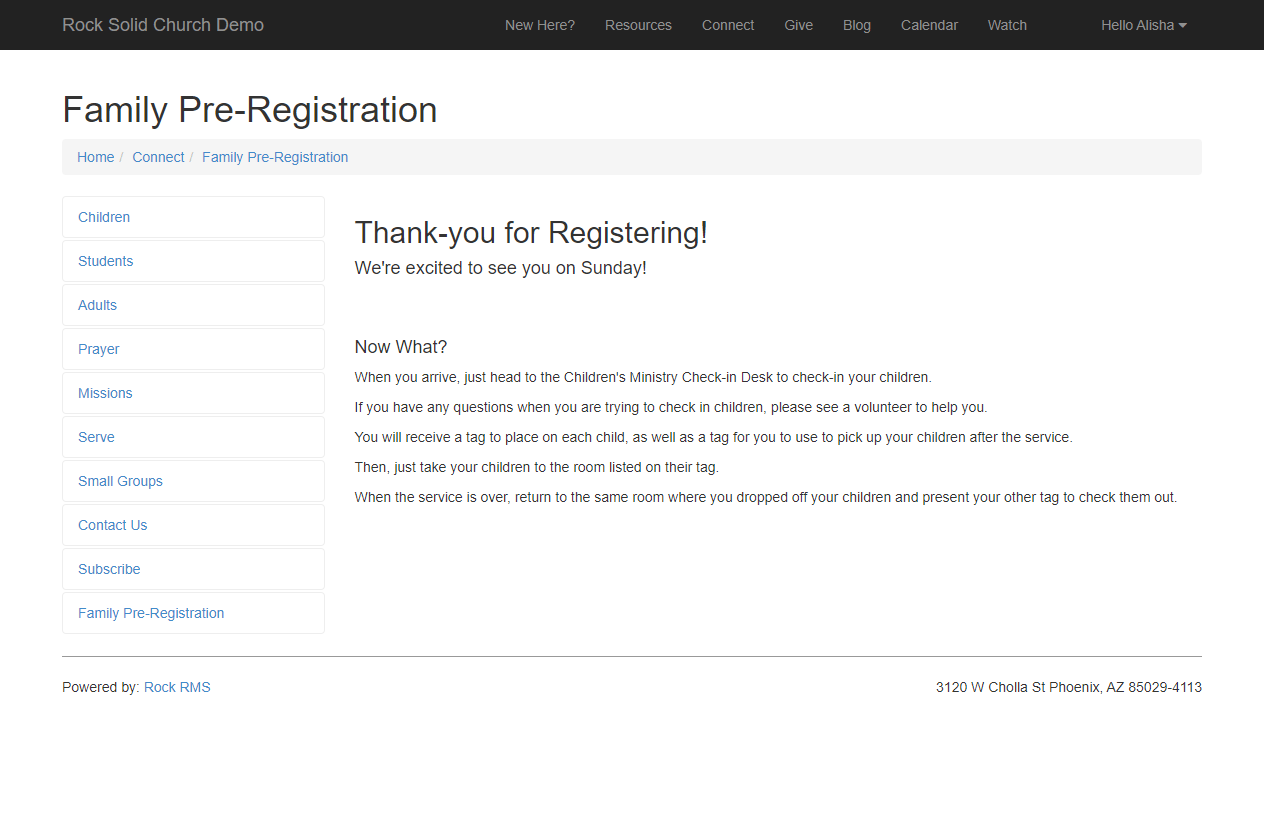
At this point, you’ll find the person/family in Rock. This means, for example, they can show up to
your next service ready to check in without needing to be manually entered by staff or volunteers.
There are many block settings to customize the
Family Pre-Registration
experience. For instance, you can launch a workflow for each parent and for each child
when the form is completed. Or, you can choose to ask for race and ethnicity information.
This is also where you'll set whether or not to show the SMS Opt-in option.
Administrators are encouraged to review this block's settings to ensure you’re collecting
all the information you need from new guests.
As noted above, you can launch different types of workflows for each submission of the Family
Pre-Registration form. The workflow(s) you select under
Workflow Types will be passed the
primary family as the entity, which is going to be a group entity. If the selected workflow type has
workflow attribute values set up with keys of ParentIds, ChildIds, or PlannedVisitDate, these will be
populated automatically. The
Parent Workflow you choose will be
launched once for each parent, so if there is more than one parent you’ll get more than one workflow.
In this case the parent (a Person record) will be passed to the workflow. The selected
Child Workflow works similarly to the
Parent Workflow except the child’s Person record will be sent to the workflow as the entity.
How Rock Handles People and Families
Now that you've seen how individuals and families are added and edited in Rock,
let's talk about how Rock helps you keep that information current.
Imagine having to manually update the ages of individuals in your organization
whenever birthdays occur, or the grades of children at the start of each new school
year. It would be a daunting, never-ending task! Thankfully, Rock uses automated
calculations to update people and families, so you don’t have to. Let's look at which
information is automated and how Rock makes the calculations.
Age
Rock calculates an individual’s age by comparing their birthdate to the current date.
Why make things more complicated than they need to be?
Age Classifications
In Rock, an Adult is anyone over the age of 18 or marked as an adult in one or more families.
A Child is anyone less than 18 or a child in all families. If either of those conditions aren't
met, the individual is marked as Unknown.
Rock calculates age each time a person is saved and re-calculates it every time the
Rock Cleanup job is run.
The value is then saved in the
Age Classification property
on the Person model, where it's made available to use in Data Views, Reports and other filtering
operations.
Grade
Rock calculates a person's grade using their graduation year and the global attribute
Grade Transition Date.
When an individual’s graduation year is entered into their
Person Profile, Rock compares
that year to the
Grade Transition Date
to determine the individual’s grade. You can configure the
Grade Transition Date in the
Global Attributes screen, located at
Admin Tools > Settings > General > Global Attributes.
A Word to the Wise
The transition occurs at the end of the specified date, so if you enter today's date,
the promotion to the next grade will take place tonight at midnight. Because this is simply
a calculation, and nothing is changed on a person's profile, you can freely change the date
back and forth and observe that the grade changes.
For more details on grades in Rock, see the School Grades chapter
below.
Primary Family
Individuals belonging to more than one family will be assigned a primary family. This is recorded
behind the scenes as the Primary Family ID
and is initially associated with the family that was entered into Rock first.
Because it’s stored behind the scenes, you typically won’t see the
Primary Family ID. However, on the
Person Profile page, the primary family
will be whichever family is at the top of the list for the individual. So, you can change the primary
family by clicking and dragging the
icon for the desired family to the top of the list. While the
Primary Family ID isn’t visible,
behind the scenes it will be updated in real time according to your changes on the
Person Profile.
Directory
Many smaller organizations like to have a directory of all the people in the database. The Directory feature allows
this and much, much more.
Directory
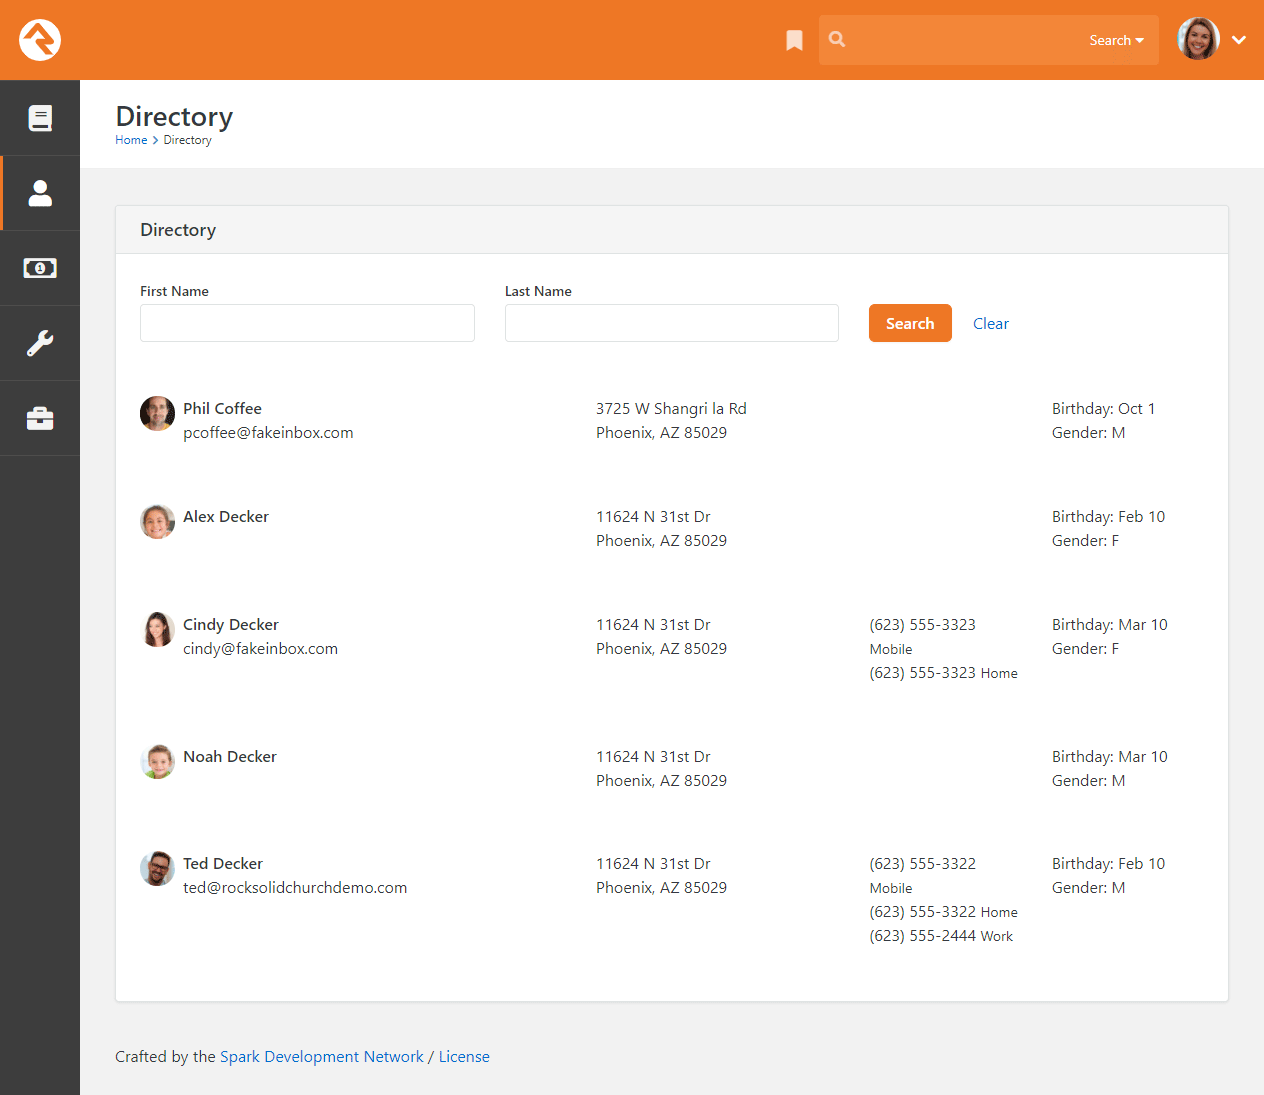
Out of the box, the directory is configured to display a simple search screen. However, you can change the “Show All
People” block setting to show the first 1,500 people in the database if you prefer.
That's not all this block can do though. Let's check out all the features found under the block settings.
Block Settings
| Setting |
Description |
| Data View |
The results of the directory are driven by a provided Data View. This gives you the power to
use the block in many different ways. You may implement it to show
All Members and Attendees
(which is the default) or perhaps limit it to group leaders, or youth. The sky's the limit. |
| Opt-out Group |
The block allows people to opt out of being shown in the directory. This setting allows you to
configure the group that will hold those who wish to opt-out. |
| Show By |
Here you have the option to show the results as individuals or as families. |
| Show All People |
This setting determines if all people should be displayed when the page is loaded or if the person
viewing the page will need to first search to find the results. |
| Person Profile Page |
Adding a page to this field will change people’s names into links when viewing the directory search
results. Clicking a person’s name will then take you to the specified page. |
| First Name Characters Required |
This setting determines the minimum number of characters that need to be entered in the
First Name field for searching.
These types of limits are helpful if you'd like people to be able to find people but not be able to
see or print the entire list. |
| Last Name Characters Required |
Like the first name setting, but for the last name. |
| Show Email |
This setting determines whether the email field should be displayed. |
| Show Address |
This setting determines whether the address field should be displayed. |
| Show Phones |
This setting determines which phone types should be displayed. |
| Show Birthday |
Determines if the birthdate field should be shown. If shown, only the month/day will be displayed. |
| Show Gender |
This setting determines whether the gender field should be shown. |
| Show Grade |
This setting determines whether the grade field should be shown. |
| Show Envelope Number |
If applicable (see Rock Solid Finances)
you can select to have a person’s envelope number shown. |
| Max Results |
You can limit the max number of results to display with this setting. This keeps your server from
crashing if you have hundreds of thousands of records. |
So, there you have it. Once you consider all the features of this block, we're sure you'll be using it all over your sites.
Duplicates
Where Duplicates Come From
Duplicate records happen - period. It’s important that your organization
understands why they occur and has a process to eliminate them by merging
duplicate records.
There are two main ways duplicate records are added to the system. The first is by a staff
person or volunteer using the internal site. Before you add someone to the database, it’s
important that you make sure they haven’t already been added. Even if you’re certain the
person or family is new, it’s always a good idea to double check.
The second way duplicates are added to the system is from activities (e.g., contributions,
event registration, connection requests) on the external website. While Rock tries to limit
the number of duplicates that are created, sometimes there isn’t enough data to know for sure.
At other times a duplicate is created for security reasons. Rock has to be very careful not
to allow someone to "hijack" a record. This would allow a person to create an account as another
person and gain visibility to their contact and contribution information. In these cases, Rock
will create a duplicate record so that a staff person can double-check that the activity is normal
before performing a merge.
Finally, it's important to understand that the amount of "friction" you decide to place on people
using the public website can affect the number of duplicates generated. For example, you can attempt
to limit the number of duplicates created by requiring individuals to log in for things like online
giving and event registration. However, this means people will have that extra "friction" of needing
to log in. On the flip side, you may choose to not require logins for these things on the web site
(thus "low friction"), in which case Rock will attempt to match to an existing person based on Name
and Email...but if Rock doesn't find such a match, a new (often duplicate) record will be
created.
How Rock Avoids Duplicates
As people are added to Rock, the system will try to look for existing records that might be a match
before creating a new record. This logic is used anywhere a person could be added, with very few exceptions.
For instance, if you use the REST API, this scoring is not done because a developer may not wish to use it.
When an attempt is made to add a new record, existing records are evaluated and assigned a score based on the
logic shown below. If a new record has the same first and last name as an existing record, with nothing else
in common, then a score of 30 points (15 + 15) would be assigned.
| Matches On |
Points |
| First Name or Nick Name |
15 |
| Last Name |
15 |
| Last Name doesn’t match, Previous Name matches |
12 |
| Mobile Phone, Email or both |
15 |
| Month and Day of birthdate |
10 |
| Year of birthdate |
5 |
| Gender |
3 |
| Suffix |
10 |
If an existing record scores higher than 35 points, it’s considered a match (and possible duplicate) of the new
incoming record. If multiple existing records score higher than 35 points, then the record with the highest score
will be selected as the match. If there’s a tie, then the “first” record (typically the oldest) will be selected.
Rock will not perform the duplicate checking process described above if the
existing record's Account Protection Profile is
configured to skip duplicate checking based on your
Security Settings.
Merging Records
While Rock will continue to pioneer new ways to prevent duplication, it will continue to happen (though
hopefully at a reduced rate). So, let’s learn how to merge duplicate records.
The first step in merging records is to search for the individual who has a duplicate record. Type the
search criteria into the Smart Search field at the top of the page. When you get your results, you can
check the records that are duplicates and click the
icon
in the list's footer.
Select Individuals To Merge
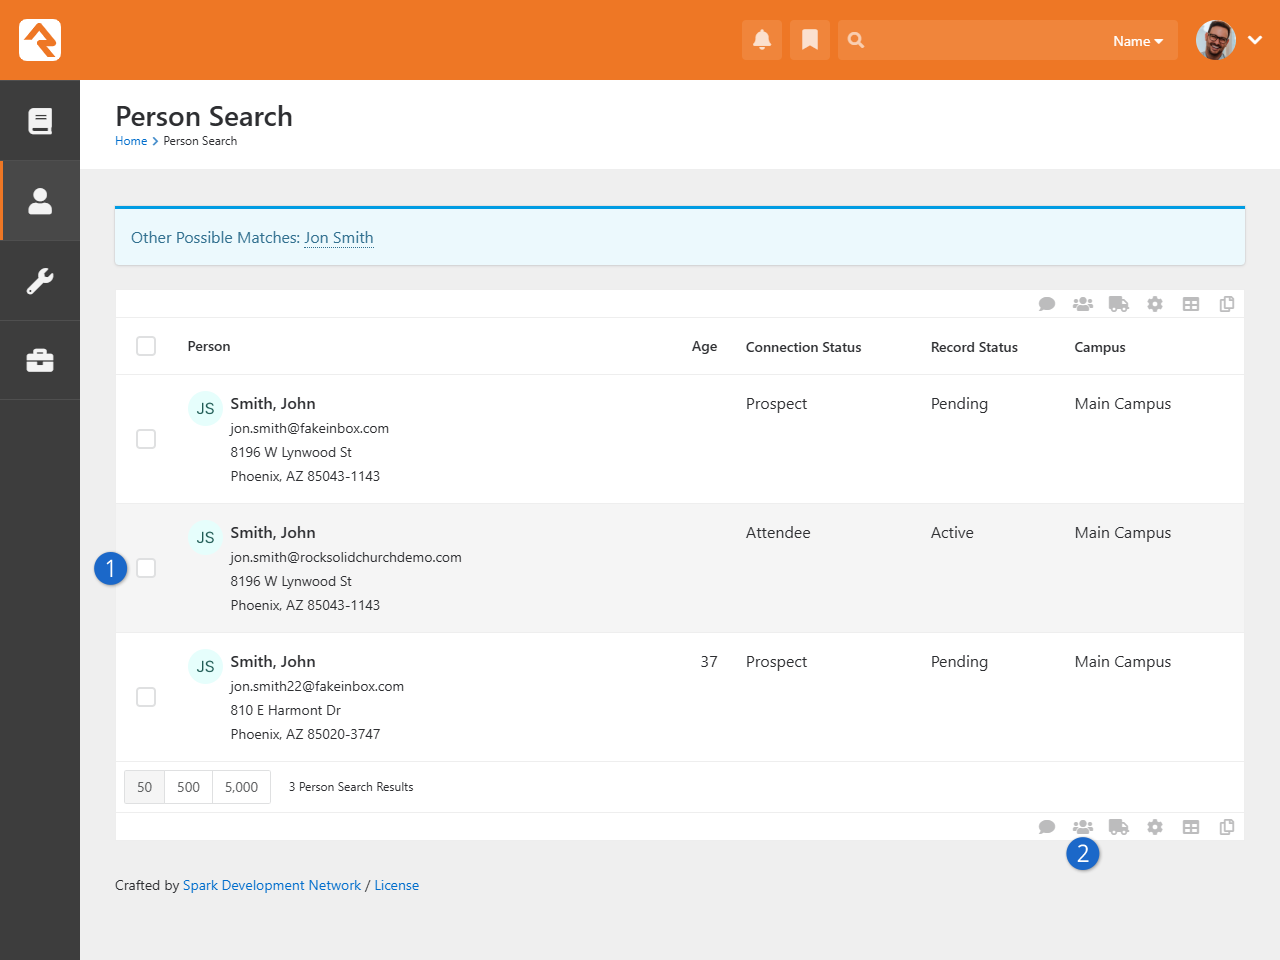
- 1 Select Records
- First select the records you wish to merge.
- 2 Click Merge
- Next, click the
icon at the bottom of the grid.
On the merge screen you’ll see each record side by side as pictured below. There is a column
for each person involved with the merge.
Merge Screen
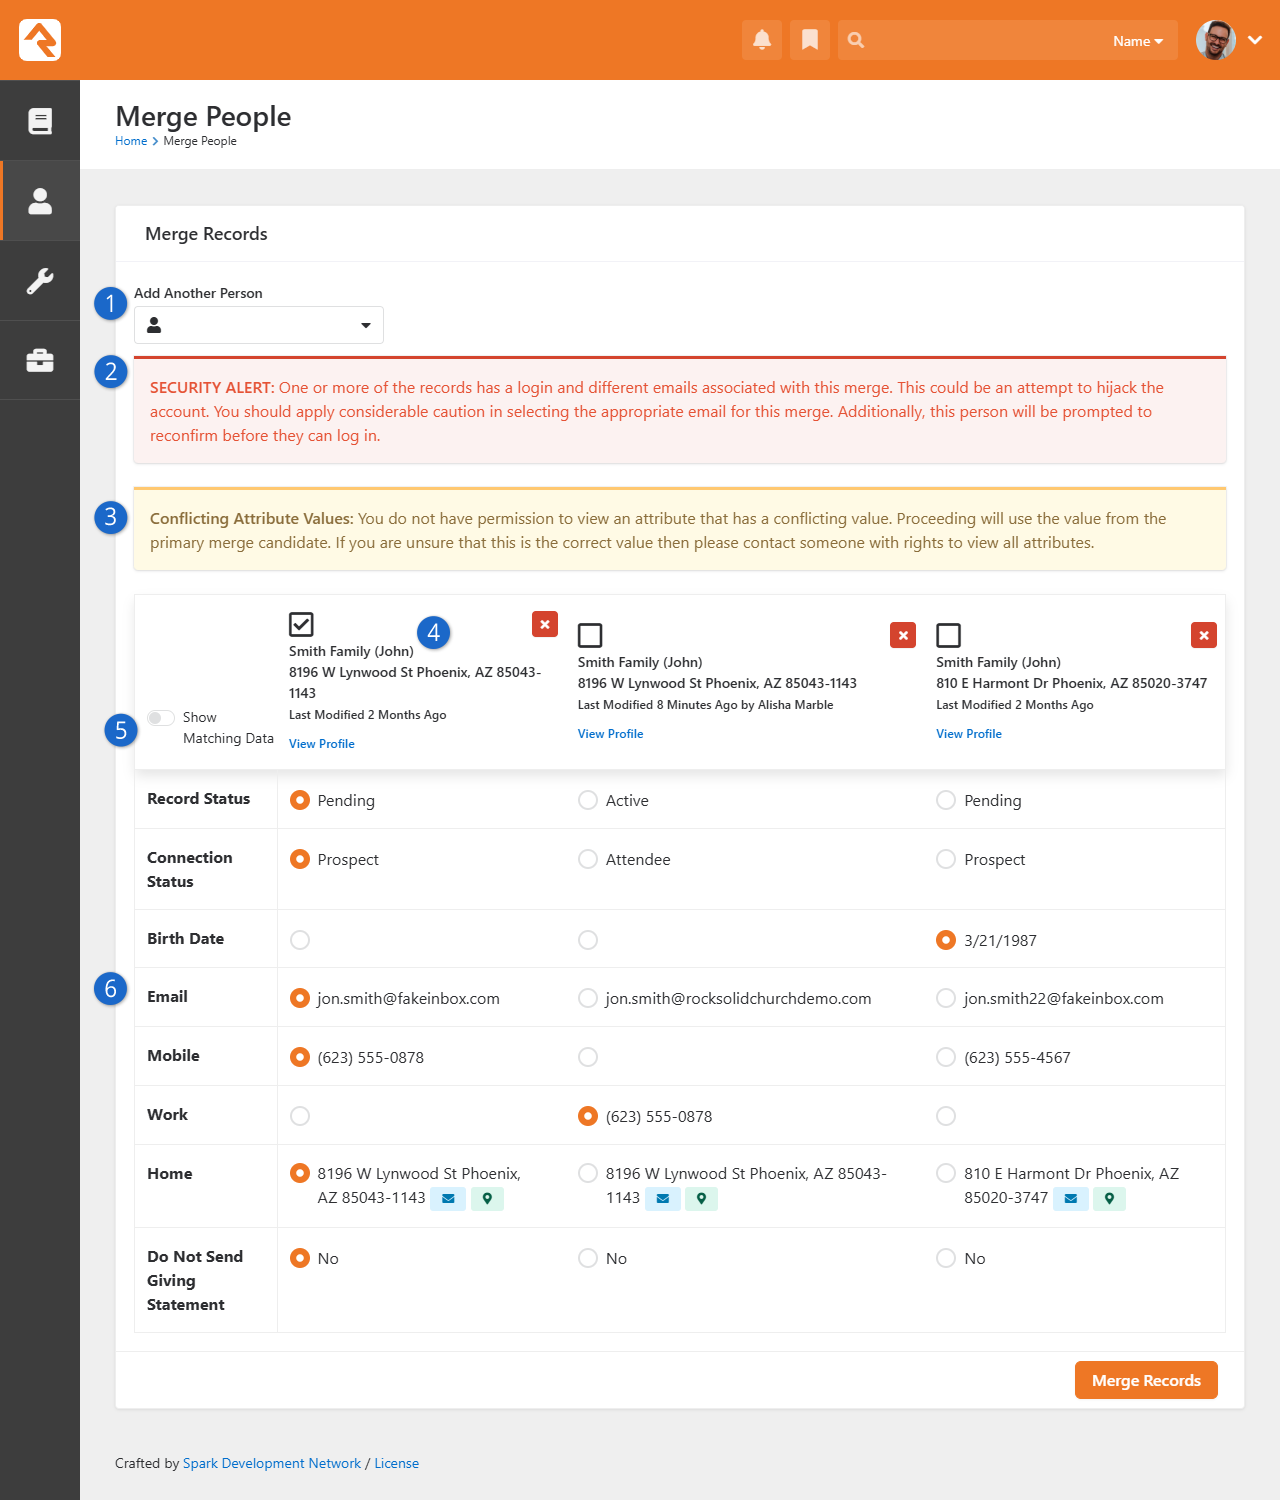
- 1 Add Another Person
- This allows you to add additional records that are also duplicates of the current record. This is
necessary if you can't select both duplicate records from a single search (perhaps one of the names is
spelled incorrectly).
- 2 Security Alert
- This alert is a reminder to be as sure as possible that the records being merged belong to
the same person. Perhaps the biggest risk associated with merging records is merging two different people by
mistake. This is not only inconvenient, it's a significant security concern because after the merge
one person could have access to another person's data.
- 3 Conflicting Attribute Values
- This message simply states that because the person doing the merge doesn't have access to a
person attribute, they won't be able to select which value to keep for that attribute. See
below for additional details and options for handling this scenario.
- 4 Master Record Selection
- The first thing you'll want to do on this screen is pick the master record by checking the box
near the top of the column. This is the record the others will be merged into.
You can click
View Profile to open
the person's profile in a new window, so you don't have to leave the merge screen to view
their details.
- 5 Show Matching Data
- Use this toggle to show or hide rows where the data is the same across all
records. Hiding matching data allows you to focus on what's different between the records.
For instance, if the first name on all the records is the same then you won't initially see a row to
select which first name to keep. However, in some cases showing the matching data can help assist
in confirming that the records are truly a match.
- 6 Data to Keep
- In each column you'll see properties and attributes for each person. Your job is
to select which value will stay attached to the record after the merge.
Merging Addresses
The address displayed at the top of the merge block is shown for reference only. After selecting the
primary/master record, you'll still need to pick which address to carry forward. If the address you
pick is not the current address for the primary record, the current (pre-merge) address will be moved
to a Previous Address after the merge is completed.
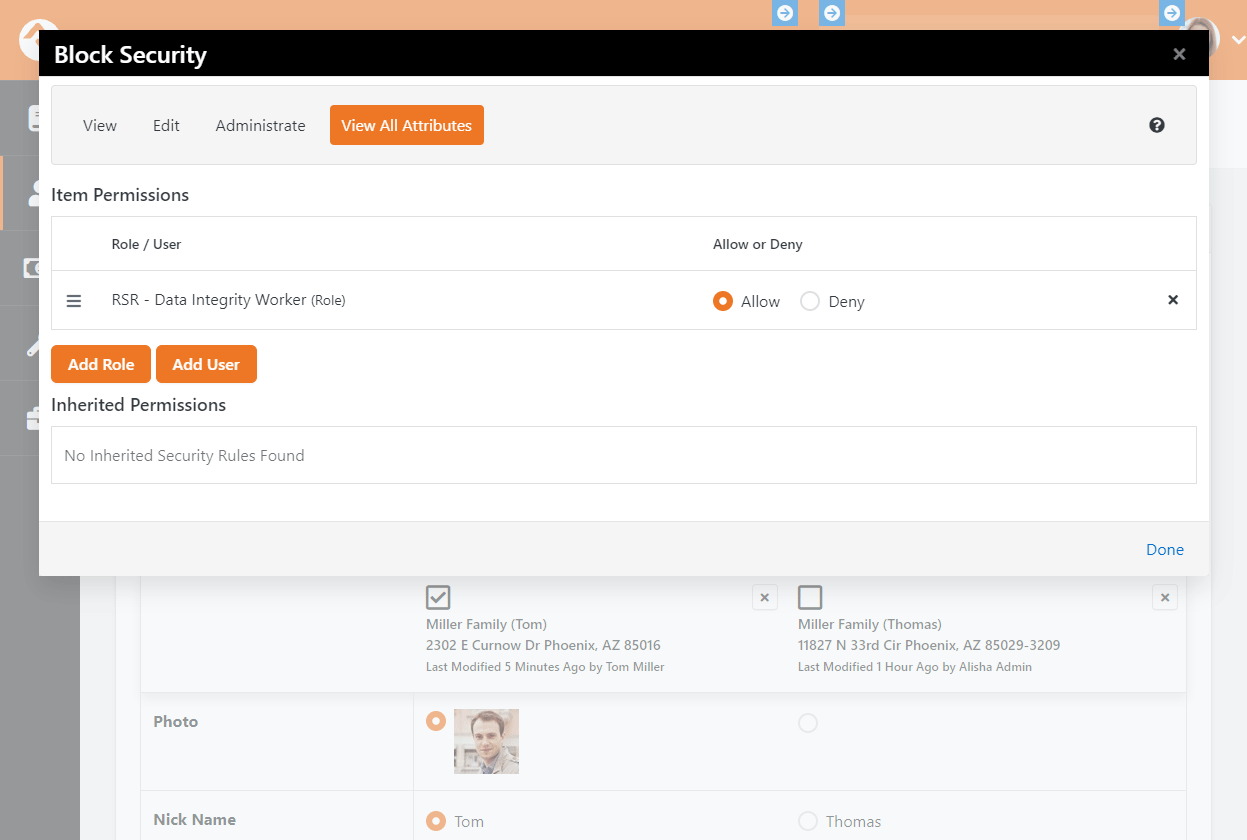
If you don't have permission to view an attribute that has a conflicting value, you'll receive the warning
message pictured in the screenshot above, near the top of the merge block. If staff members responsible for merges
shouldn’t have access to attributes outside of a merge context, we recommend using the “View All Attributes”
Security Verb as pictured below. Roles or individuals with this access will be able to view any attribute values
associated with the records being merged, and can select the value to keep, but will not be able to view those
attributes in other contexts (like the Person Profile) without additional security.
Merge Records - View All Attributes
When you’re done, click the Merge Records
button and you'll be taken to the Person Profile
page of the merged master record.
If two records exist with the same name, in cases where either of them has an email address and either of them
has an associated user login, Rock will display a hijack warning message. For security
purposes it's very important that you verify the validity of email addresses associated with either record, and remove invalid emails
before you merge the records. Failure to delete invalid email addresses prior to the merge may put a person's
information at risk of being exposed to someone else.
After the records are merged, the person will be required to confirm
their email address the next time they log in. The Reset Login Confirmation
option comes enabled out of the box, but you can disable it in the block settings of the
Merge People screen.
Merging Records and Family Attributes
If two people being merged have differing family attribute values, the merge will display both values and
allow you to select which should be used. If the family name and/or campus are different, both values will
be displayed in the Family Values section,
and you can select which should be used. All other differing family attribute values will be displayed in the
Family Attributes section. Note that any
changes made will update that value for the family, which will affect every member of the family. To learn more
about family attributes, see the Family Attributes section below.
If you don’t have Edit access to the merge block, you’ll see a message noting that your request to merge a person
has been saved. This Merge Request will be listed
under Tools > Data Integrity > Merge Requests. Out of
the box Rock only allows the members of the RSR - Data Integrity Worker
to complete merges.
Merge Request
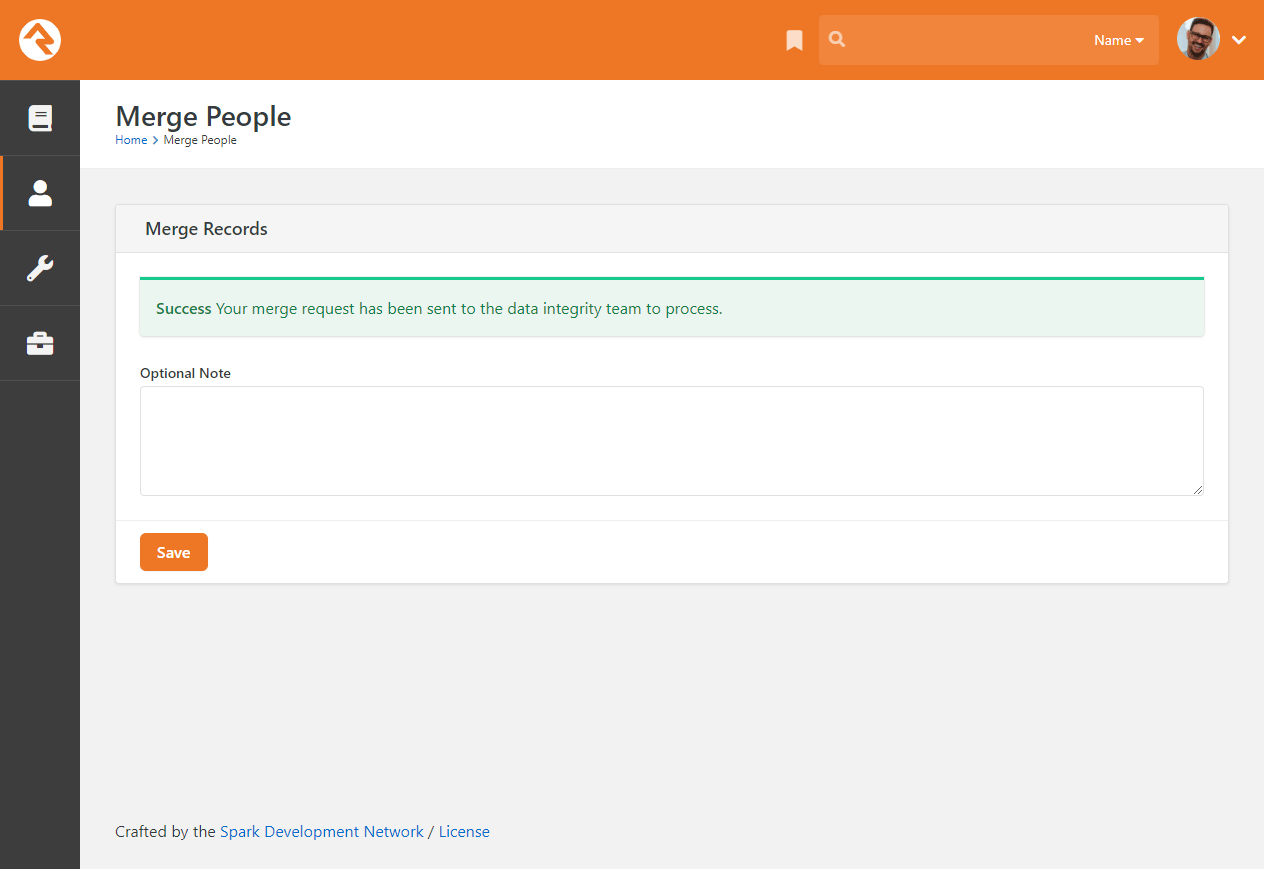
Merging Records Without Enough Security
If you have access to merge but don't have enough security access to view things
such as attributes, you won't be able to choose which item survives when
the records are merged. Rock will take the value from the primary person/family
you choose at the top of the merge panel. This could lead to unintended data being
selected during the merge. You should consider giving individuals who process merge
requests 'View All Attributes' access as described above.
Account Protection Profiles
Every person in Rock has an
Account Protection Profile.
This is a way to classify person records, to protect certain accounts from hijack attempts.
A person's
Account Protection Profile
is calculated each night by the
Process Elevated Security
job and will be one of the following values:
- Low: There are no risk items associated with this person.
- Medium: The person has a login for Rock.
- High: The person meets one or more of the following conditions:
- Has an active Scheduled Financial Transaction
- Has a saved Payment Account
- Is in a security role with a "High" Elevated Security Level
- Extreme: The person is in a security role that has an
Elevated Security Level
of "Extreme"
These
Account Protection Profile
levels are used by the
Security Settings
described in the
Admin Hero Guide.
When performing a merge, if the person being merged has an
Account Protection Profile
of Medium or higher, you'll see a message when attempting to merge the record.
Merge with Elevated Security Warning

There are restrictions on who can merge records that have High or Extreme
Account Protection Profiles.
This is controlled by your
Security Settings
configuration. If the person performing the merge doesn't have the needed
security, they'll be presented with a message as pictured below and will
not be able to complete the merge.
Merge with Extreme Record
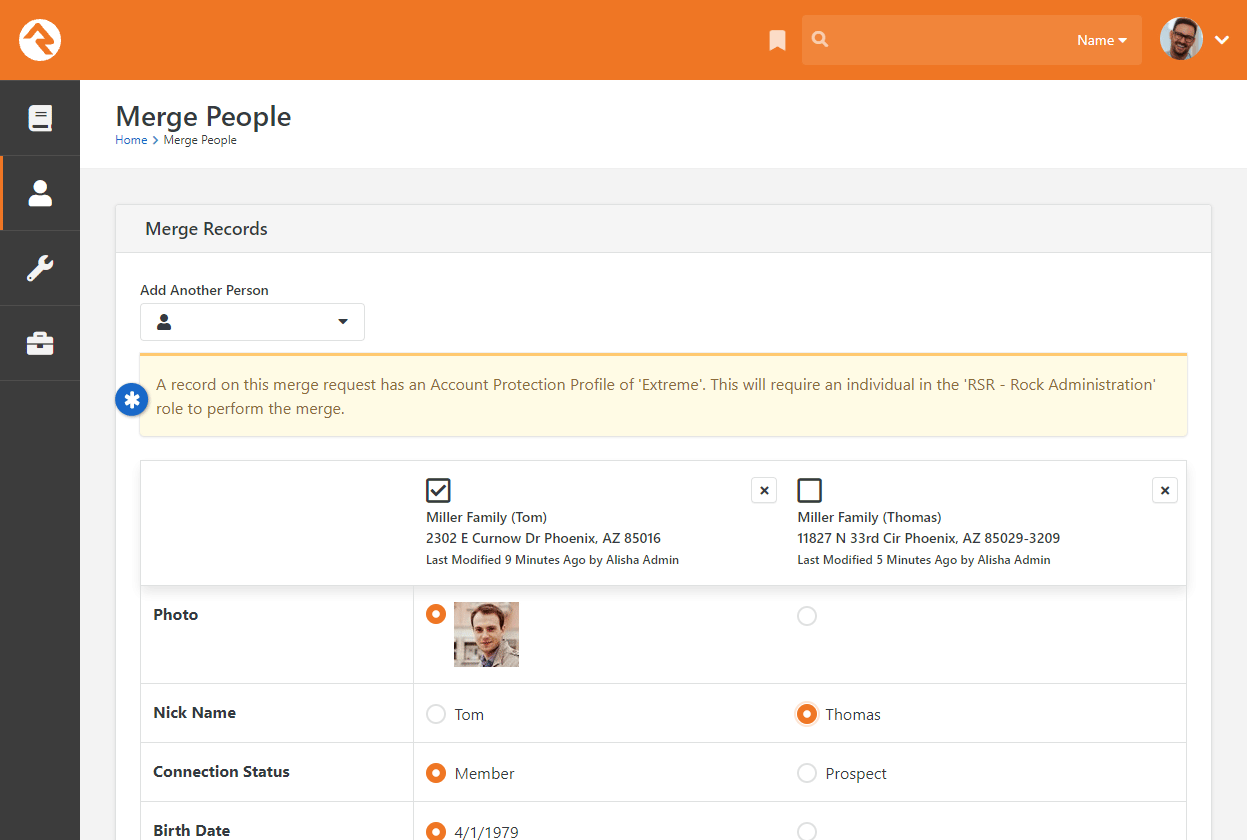
Recommendations for Life Events
Below are some suggested processes for common life events. While these are just
suggestions, you’ll want to have documented processes for each of these events
so your staff handles them consistently.
Coming Soon!
In an upcoming update to Rock, you'll be able to automate some of these
processes. Keep your eye on Rock’s workflow features as they are released.
Death of a Family Member
The death of a loved one is a very hard thing. It’s made even harder, though,
when the remaining person is constantly reminded of their loss. When someone
notifies your organization about a death, we suggest taking the following steps:
-
Mark the individual’s record as Inactive
with the reason of Deceased.
-
Move the deceased individual to a new family by clicking the
button
from the Edit Family page.
-
Remove all contact information from the record.
-
Add a note to the deceased person marked as Alert
with the text of "Deceased" and the date they died.
-
If married, create a Previous Spouse
relationship back to the spouse. It's generally best to leave the surviving spouse as
Married as a matter of respect unless
they indicate otherwise.
-
Don’t forget to talk to your finance department about how to deal with regular contribution records.
We recommend that the contributions assigned to the deceased person be
moved to the surviving spouse. This can be done from the
Person Profile page.
For optimal data management, we recommend removing deceased individuals from their original families
in all scenarios. While this may have minor impacts on certain features, the overall benefits outweigh
these considerations.
Divorce
Before making these changes, be sure to discreetly get as much information about
the family situation as you can. This will ensure you get the information
right and not create an awkward situation in the future.
-
From the Edit Family
screen, click the
icon for one of the adults to move them to a new family.
-
Depending on the custody status, you may want to ensure the children are in both families.
To do this, find the new family and add any children to it, without removing them from their current family.
-
Create a Former Spouse
relationship to both adults.
-
Update phone and address information.
-
Add any name changes on the Edit Individual
screen (under Advanced Settings).
-
Update the Marital Status for both individuals.
-
You may need to use the
Reassign Transactions
button to transfer financial transactions from one spouse to the other. This can be found under
the Contributions
tab in the Person Profile
page, at the bottom of the transaction list.
Marriage
After the wedding, you'll want to complete the following steps.
-
Go to the primary record (usually the husband or person with the primary address).
-
From the Edit Family
screen click the Add Person button
and select the individual from the database, removing them from their current family.
-
Update the female’s title to "Mrs."
-
Update both adults’ marital status to "Married."
-
Add the anniversary date, if known.
-
Add the wife's maiden name as a previous name on the
Edit Individual screen (under
Advanced Settings).
Child Turns 18
When a child reaches adulthood it’s a good idea to move them to a new family, even if they are still living
in their parents’ home.
-
From the Edit Family
screen, click the
icon.
-
Create Parent relationships back to the parents.
-
Update the individual’s status from Child
to Adult.
You can use the notes to document the reasons for the changes. While it may seem obvious now, it won’t in a couple of weeks,
especially for the next person who views the records.
Process Adult Children Job
Rock ships with a job that updates children to adults automatically, which not only makes things easier for you but also
helps keep the person data in Rock accurate. The job only processes people who have a child role in one or more families,
but also is of an "adult" age. The default adult age in Rock is 18, but you can change this. There are several settings the
job uses to process individuals, which you can manage by navigating to
Tools > Data Integrity > Data Automation | Move Adult Children.
With these settings, the job looks at all the families a person belongs to and their role
in each of those families, then decides whether or not the person should be updated as an adult and/or added to a new family.
You can learn more about jobs and how to configure them in the
Jobs chapter of the
Rock Admin Hero Guide.
Person Notes
You just can’t take too many notes! Documenting key conversations and important
details is vital to the success of your organization. Here are some examples:
- Information on life events like hospitalization of a loved one
- Interest in a specific serving area
- Likes or dislikes (i.e., preferences related to your organization)
- Time and date of phone calls
These notes help the staff to be on the same page and help make an organization of
any size feel small and caring. There are different types of notes:
Types of Notes
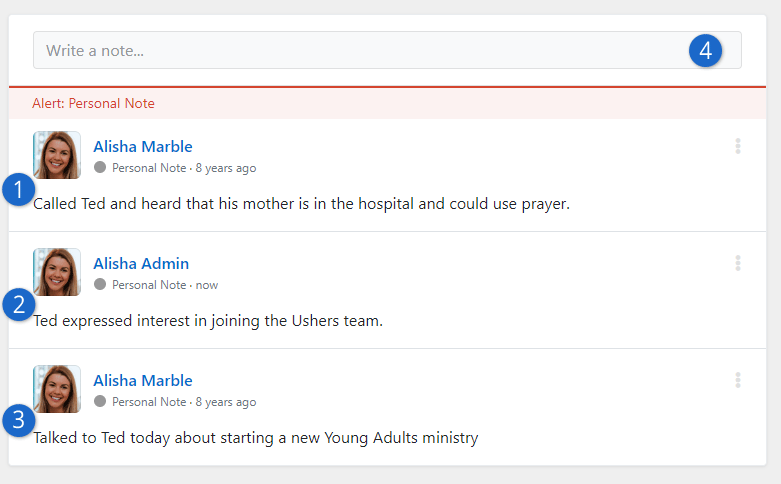
- 1 Alert Note
- Used to alert viewers of very important topics. These note types will always remain
at the top of the list.
- 2 Normal Note
- These are the default note type. They are viewable by anyone who has been given
access to them.
- 3 Private Notes
- These notes are viewable only by the person who entered them.
- 4 Add Note
- Click in this area and start typing to add a new note.
Sometimes you might want to enter a note that only you can see. There are a couple of ways to
do this. The first, and easiest, is to make the note private. When you do this, you’ll be the
only one who can view it. If you would like to share the note with a limited group of people (like
Pastoral Staff), click the
button and enable viewing for only the
Pastoral Staff group.
Note
Because we can't add security to an item before it's been created, the security
icon will only be visible after the note is saved.
Adding A Note
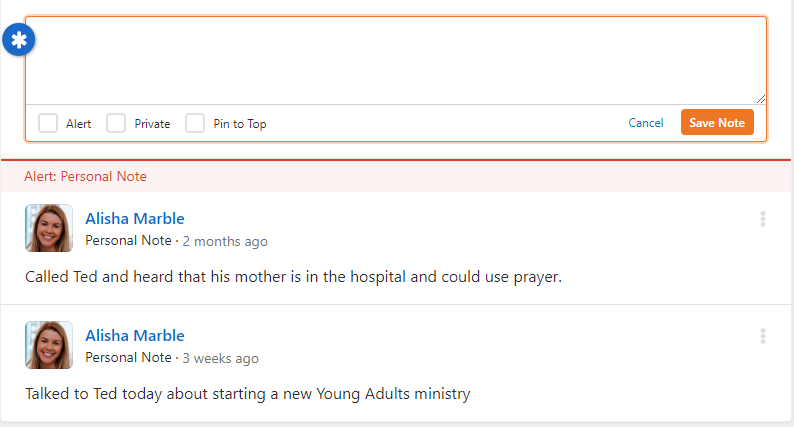
- Editor Window
-
This is where you can enter notes and mark them as Alert or Private. If neither Alert nor Private are
checked, the note can be seen by anyone with security to view person notes. You can also select
Pin to Top to keep the note at
the top of the list.
Sometimes a note is very important, and you want everyone to see it. Checking the
Alert checkbox will keep the note at the
top of the list and highlight it in red. These types of notes can be used to warn staff of a potential issue.
Warning
If you’re creating an alert note, then it’s probably related to unpleasant or sensitive circumstances.
As you consider your wording for an alert, try to be as discreet as possible while still getting your
point across.
We mentioned above that Alert notes
will stay at the top of the list of notes. Below the
Alert notes will be notes marked as
Pin to Top.
If there are multiple Alert, Pin to Top, or regular notes, then the most recent notes will be displayed
first.
Security for Notes
It's important to understand who will be able to see or edit notes. We touched briefly on note
security above, but here is a full breakdown of what you can expect.
- Private: Private notes are only viewable by the creator. No one else, no
matter what their permissions are, can see them.
- Approve: The Approve security verb lets you approve notes. You can
view any notes for which you have Approve permission.
- View: You can view a note if you have View security to the note itself.
You can also view notes you have created or modified in the past. Lastly, you can view a
note if you have rights based off of the Note Type.
- Edit: Edit access gives you rights to add a new note and to edit notes
that you have created. Edit access DOES NOT give you rights to edit notes
that were created by someone else.
- Administrate: Administrate permission will let you edit notes,
including notes you did not create.
Badges
Badges are one of Rock’s most exciting features. As you add more and more information into Rock,
you can quickly become overwhelmed with the amount of data you collect on a person. Badges allow
you to summarize key points of information in a graphical way. This allows you to quickly scan the
page and familiarize yourself with the individual.
Badges come in two forms:
an iconic badge that shows in the Badges block
and a label badge that shows in the Person Bio area.
While they look very different, they share the same configuration and settings.
Note
There may be some confusion about when to add a label to the
Person Bio area
and when to add a new badge. We suggest that if you're categorizing a
person into general groups that you use a label in the bio section. If
you're describing a person’s activity or achievements, then consider a
new badge.
Let’s look at the badges that come pre-configured and the steps to add your own new badges.
Defining a New Badge
You define new badges under
Admin Tools > Settings > General > Badges.
Here you'll see a list of currently configured badges. You can also
choose to create a new badge from this screen.
Badge List
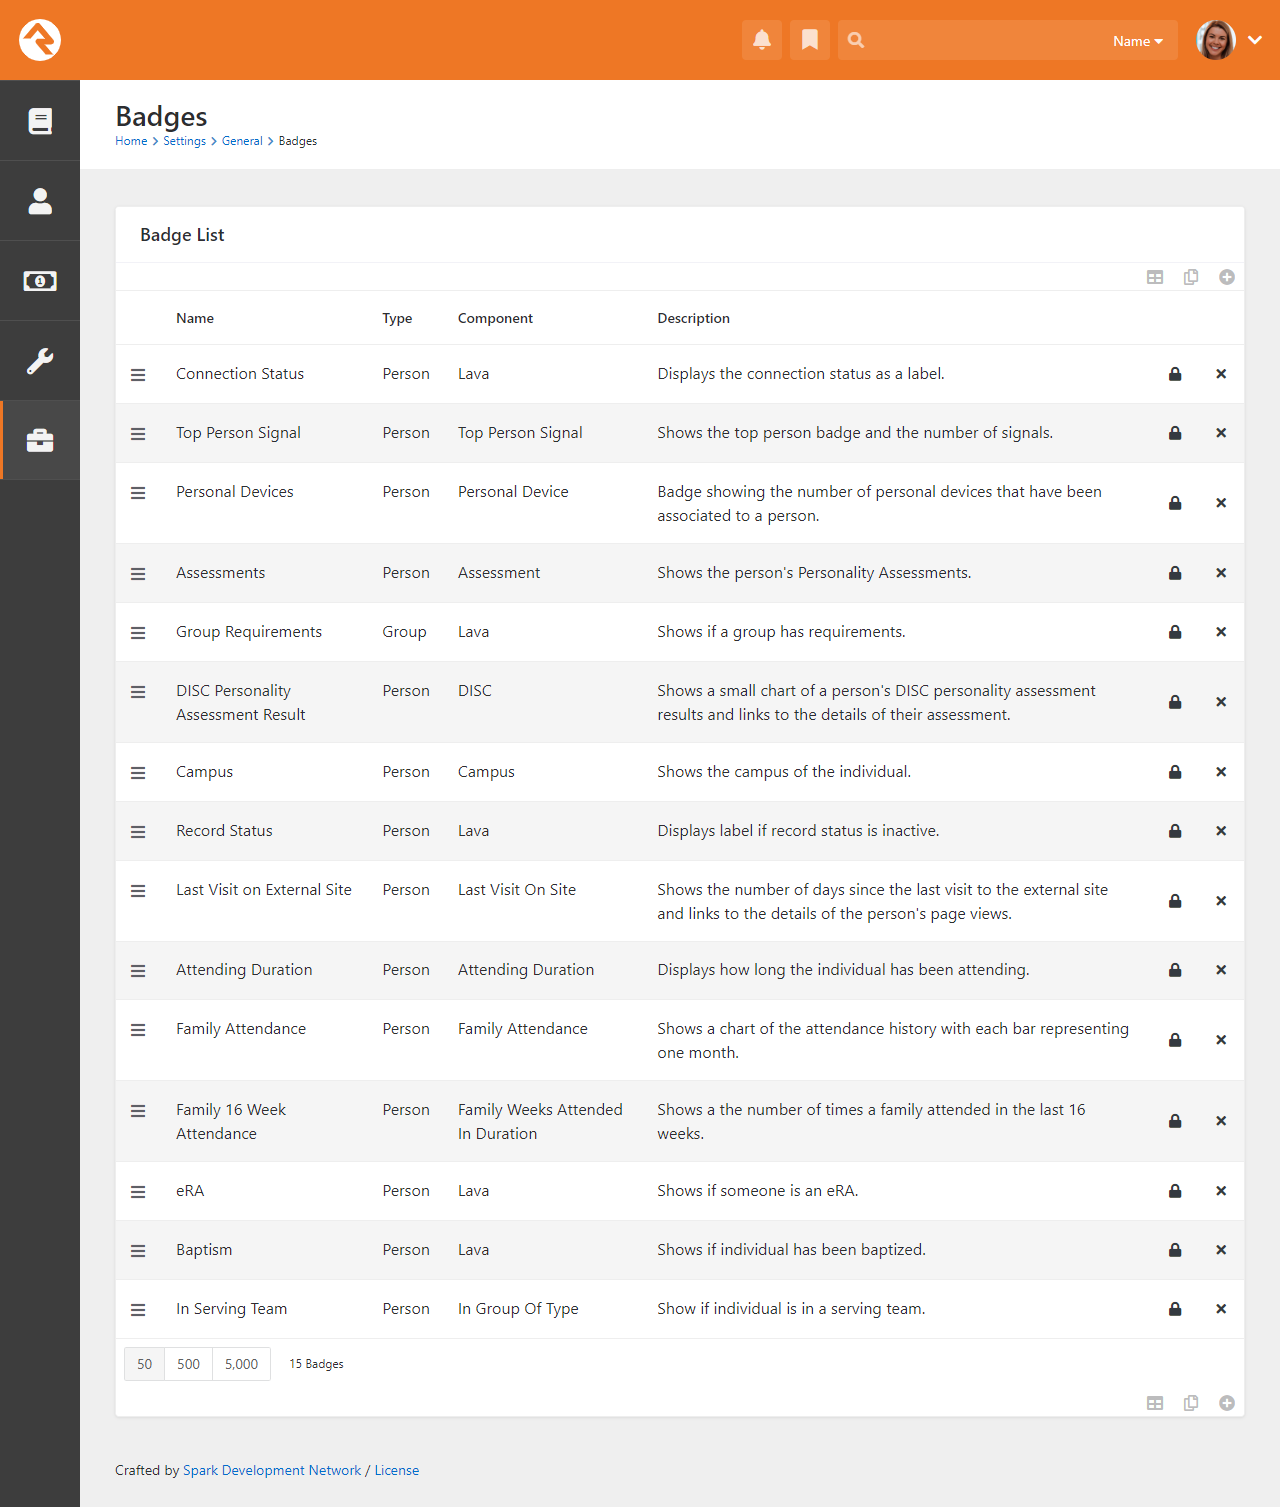 Add Badge
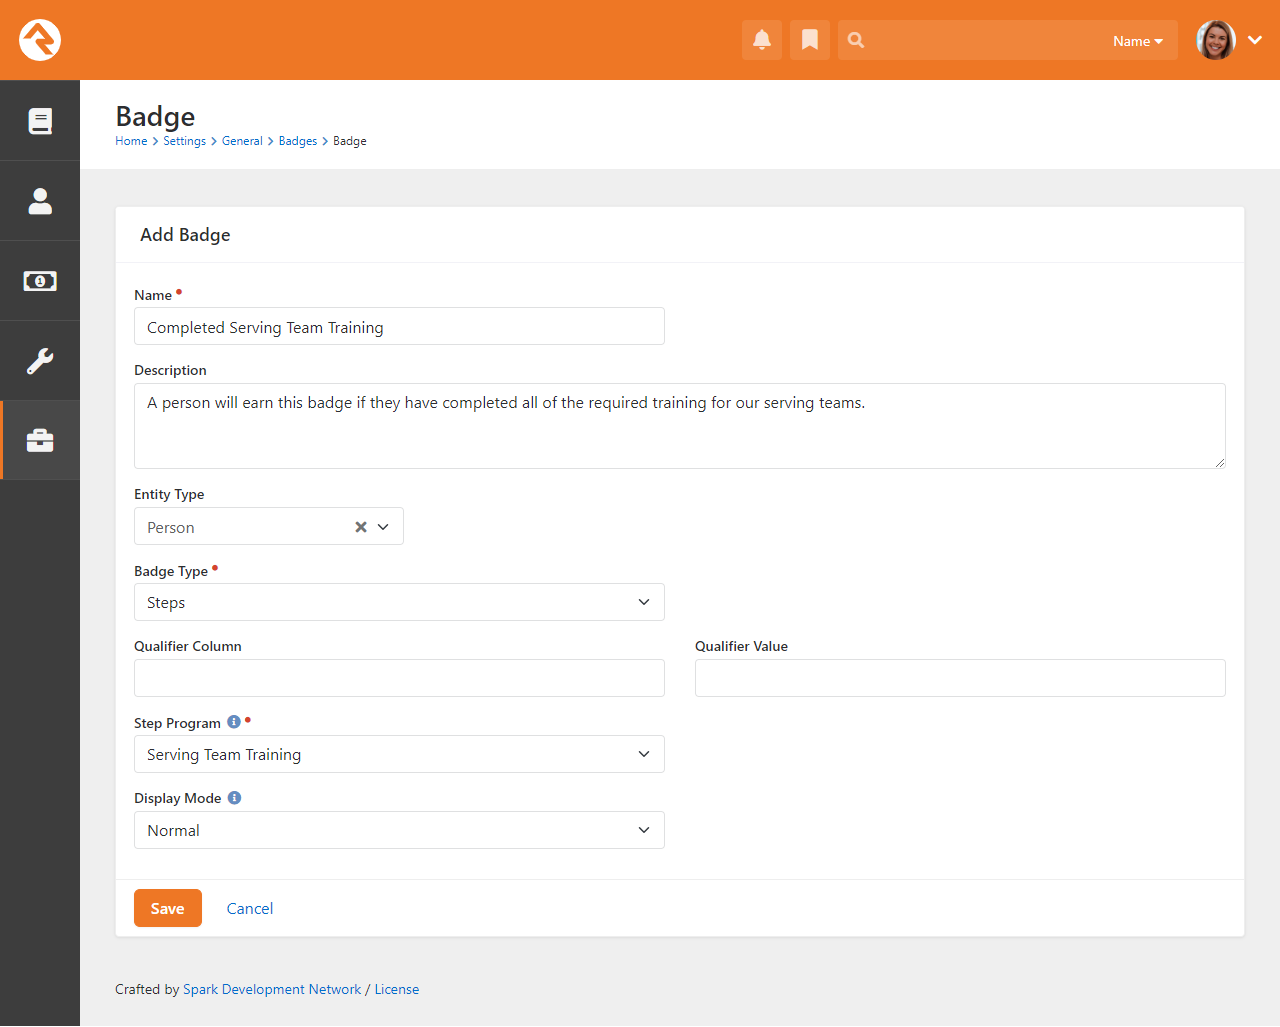
When you add a badge you’ll provide it with a name, description, entity type and badge type. You can choose
to associate the badge with any entity, like a person or a group. The entity type you choose will affect the
badge type options available to you. Some badge types require additional configuration.
Let’s look at each badge type and how it can be used.
Achievement
A badge of this type will be displayed when a person has earned the provided
Achievement Type.
The badge's icon will be the icon configured for the Achievement Type
or will be a generic medal icon if the Achievement Type doesn't have an icon
configured.
Steps
This badge type allows you to display progress in a step program. You can choose which step program to
display and the Display Mode (normal
or condensed) for the badge icons. If you want to learn more about Steps badges, there’s a whole chapter
for them in our
Engagement
manual.
Assessment
This type of badge shows the results of assessments taken through Rock. This badge is pre-installed on
person profiles out of the box.
Streak Engagement
If you have any streak types set up, you can create badges for them. Badges of this type are somewhat
similar to the family attendance badge. This is a great way to quickly and easily show Streak data (in
the form of a bar graph) for a person on the
Person Profile page.
Giving
This badge type will show up when the person has given at least the amount you specify to specified
accounts, within a specific date range. You get to use Lava to determine how the badge looks; by default,
it's an icon type badge.
Attended Group of Type
This badge type will show up when the person has attendance in a group of the type you specify, within a
set date range. You get to use Lava to determine how the badge looks; by default, it displays the same icon
as the group type uses.
In Data View
This badge can be reused any time you have a Person based Data View that contains the people you want to badge.
You provide a Data View, and it will show the
badge if they are included in it. The icon that's used for the badge is whatever you wish because it comes from
whatever HTML or Lava you put into the Badge Content setting. Note that the
Person will be included into the Lava merge
fields so you can use any property of the person in the display logic of your badge.
This badge type can also be used with Groups
or other entities besides Person.
Top Person Signal
A badge of this type will show the top signal that you have stored for the person whose profile you're viewing.
Read more about signals here, but remember that signals are ranked. This badge
will examine all the signals you have for a person and display the highest-ranked one.
Personal Device
A badge of this type will show how many devices are linked to the person and take you to the page you specify
in the badge when it's clicked, so you can see their devices or interactions.
Interaction in Range
A badge of this type will show how many interactions the person had with a specific channel, within a specific
date range. When clicked, it will take you to the page you specify (usually the interactions page for the channel,
but it could also be a report or another page you create) so you can get more information.
This is useful to see how many times someone visited your website in the last month, or how many communication
interactions (received, opened, clicked, etc.) were seen from them in the last week.
Geofenced By Group
The Geofenced By Group badge displays a label
of the group name that has a geo-fence that the individual lives within.
Alert Note
This badge type will show up when a type of note which you specify has been added to the entity and marked as "Alert".
Attending Duration
Like the Campus Badge,
the Attending Duration
is fixed in nature and isn't meant to be re-used.
Campus
The Campus Badge displays a label of the individual's
current campus. There’s not much more it does, so it’s re-use is very limited. The
Campus Badge isn't shown if you only have one campus
in your system.
Family Attendance
This badge drives the 24 Months of Attendance chart.
It also provides several settings to allow you to customize it. For instance, if you find the animation on the bars
distracting, you can disable it. You can also change the duration from the default of 24 to whatever you wish.
Family Weeks Attended In Duration
This badge powers the 16 Week Metric Badge.
It’s probably not that re-usable, but you can change the duration from 16 weeks to whatever value you desire.
In Group Of Type
Unlike the others, this badge type was made to be used often. The
Serving Badge uses this badge type. Here’s
how it works. You provide a Group Type, and it
will show the badge enabled if they are a member of a group of that type or disabled if they aren’t. The icon that’s
used for the badge comes from the Group Type's
"Icon CSS Class". You can also set the color of the icon.
You can use this badge for all types of groups (think Bible Studies, specific classes, etc.)
In Group with Purpose
A badge of this type will show an icon if they are a member of a group with a specific purpose specified. Out of the
box, the most likely purpose you could use this for would be "Serving Area", but since you can create any number of
purposes, you can have a different badge for any of them. You don't even need to know Lava to configure badges of these
types; just specify the icon and the color you want it to have.
Last Visit on Site
This badge type drives the Last Visit on Site badge.
The Last Visit on Site badge displays the number of days
since a person's last visit to a selected site. It’s unlikely that this badge type can be repurposed for any other use, but
you can choose which Site should be tracked and details of which pages were viewed.
Lava Badge
The Lava Badge is the Swiss Army Knife of badges. This
badge takes a Lava template and renders it to the screen. You can learn more about Lava here,
but for now think of it as Microsoft Word’s mail merge feature for web development. The badge takes the data on the entity
and merges it with your template.
Many of the label badges and the Baptism Badge use this
badge type. Feel free to look at their templates to see how they work. You can develop some very powerful badges using this
badge type.
Note
As you create new badges, note the order they appear on the list. Badges will display in this order when you place them on
the Person Profile page.
To learn more about styling badges in Rock, check out our
Rock Badges
styling page.
Adding Badges to The Person Profile Page
Once you've defined a new badge the next step is to add it to the Person Profile
page. From this page click the button
in the Admin Toolbar. This will display a block properties button
for each block on a page. Hover over the badge block and select its
button. Finally, select the badge you wish
to add in the container you want to see it in (e.g., Top Left, Bottom Right), and press Save.
Adding Badge to Person Profile Page
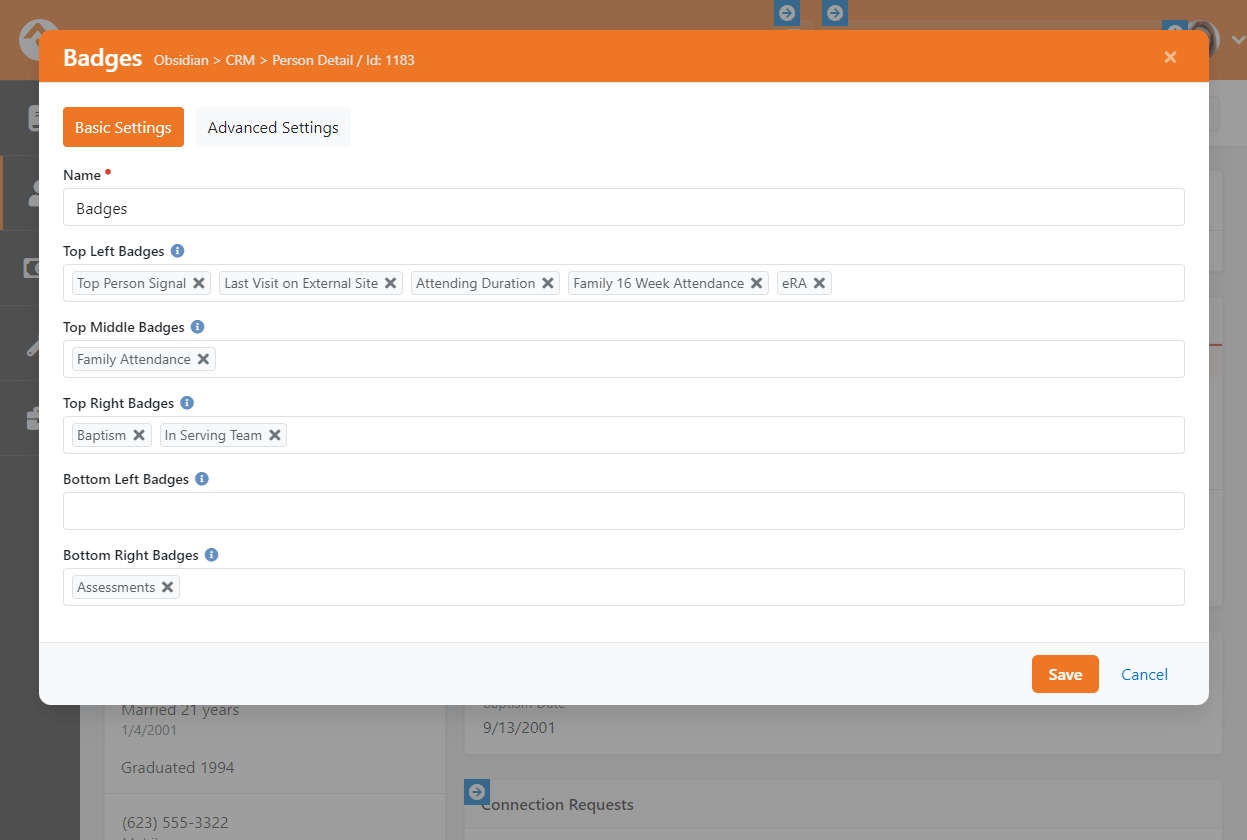
Warning
As you can see, badges are a very powerful way to display useful data about an individual. There is such a thing as too much of a
good thing. Adding too many badges can diminish their value by overwhelming the viewer.
Viewing Badges Using Custom Security Roles
If you create a new security role that should be able to view badges, there's a little extra configuration
you'll need to do for the badges to work properly. Without the right setup in place the person will be able
to see the badge icons, but the icons won't light up as expected.
Navigate to
Admin Tools > Settings > Security > Rest Controllers > Badges
and click the icon to add the new role to each badge that the role should be able to view.
Also don't forget that the person will need permissions for viewing the parts that make up a badge. For instance, a person needs
permission to view the Baptism Date attribute in order for the Baptism badge to appear properly. The person also needs permission
to view the badge itself.
Person Signal Types
Signals are discreet flags that can be assigned to a person to bring attention to a matter. As with most aspects of Rock,
signals are highly customizable. They can be used to flag anything from security concerns to high-level lay leads to anything
and everything in between. Some examples of how your organization might use signals are:
- Safety and Security - to flag someone who shouldn't be around children or on campus.
- Pastoral Care - to bring attention to someone who needs extra or specialized care.
- Administrative Tasks - to alert staff of a missing form or other administrative matter.
Signals differ from tags in that tags are meant only to provide information while signals are meant to prompt you to further
action. They're a quick, visual way of saying, "Hey, there's something here you should know about."
Person Signal Types
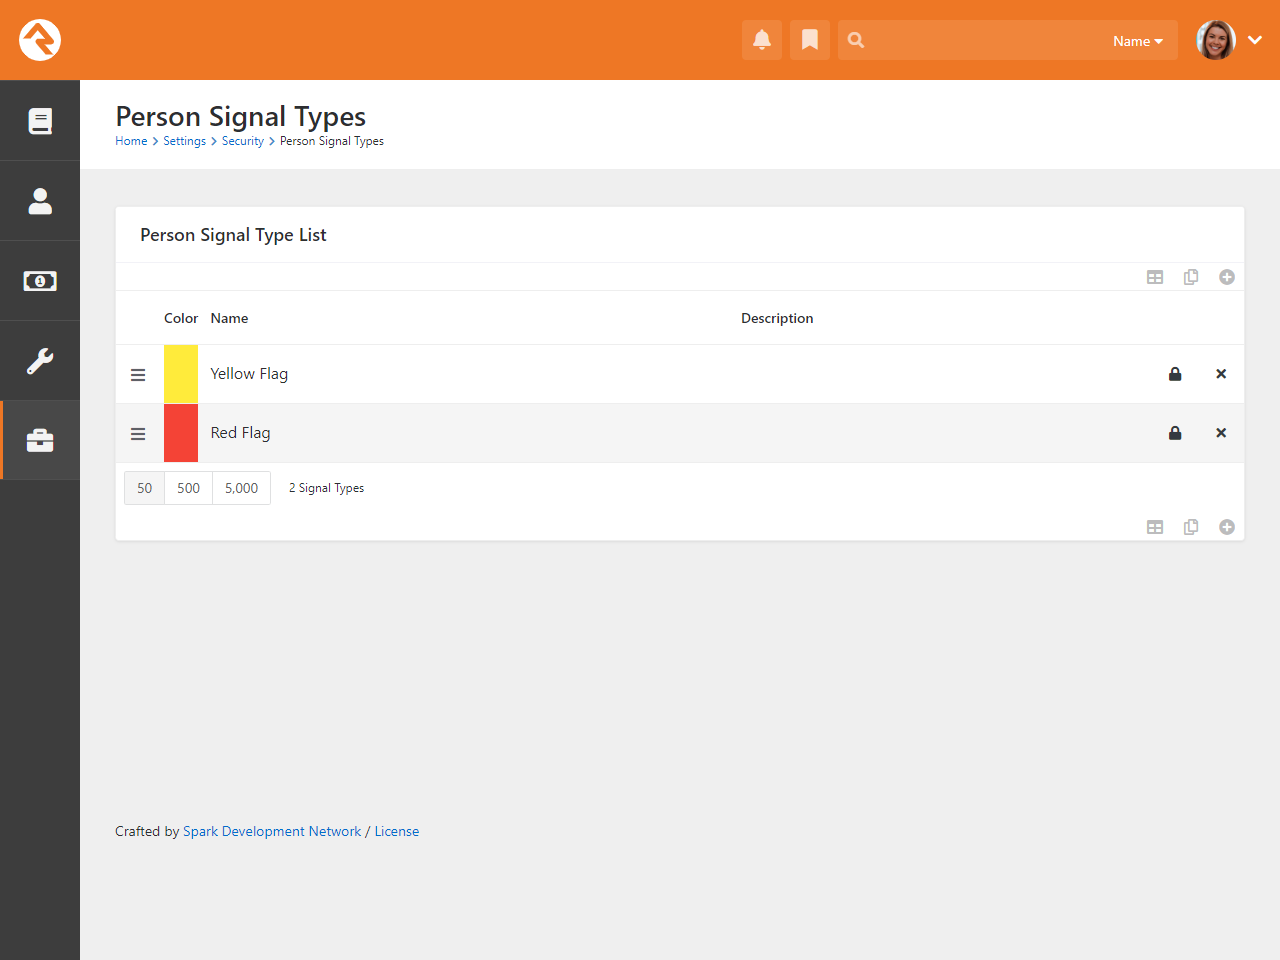
Signals are managed from Admin Tools > Settings > Security > Person Signal Types.
You can create as many signals as you need for your organization, giving each a specific color and icon to differentiate them.
As you set your signals up, keep the following in mind:
-
The list order of the signals in the Person Signal Types screen is important.
The color of the top-most signal is used as the color for the Person Signal Type
badge displayed on the Person Profile page, so it's best to keep the most
important signal types at the top of the list.
-
It's best to use general names for signals. For example, "Safety Team Recommendation" is general without being too vague. This helps to avoid
the problem of labeling people, something that not only isn't kind but could also pose future legal issues. Consider using an appropriate
color and icon for signals as well.
-
Configuring the security settings for each signal type is essential. Signals aren't meant for everyone to see. Likewise,
the information provided on the Person Profile page
(particularly in the tabs subsections) is sensitive and should only be viewed by those with the appropriate security permission.
Note Security
To view Person Signal Type notes, you must have access to the Security tab on the
Person Profile
page and have View access to the Person Signal Type.
Person Signal Types

For individuals, signals are managed on the Security tab of the
Person Profile
page. Each signal has a type, owner, expiration date, and note. The owner is the
person to contact for follow-up details and defaults to the person currently
logged in.
When a person is assigned a signal, a flag-shaped badge appears on their Person Profile
page. The flag's color reflects the highest-priority signal type assigned. The flag also
displays a number indicating the total signals assigned. Hover over the flag to see a list
of the person's signals. A detailed view is available in the Security tab. Signals also
appear on group member lists as an icon of the top-level signal next to the person's name.
Person Signal Type Badge
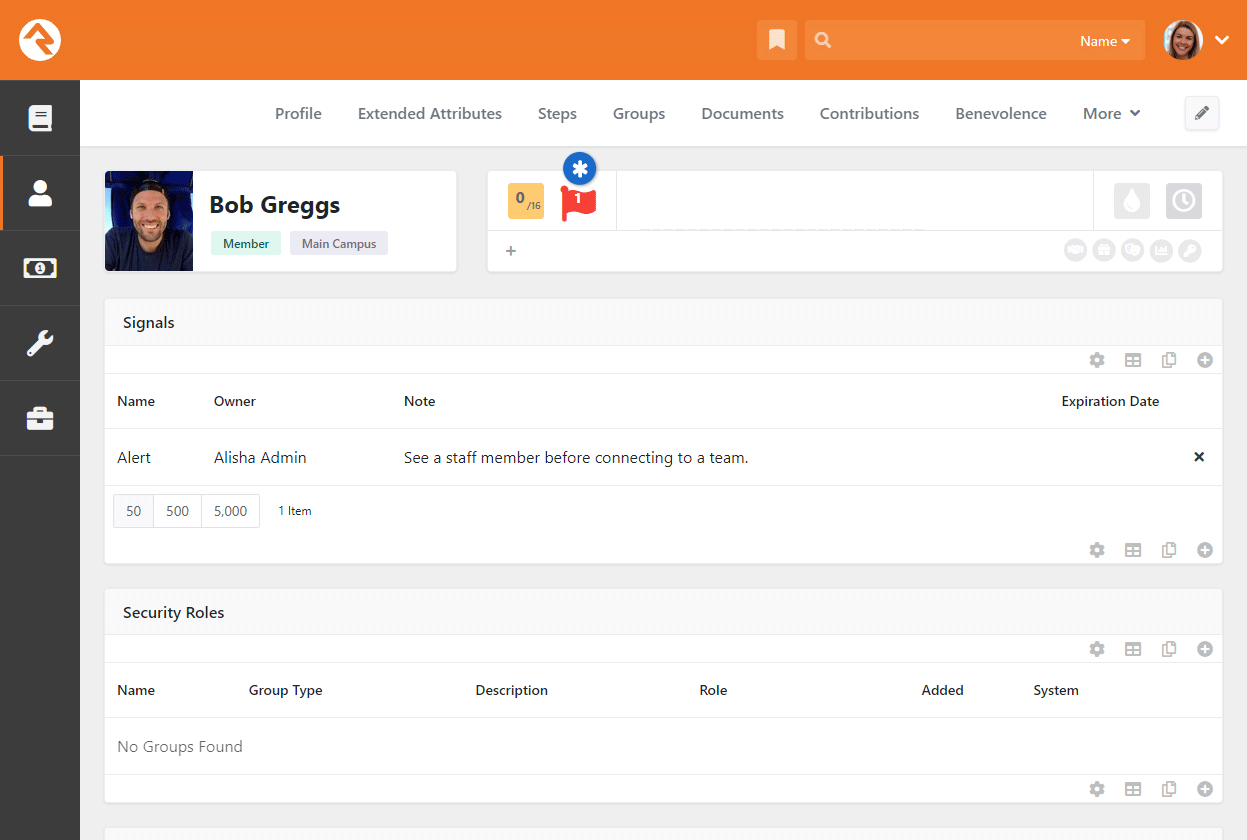
- * Signal Badge
-
The flag here is red because the color associated with this signal is red. If Bob had two signals, and if the
higher-ordered signal was assigned a yellow color, then the flag would be yellow and the number “2” would appear
in the center.
My Pages
My... mine... some of our first words as a child. In Rock, though, the
My Pages aren't a
selfish grab for more, but rather a place where you can retreat to experience a personalized
view of Rock. These pages are found under the login status on the internal site.
Finding My Settings
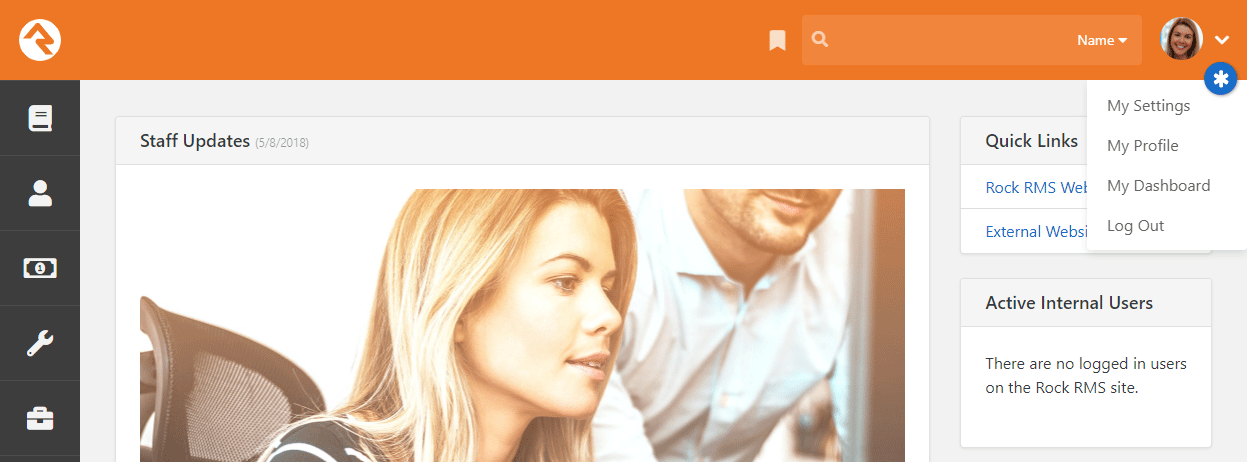
- 1 Photo
-
From here you can access the
My Settings,
My Profile and
My Dashboard
pages. We'll review each one in the sections below.
My Settings
Every person has a My Settings
page on the internal site. This is a place where each person can manage their Rock settings.
Pictured below is a listing of the settings available. Note that many plugins install new pages
here, so your options may appear differently.
My Settings
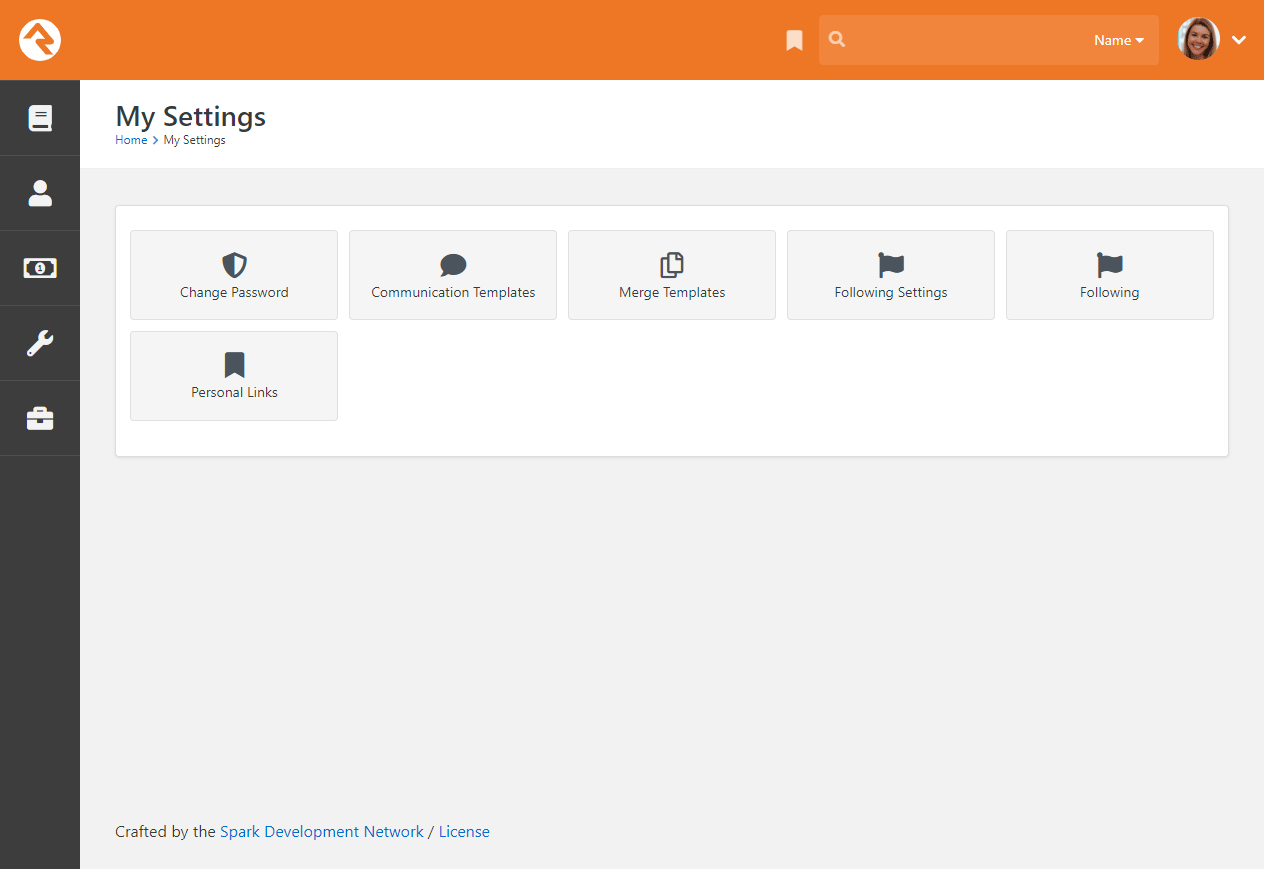
For details on the settings pictured above, see the
Rock Admin Hero Guide.
My Dashboard
My Dashboard is a central location
for you to review all your assignments and open requests, as well as followed groups, items and
suggestions.
My Dashboard
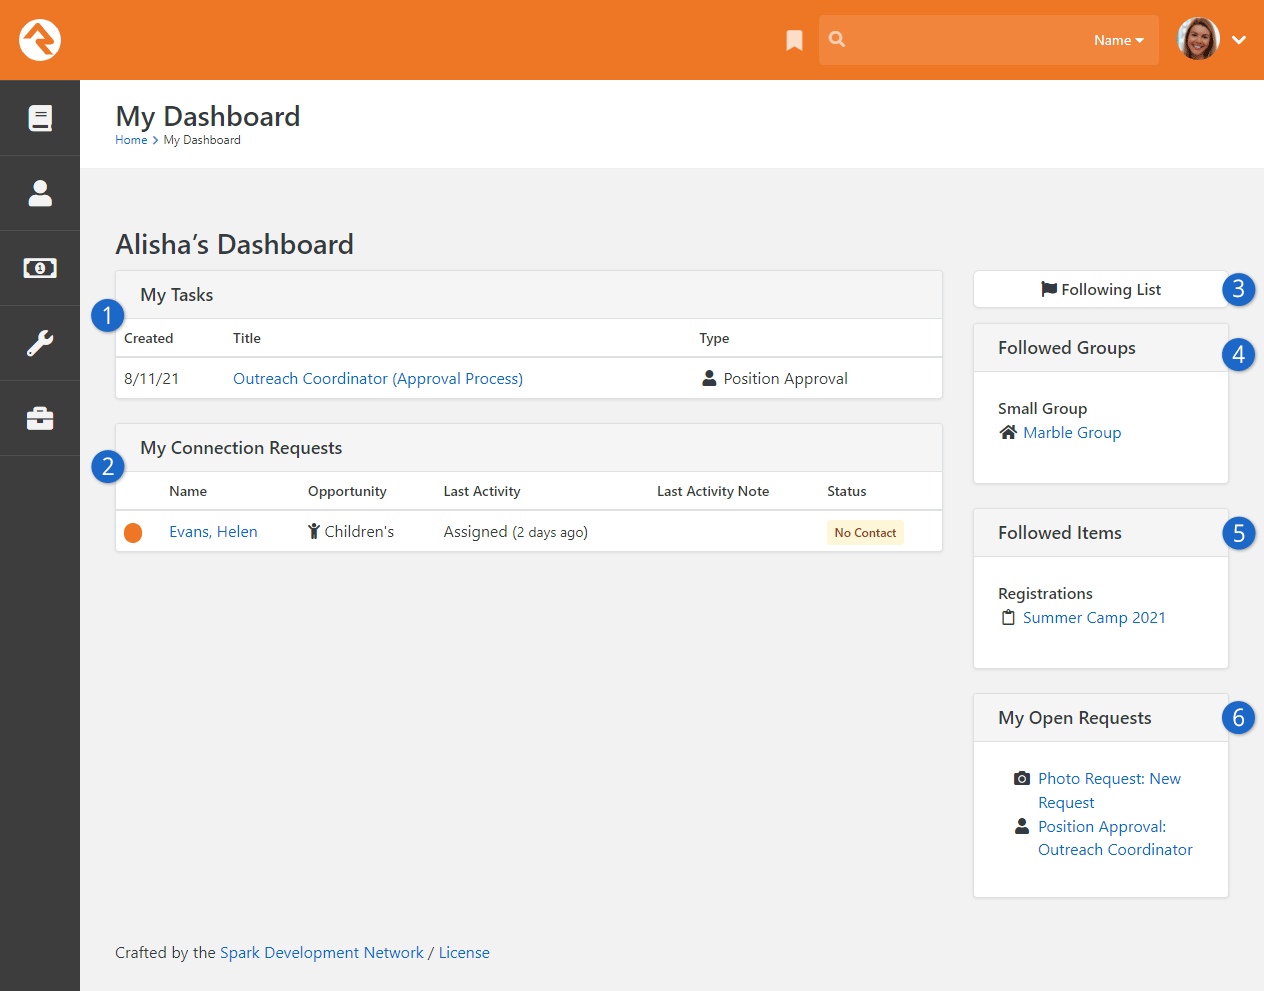
- 1 My Tasks
- This is a list of workflows that are active and currently assigned to you.
- 2 My Connection Requests
- This is a list of connection requests that are active and assigned to you.
- 3 Following List
- Click this button to view or manage the people you’re following.
- 4 Followed Groups
- This is a list of the groups that you're currently following.
- 5 Followed Items
- Rock allows you to follow several types of entities. Here you'll find a list
of all the items you've chosen to follow.
- 6 My Open Requests
- This is a list of open workflows that you've initiated.
My Profile
This is simply a quick link to go directly to your
Person Profile
page.
Personal Links and Quick Returns
Rock’s Personal Links feature makes navigating to your frequently used pages quick and easy. Just
click the bookmark icon next to the search bar at the top of any page in Rock to instantly
access your
Personal Links and
Quick Returns. This feature
also allows administrators to create shared groups of links for individuals in the organization.
Bookmark List
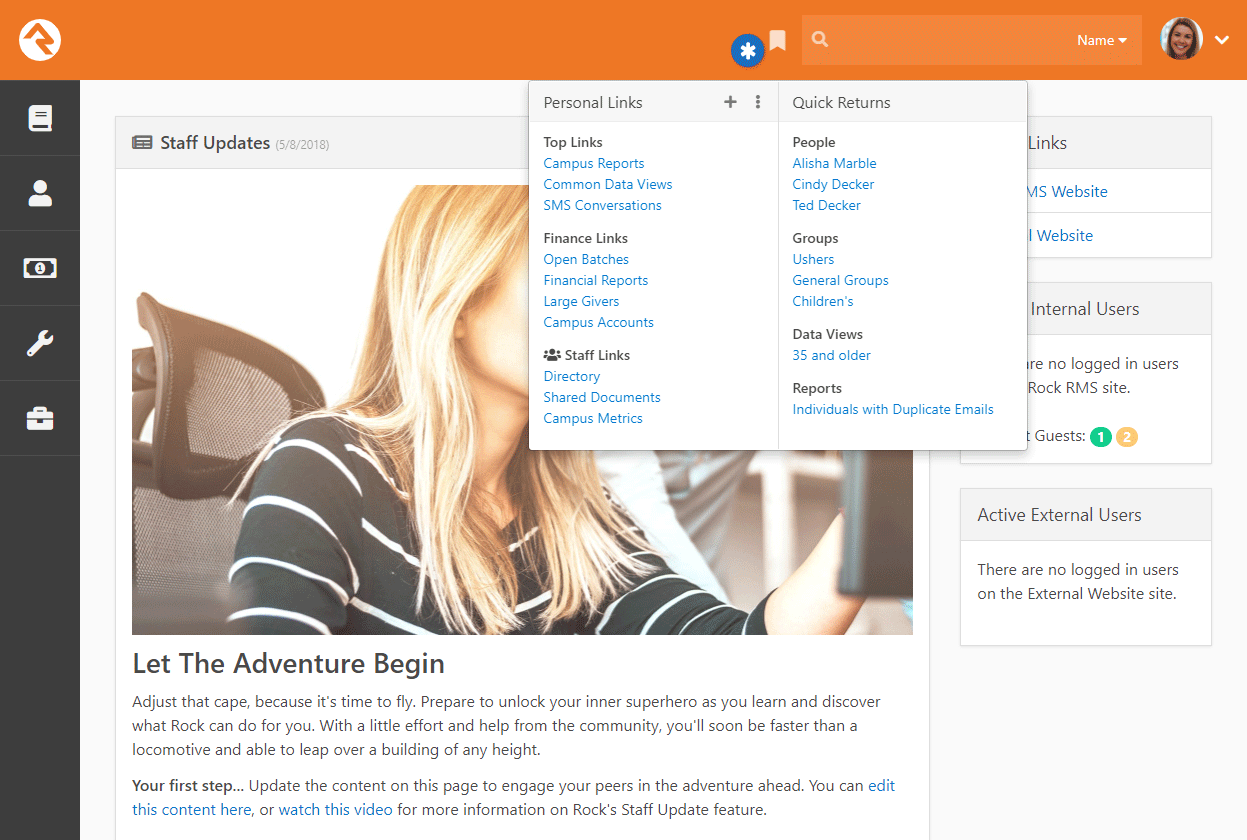
Personal Links are pages
that you’ve bookmarked inside Rock. The links are divided up into sections that you can
name and reorder to your liking.
The Quick Returns are
pages that automatically get bookmarked for you. For instance, viewing a group or a person’s
profile will add it to your list so you can get back to it easily. Items get automatically
added to your Quick Returns from the following pages:
- Person Profile
- Data View Detail
- Report Detail
- Group Detail
- Financial Batch
- Workflow Detail
- Dynamic Data block (if enabled in the block's settings)
Dynamic Data Block
If you have pages with multiple dynamic data blocks on the same page, you might end up
with multiple quick links you wouldn't expect if they all have
Enable Quick Return
enabled. In these cases, it's best to have only one dynamic data block on the page with
Enable Quick Return
enabled.
Quick Returns will keep up
to 20 items from your browsing history. This could be 10 people and 10 groups, or five each of
people, data views, reports and groups, or any other combination that adds up to 20. When you
navigate to a new page the oldest item in the list is removed, so you'll always see a list of
your 20 most recent activities.
Administrators can add new types of pages to
Quick Returns using the
AddQuickReturn Lava
filter.
Also, keep in mind that
Quick Returns
are stored in your browser. If you switch browsers, they will not follow you.
You can add any page in Rock to your
Personal Links. When
you’re on a page you want to bookmark, simply open your
Personal Links
and click the
button, then select
Add Link. The URL of the
page you’re on will automatically get copied to the screen, including any query string
parameters. Feel free to modify this if you'd like.
You can also organize your links into sections. Think of sections as folders for your links.
Adding a section is just like adding a link.
Just click the
button and select
Add Section to add a new
section.
Your links and sections are managed using the
Personal Links page. To access
this page, you can
click the
icon within the
Personal Links
window and select
Manage Links, or you can
navigate to the page by going to the
My Settings page and clicking
Personal Links.
Personal Links Page
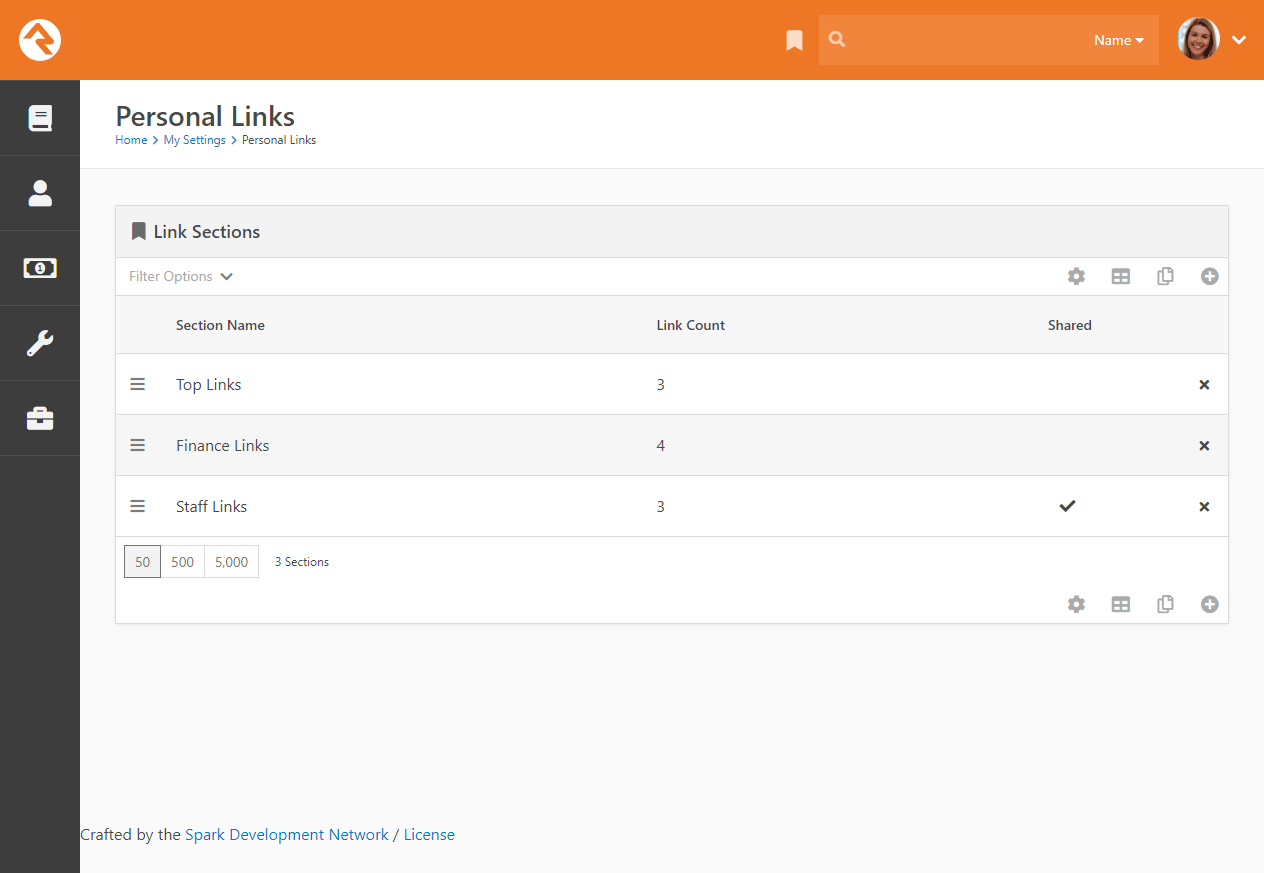
Using the page pictured above you can add new sections, arrange the order of your sections or
view the links within a section by clicking one of the rows.
Personal Links Section Detail
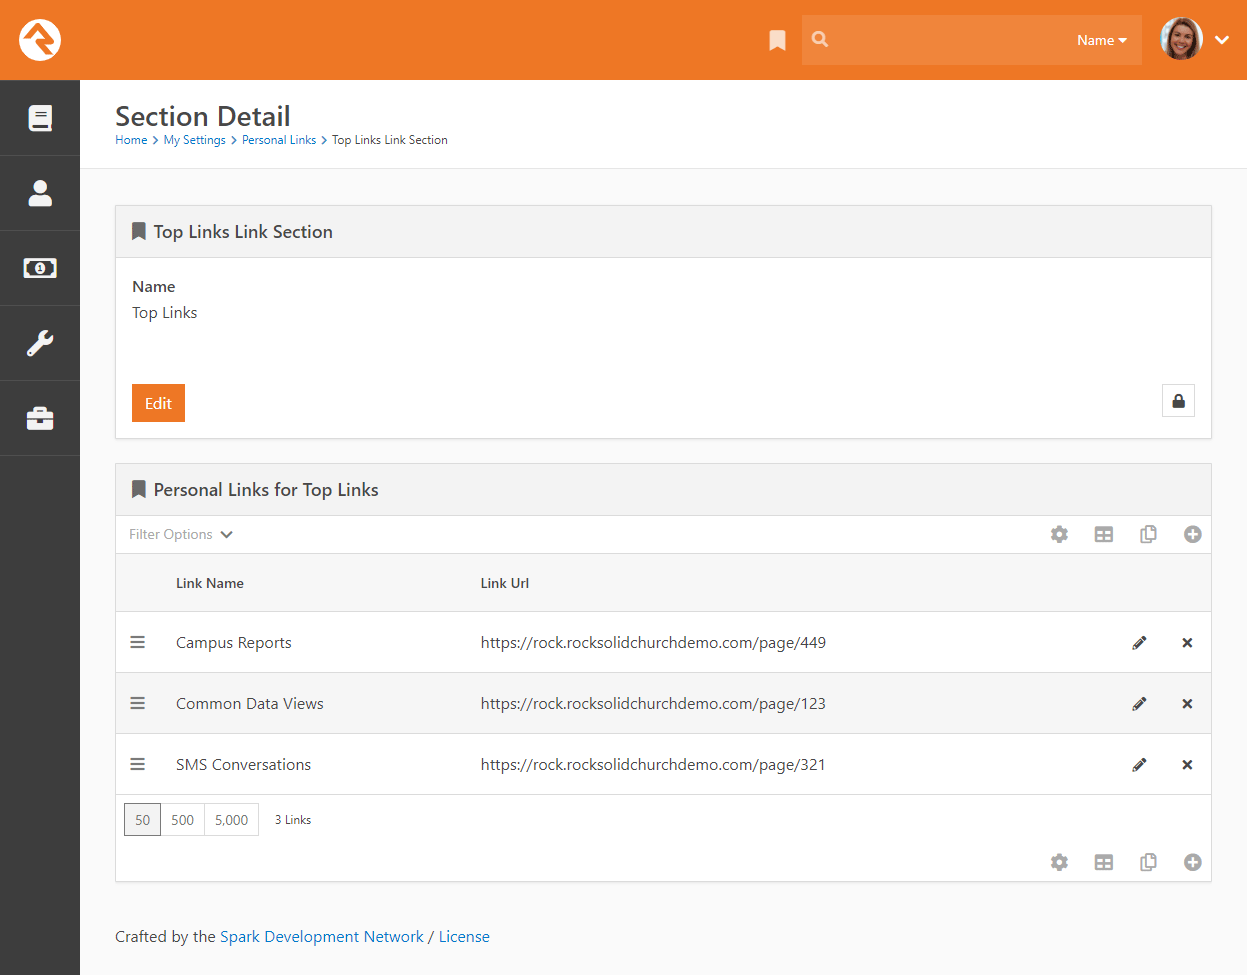
From here you can manage all of your links within a section. You can rearrange their order,
add new links or modify existing links. You can also
Edit the section to change
its name.
Shared Links
Administrators have access to similar pages for managing
Shared Links. These
are links which are shared with others in the organization and will appear in people’s
bookmark list. Shared sections will have a icon next to them,
to distinguish them from sections you’ve created for your own use.
Shared links can be managed by navigating to
Admin Tools > Settings > CMS > Shared Links.
Shared sections and links work the same way as personal sections and links, with the same
options available for managing them or adding new ones.
Shared Links
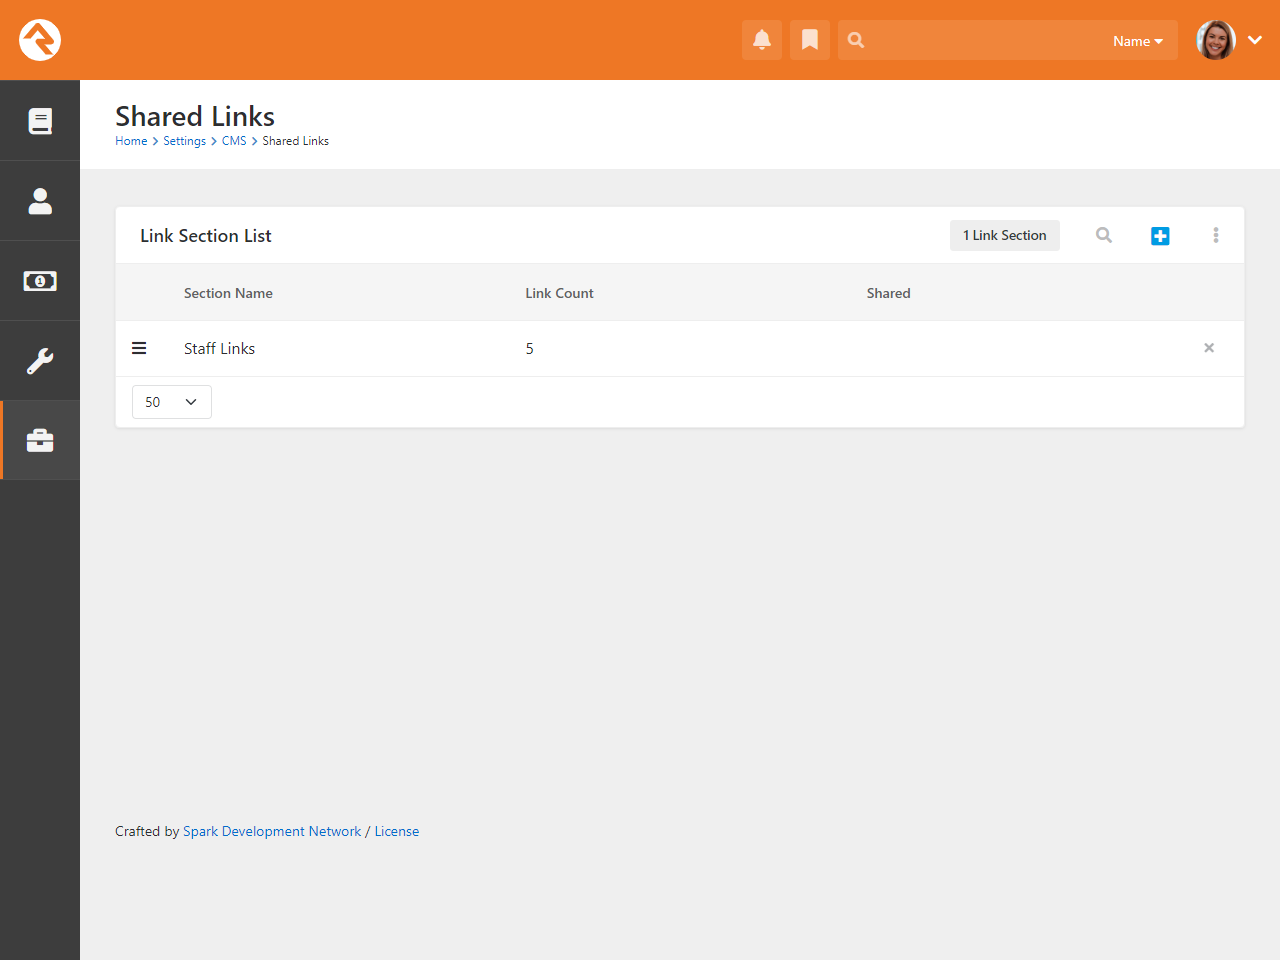
Using security, administrators can manage who can see each section. This allows you to
personalize who can see the links based on roles within your organization. Keep in mind
that this works at the section level, not for individual links.
Configuring a Person
As you’ve seen, there are a lot of ways you can describe an individual in Rock. However, there
are still a few more configuration options available for you to extend. Below we’ll walk through
some of these additional settings on a person. Generally, these options are accessed by clicking the
icon
in the Person Profile page.
Note
Each of these settings is a
Defined Type.
You can add new values for each of these items by editing their
Defined Values.
See the
Rock Admin Hero Guide
for more on working with
Defined Types.
Connection Status
The Connection Status helps categorize
a person’s relationship to your organization. While many organizations will want to modify these options,
the following statuses are available immediately after installation.
| Status |
Typical Usage |
| Member |
This individual has completed all requirements established by
your organization to become a member.
|
| Attendee |
While not a member, this person is a consistently active
participant in your organization’s services and/or events.
|
| Visitor |
This status is used when a person first enters through your
first-time visitor process. As they continue to attend, they
will become an attendee and possibly a member.
|
| Participant |
A participant is indirectly involved with your organization.
For example, if a family is part of a church’s youth sports
program but doesn't attend that church, they would be entered
into Rock as participants.
|
| Prospect |
Prospect is the default status given to any record that's
added from the website. Watch out for duplicate records with
these!
|
It's up to your organization to determine the needed connection statuses. These
statuses can be modified by an administrator under
Admin Tools > Settings > General > Defined Types > Connection Status.
Record Types
Record types help Rock add some capabilities to track certain types of entities
within the database. There are five record types included after the install:
- Person: A person record
- Business: A business record
- RestUser: A Rest User (API)
- Nameless Person: An unknown person (see
Nameless People)
- Anonymous Visitor: A visitor to your website who is not known. This is used with Rock's
Personalization
features.
For the most part, it won’t make sense to add additional types unless you’re
adding new functionality by writing plugins.
Record Status
The record status gives you an idea of the state of the relationship
between your organization and the individual. Each option included by
Rock is discussed below:
- Active: Denotes an individual who is actively
participating in the activities or services of the organization.
- Inactive: Represents a person who is no longer
participating in the activities or services of the organization.
- Pending: Is used by the system to mark a record
that needs to be verified before becoming active. This state is often
used when someone registers online, to allow a staff person to confirm
the new individual and check that it isn't a duplicate record.
You can add your own record statuses but realize that some of the features of
Rock assume that the values provided have a certain meaning. Consider using
connection statuses rather than record statuses if you need to track a person’s
status in a more detailed way.
Making a Person Inactive
In most cases, when you make a person inactive, they will automatically become
inactive inside any groups unless the group isn't configured to remove people
who are inactivated in the system.
Inactive Reasons
When someone is marked with the Record Status
of "Inactive" it’s a good idea to determine the reason. The system comes configured with the following reasons.
- No Longer Attending
- No Activity
- Moved
- Deceased
- Does not attend with family
It’s simple to add more, so by all means feel free to add your own.
Marital Status
You also have the option of adding additional martial statuses to Rock.
The defaults are:
- Single
- Married
- Unknown
- Divorced
Hopefully these cover it, but if not, then adding them is easy.
Phone Types
We’ve chosen to release Rock with a limited number of phone type options,
allowing you to add others that make sense to you. The default values are:
Titles
The following titles are available in Rock: Mr., Mrs., Ms., Miss, Dr.,
Rev. and Cpt. Feel free to add more to your liking.
Suffixes
The following suffixes are available: Jr., Sr., Ph.D., II, III, IV, V and VI.
Should you have a VII or VIII, you can add them yourself.
Person Attributes
Person attributes are a fundamental strength of Rock, so let’s spend some time
unpacking this feature.
When to Use Person Attributes
Person attributes should be used any time you want to store the characteristics
of an individual. There are a couple of situations when a person attribute
may not be the best fit though. Ask yourself these questions before you
add a new attribute:
- Is there already a common person element or person attribute that exists? You’d be surprised how many
duplicate attributes get created.
- Is the attribute related to a specific group? If so, consider making it a group member attribute
instead.
- Is this attribute really needed? While there are many interesting things you could track about an individual,
you should ask yourself if the data item is helpful to your mission. You don’t want to get overwhelmed with the
number of attributes you create.
- Will I be able to keep this attribute accurate going forward? If the value of the attribute changes over time you
should ask yourself if you’ll be able to keep it updated. Inaccurate data is often worse than no data at all. For
instance, tracking a child’s height might be interesting but impossible to keep accurate. Even if it’s accurate,
there’s no way for a person to verify it.
Managing Person Attributes
Person attributes are managed from
Admin Tools > Settings > Person Attributes.
Each element of the person attribute is discussed in detail below.
Person Attribute Edit
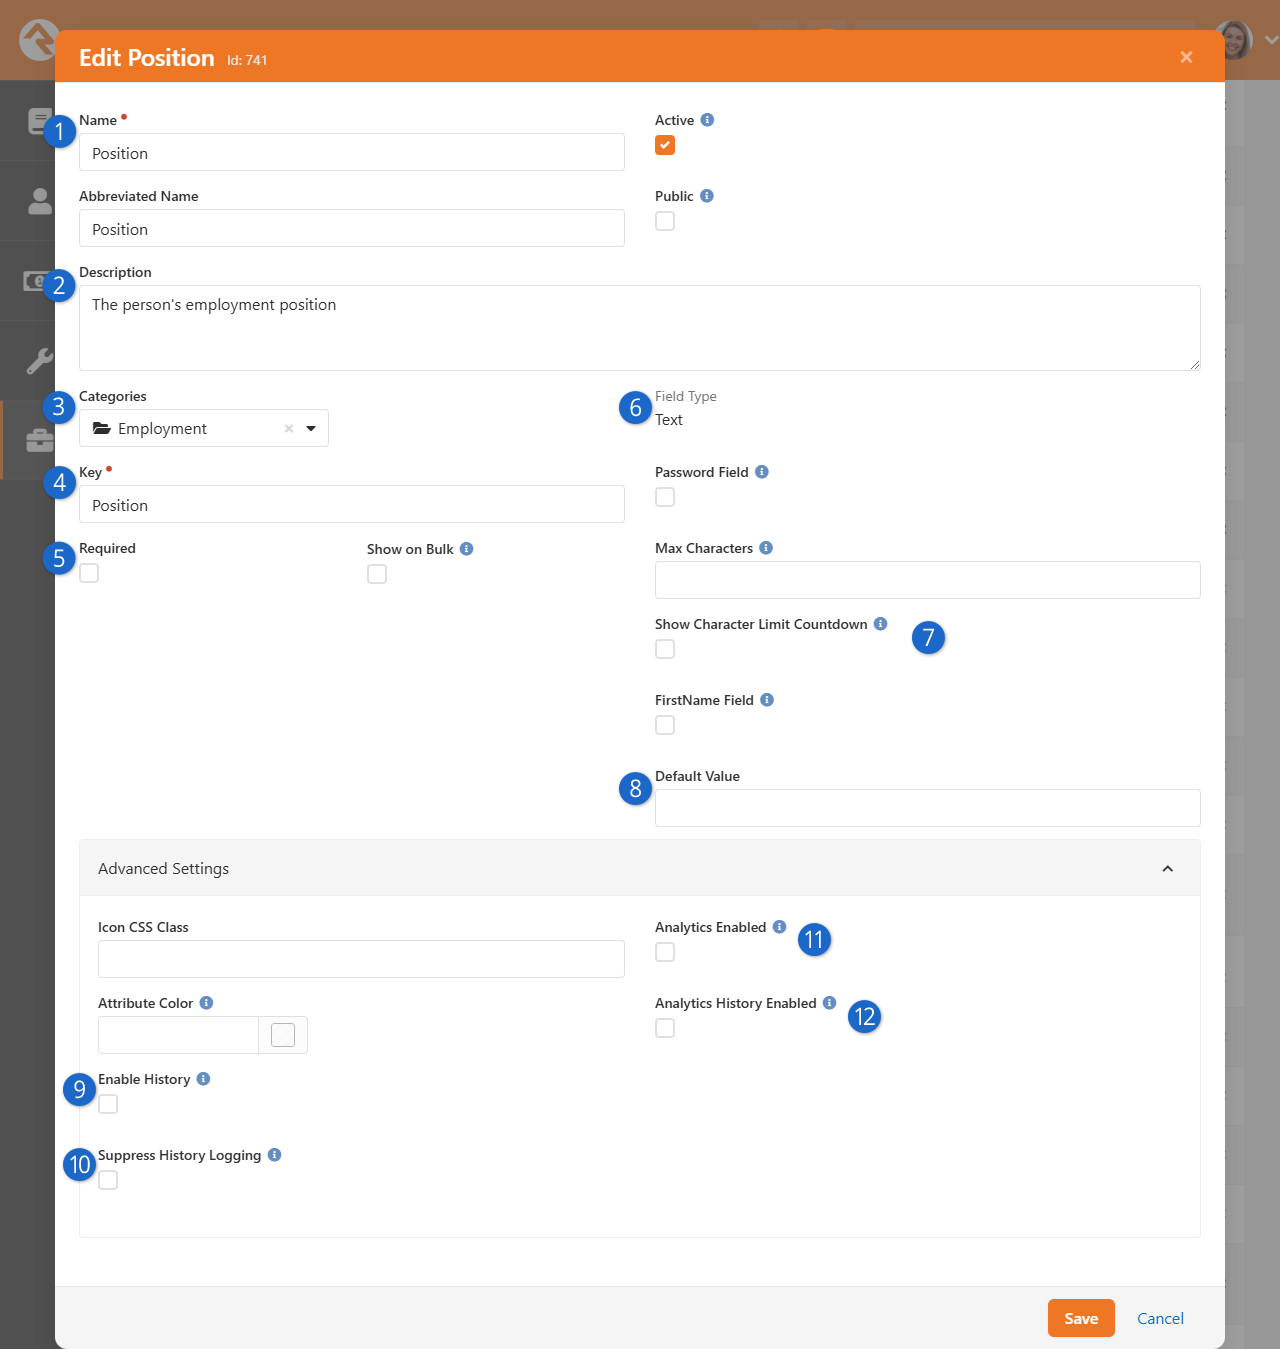
- 1 Name
- The name of the person attribute. This will be used as the label when displaying the value.
- 2 Description
- While many people might skip over the description thinking that the name is obvious, we encourage
you to spend a moment to enter a thoughtful description of the person attribute. What’s obvious to you
now may not be clear to you, or others, in the future. You might define what it means to your
organization.
Sample: Baptized Here tells us that the individual was baptized at our organization and not by a previous church.
Example Description 1: This value is updated by the baptism coordinator after the baptism record card is received.
Example Description 2: This value is updated by the system once the individual is marked completed in a baptism workflow.
- 3 Categories
- While person attributes should be created wisely and purposefully, over time it’s likely your list
will grow to be very long. To help with this, you can categorize attributes into groups. This allows
you to manage groups of attributes instead of individual attributes. A person attribute can be in more
than one category, allowing it to be displayed in multiple areas while maintaining a consistent value.
- 4 Key
- For the most part, you don’t have to worry about the attribute’s key. A default value is created for you
based on how you name the attribute. The key is more for developers who might wish to override the default.
(You know how developers can be.)
- 5 Required
- Yep, you guessed it. You can require that certain attributes be completed whenever a person is edited.
- 6 Field Type
- OK, this is where it gets fun. Rock allows attributes to store different types of data. You get to tell
the system what type to use for your attribute. This determines what options exist for an attribute’s value.
For example, let’s say you want your person attribute to track which foreign languages a person can speak.
You wouldn’t want to pick a Field Type
of “Date” because a date wouldn’t tell you anything about languages. Instead, a field type like “Defined
Value” or “Multi-Select” would be better for tracking spoken languages.
See below for a list of common field types and how they're used.
- 7 Attribute Settings
- What you see in this area will change based on the
Field Type that's been selected.
In this example we see options like "Password Field" and "FirstName Field" which only
appear for Text attributes.
- 8 Default Value
- Most field types allow you to enter a default value that should be used when no specific value is provided.
- 9 Enable History
- If this is enabled, changes to the attribute's value will be written to the
AttributeValueHistorical
table in Rock. This table tracks changes to attribute values by storing the previous values and the current value. If
you're not sure about this piece don't worry, it's turned off by default and doesn't impact your attribute whether
it's enabled or not.
- 10 Suppress History Logging
- By default, Rock records changes to attribute values (along with other system changes) in the
History
table. You can view this information on the Person Profile
page in the "Person History" section under the History
tab. If an attribute value changes frequently, though, you’ll see a high volume of Person History entries. This is
often the main reason for suppressing history logging.
- 11 Analytics Enabled
- This one applies to Business Intelligence (BI) reporting, which we cover in the
Business Intelligence manual.
If it's enabled, this attribute and its value will be tracked on Person
Analytics tables (aka BI models). Specifically,
tables like
AnalyticsDimPersonCurrent and AnalyticsDimPersonHistorical will store the
attribute's value. If you're not reporting from BI tables, this setting can be ignored.
- 12 Analytics History Enabled
- This is directly related to the Analytics Enabled
setting above. In fact, this does nothing unless Analytics Enabled
is also checked. Enabling analytics history will add historical rows to the
AnalyticsSourcePersonHistorical and
AnalyticsDimPersonHistorical BI tables. This allows you to track changes to attribute values over time in BI reporting.
You can learn more about these types of tables in the
Business Intelligence manual.
As promised, let’s take a look at some attribute Field Type
values and see how they can be used.
| Field Type |
Description |
| Boolean |
That’s just a fancy term for True/False. Use this for situations
where the options are Yes or No, Done or Not Done. For
instance, the Baptized Here
attribute that comes with Rock is a Boolean. You were either
baptized here or you weren’t.
|
| Campus |
Don’t use this to denote which campus someone attends. There's
already a common element for that. Instead, this might be
used to track which campus someone started attending or where
they were baptized. Each of these could be different than
their current campus selection.
|
| Campuses |
This allows you to pick several campuses as the value of the
attribute. Perhaps you could use this to track every campus
they have ever attended.
|
| Date |
You can probably guess what this does and how to use it.
|
| Date Range |
Tracks a start and end date.
|
| Decimal |
Stores a number with a fractional value.
|
| Defined Value |
Defined values are reusable lists of valid values.
Marital Status,
Phone Type and
Record Status
are all examples of defined value lists. You can use any of the pre-defined
defined types or create your own. You can read more about
defined types/values in the
Rock Admin Hero Guide.
|
| File |
Allows you to upload a document into the person attribute.
This is helpful for storing scanned copies of signed
membership covenants or other documents you want to keep on
hand. If you think you’ll be uploading a lot of documents of
a specific type, you might consider adding a new
File Type.
You can read more about this in the
Rock Admin Hero Guide.
When considering storing files in Rock keep in mind the
storage implications of the files you’ll be adding to the
system.
|
| HTML |
Allows you to store a fragment of HTML that's specific to
the person attribute. While this is uncommon, it's useful
in some cases.
|
| Integer |
Stores a whole number (no fractions or decimals).
|
| Memo |
A larger text field for entering multiple lines of text.
|
| Multi-Select |
Allows you to specify a list of values that multiple items can
be selected from. You define the list of values by passing in
a comma-separated list of items (Red, Blue, Green).
You can also choose to store a separate value than the label
by using the notation Value^Text
(1^Red, 2^Blue, 3^Green). The items will be displayed as a
checkbox list.
|
| Person |
Allows you to tie the person attribute to a specific person.
Be sure to consider using known relationships before adding a
person attribute with a field type of Person
as they are often a better solution.
|
| Single Select |
Are very similar to the multi-select field type but only allow
a single value to be selected. The single select field type has
the added option of displaying the list as either a radio list
or dropdown select.
|
| Text |
A simple single line of text.
|
| Time |
Allows for the entry of time to a person attribute.
|
The field types above are the most common for person attributes, but others exist that we don’t cover in this guide.
The other types may be useful in certain edge cases, but the ones detailed above should be all you need for most
scenarios.
Securing Person Attributes
The list of person attributes on the screen above also gives you the ability to
secure person attributes so only a limited number of people can view and/or
edit them.
Note
By default, All Users
can view an attribute, but only Administrators
can edit them.
Displaying Person Attributes
Person attributes can be viewed and edited from any tab on the
Person Profile
page. This is done by adding the Attribute Values
block to a zone and setting it to display a specific category of person
attributes. This is very flexible because a person attribute can belong to
more than one category.
To add a new block to a zone, use the Admin Toolbar
at the bottom of the page. There you'll use the
to bring up the
Zone Editor which will allow you to add a new
block. For more information on the content management features of Rock be sure to see
Designing and Building Websites Using Rock.
Tip
Don’t limit yourself to adding
Attribute Value
blocks to only the Extended Attributes
page. These blocks can be added under any of the tabs on the
Person Profile page.
Public Person Attributes
While it’s useful for your staff to see and edit person attributes from the
Person Profile page, sometimes you may want to let
people update their own attributes. For example, if you need to ask questions of people who are interested in
serving, you can create person attributes for these questions and then use the
Person Attribute Forms block on your external
Rock site to prompt people for the answers to those questions. This block can be used to display any combination of
person attributes and allows the person who’s logged in to fill out their own values. See the Adding Content to Rock
section in the
Designing and Building Websites Using Rock
book for more details on that process.
Basic Usage
Once you’ve added the Person Attribute Forms
block to a page, you can configure the forms and fields for it to display. Think of forms as pages that a person
will navigate between using Next and
Previous buttons. The fields are the person
attributes to display on each form. Open the block's edit page to create the forms and select the fields. You can
give each form a title to be displayed, and optionally add any header or footer HTML content to each form.
Person Attribute Forms Settings
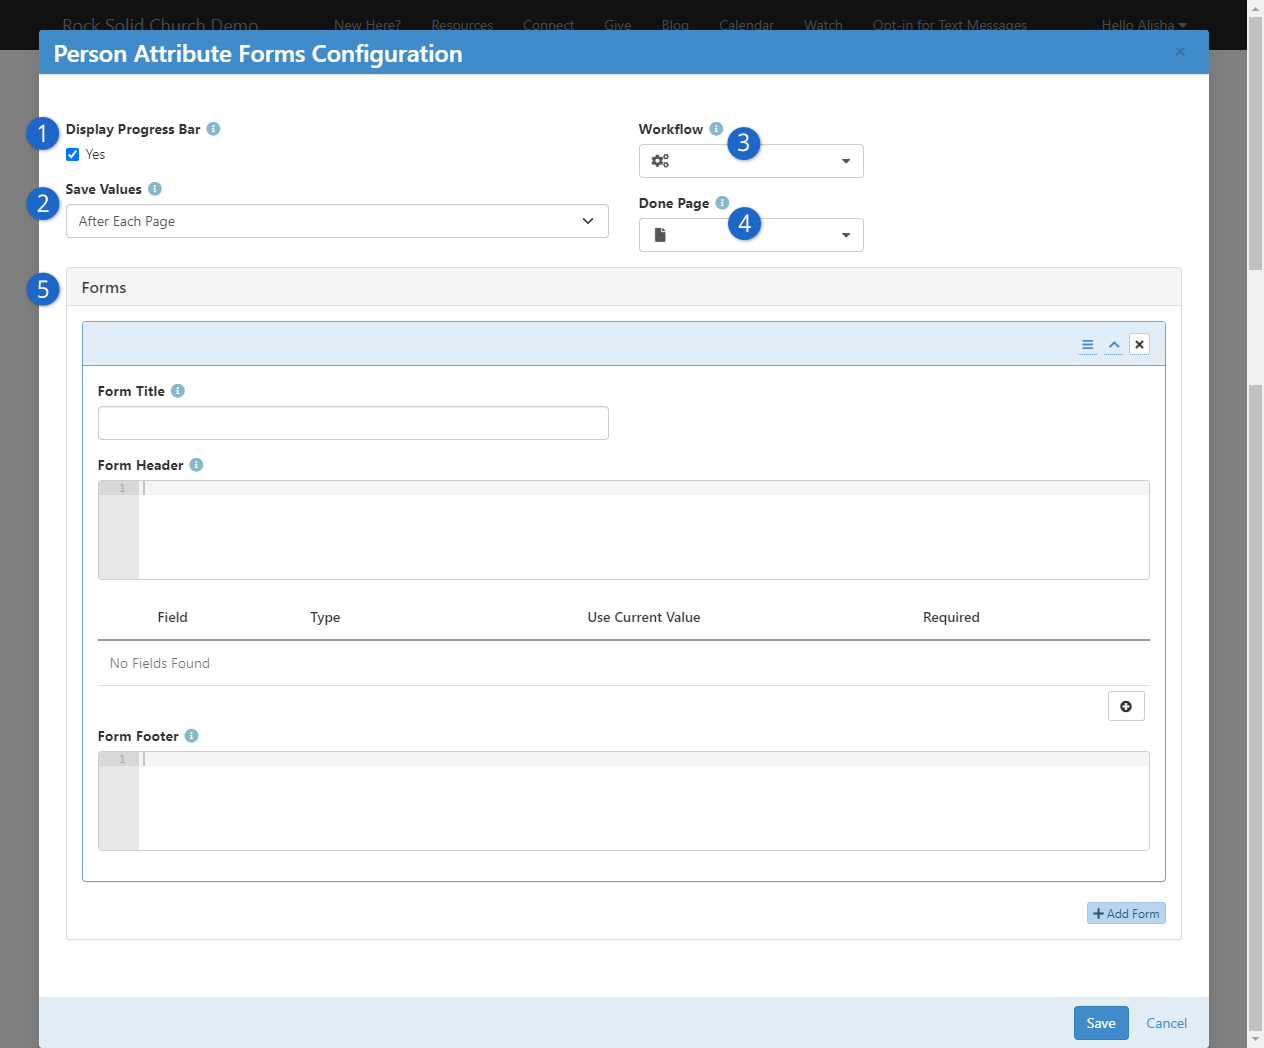
- 1 Display Progress Bar
- If you are going to configure this block with multiple forms, you can optionally have a progress bar
displayed at the top of each page that gives a visual indication to the individual on how far along they
are in filling out the forms.
- 2 Save Values
- This determines when the values for each field are saved. They can either be saved after each page
(when the person clicks Next) or at the
end of all the forms (when the person clicks Finish).
- 3 Workflow
- You can configure the block to automatically launch a workflow after the individual has filled out all the
forms. For example, you may want to launch a workflow that sends a notification to a staff member,
and/or perhaps sends a thank you email to the person who filled out the form.
- 4 Done Page
- In addition to sending a workflow, you can also pick another page on your website that people should be
sent to after they have filled out all the forms. This could be a page that has an HTML block with a
thank you message.
- 5 Forms
- One form is added by default, but you can add additional forms by clicking the
Add Form button
at the bottom. To add Fields to a form, click the
button. This will display the
Form Field dialog.
When adding a field to a form, there are several options for each field that can be set.
Field Settings
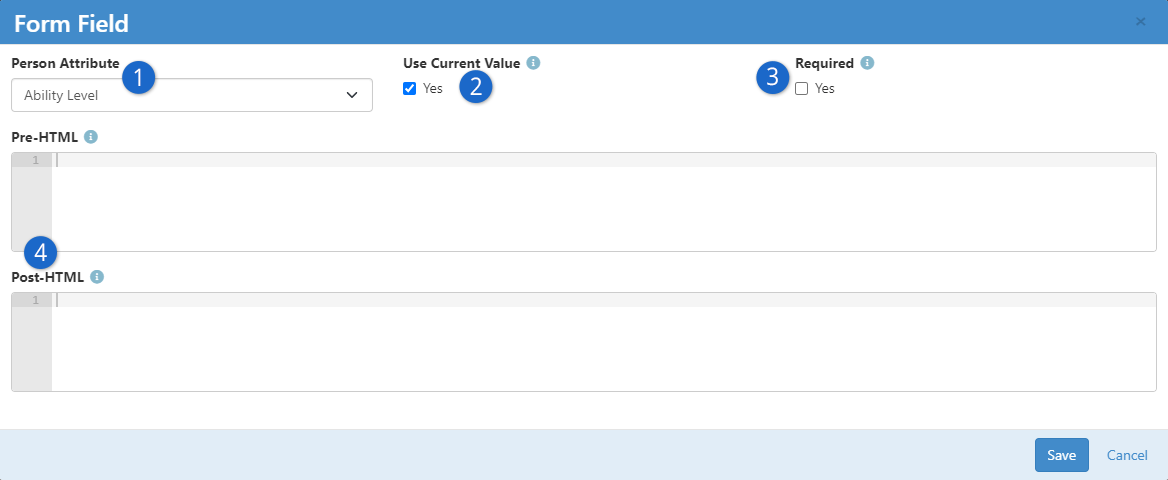
- 1 Person Attribute
- This one’s obvious. Select the person attribute that you’d like to display on the form.
- 2 Use Current Value
- Check this box for the individual to be able to see what their current value is for this
attribute. If you don’t check this box, the person won't see the current value, and if they
don’t enter anything, it will get updated with a blank value.
- 3 Required
- Check this box for the individual to be required to fill out a value for this person attribute.
- 4 Pre-HTML/Post-HTML
- You can optionally enter any text or HTML to be displayed before or after the field. This is useful
if you want to highlight certain fields or group them in a special way. This may take some HTML knowledge
to pull off correctly, but it’s not required.
Family Attributes
We've just looked at how to add person attributes to records, so now let's consider how you can
add the same functionality to families.
As you consider your data needs, you'll want to evaluate whether the data attribute best
describes an individual (person attribute) or the entire family (family attribute). Say, for
instance, your organization is involved in the foster care movement. You might want to note
which families are participating in this initiative. You might also want to note where they
are in the process of getting approved. While you could put this information on the head of
household, it would make more sense to instead make these fields family attributes. This will
allow both the head of house and the spouse to be able to update them on the
Person Profile page.
Viewing Family Attributes
Family attributes are displayed in the Family Members block
of the Person Profile page.
You'll note that attributes that are marked
Show in Grid
will always be displayed. Attributes not marked in this way will be displayed when the
icon is clicked
in the upper right of the family bar.
Family Attributes
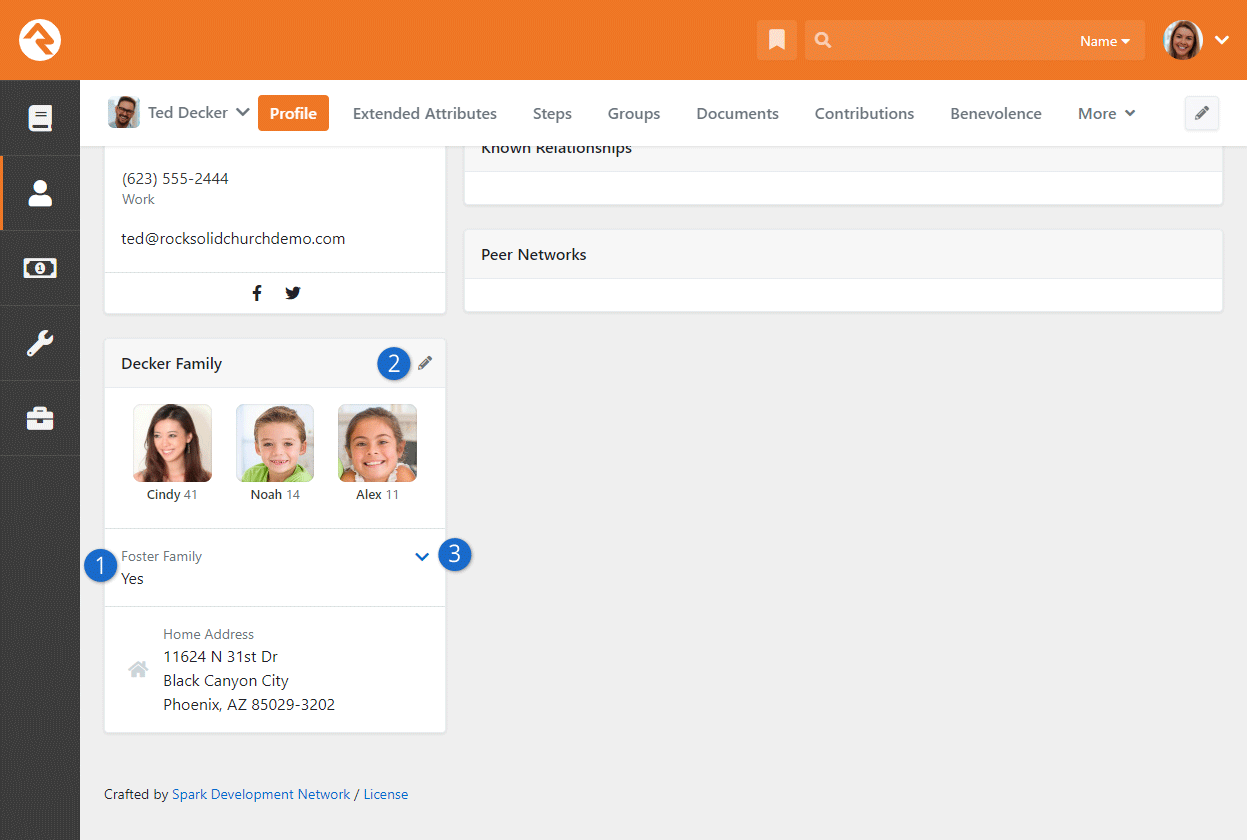
- 1 Attributes
- Attributes marked Show in Grid
will always be displayed here.
- 2 Edit Family
- You can update the family attributes (as well as other family information) by
selecting the icon.
- 3 Additional Attributes
- The
icon will appear here only if there are family attributes with Show in Grid
disabled. When present, the icon can be clicked to view those attributes.
Adding Family Attributes
Since families are simply a group type in Rock, you'll add family attributes in the
Group Type editor under
Admin Tools > Settings > General > Group Types.
Family attributes should be added as "Group Attributes" within the Group Type.
Categories Not Yet Supported
Attribute categories are not currently supported for family attributes. There are plans to
add support for categories in a future release.
Person & Family Analytics
An important role for leaders is to care for and support the people who engage with their organization.
As an organization grows this can become a difficult task as you may lose track of many of the details
that make your larger organization feel small. Rock’s person and family analytics tools help summarize
all these details and provide predictive alerts when certain key behaviors change.
These tools provide a very clear picture of a family’s involvement. As you’ll see, this opens the door
to some incredible opportunities for your organization. It can also, if not guarded, be somewhat creepy.
Most tools in life can be used as a weapon (think of a hammer). We know we don’t need to say this but be
careful that these tools aren’t used as a weapon. There… that’s done… let’s jump in!
Well, Almost Done...
You'll note that in several places we use the
icon to represent these analytic tools. Just another subtle reminder that these tools are a
guardian for good.
eRA – Estimated Regular Attender
Wouldn’t you love to know each and every one of your regular attenders? Get a reminder every time
a new one showed up and another when someone left? Well, without divine intervention, that’s just
not possible today. With all the data in Rock, though, we can make a decent prediction of a regular
attender. This is what we call eRA (no… not Earned Run Average… Estimated Regular Attender).
Recipe for an eRA
The key data points for calculating an eRA are giving and attendance. Neither is treated as
more important, as each is a good reflection of activity. While researching the best algorithm,
we tried to have a bias toward the speed of detection without having too many false positives.
The result should determine a regular attender within four months of the first activity.
There are actually two recipes for determining an eRA. The first determines how one becomes
(enters) an eRA, the other determines how one exits from being an eRA.
Criteria for Becoming an eRA
- Have given at least four times in 12 months, once being in the last six weeks
- (or) have attended at least eight times in the last 16 weeks
Keep in mind that every giving transaction counts toward eRA. So, if a person gave
twice last Sunday and twice this Sunday, that counts as four transactions and the
person will become an eRA.
Families and eRA
If a person meets either of the criteria above then the eRA status is applied to
all Active family members, including children.
Criteria for Exiting an eRA:
- Haven't given in over eight weeks
- (and) have attended less than eight times in the last 16 weeks
- (and) haven't attended at all in the last four weeks
Inactive Records
Inactive family members will not receive an eRA status. However, making a person Inactive
after they have been established as an eRA will not immediately remove their eRA status.
The same “exiting” rules apply as described above.
You might be thinking, "Those are a great start, a little tweaking for our organization and we'll
be set." Another goal of the eRA metric is to have a well-defined measure that churches can
use to help benchmark. Because of this, we don't allow the recipe to be configured.
If you're not sure why standard benchmarks are needed, let’s use an example. If you ask a
church what their attendance is, the need for standard benchmarks becomes clear. Without
asking at least four qualifying questions (is that just weekend services, does it include
volunteers, etc.) you won't know what this number really represents. For that reason, and to
establish that well-defined measure, when calculating eRA Rock looks at the attendance for
groups whose attendance counts as 'Weekend Service'.
What's This About "Weekend Service"?
You may be wondering what counts as "Attendance" when it comes to Family Analytics. This is determined by the
Weekend Service setting on any Group Type used for check-in. Out of the box, Rock ships with the Kids/Youth and
Serving Team Group Types configured with the Weekend Service option enabled.
If you have another Group Type you wish to count as "attendance at a Weekend Service" (and thus, count towards
Family Analytics) go to Admin Tools > Settings > General > Group Types
and edit the desired Group Type to enable Weekend Service
under the Attendance/Check-in tab.
Viewing the Analytics
Person Profile Page
Most of the information will be viewed on the person's
Profile Page, specifically the
Extended Attributes tab.
Let's take a look.
Analytics Attributes
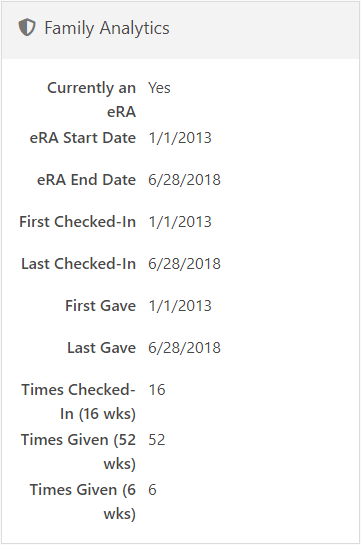
Security
By default, all these values are viewable by the RSR - Staff Workers and RSR - Staff Like
Workers. You can adjust the security of each of these attributes under
Admin Tools > Settings > General > Person Attributes.
eRA Badge
The state of the person's eRA can also be seen on the badge bar. The eRA badge has three states.
eRA Badge
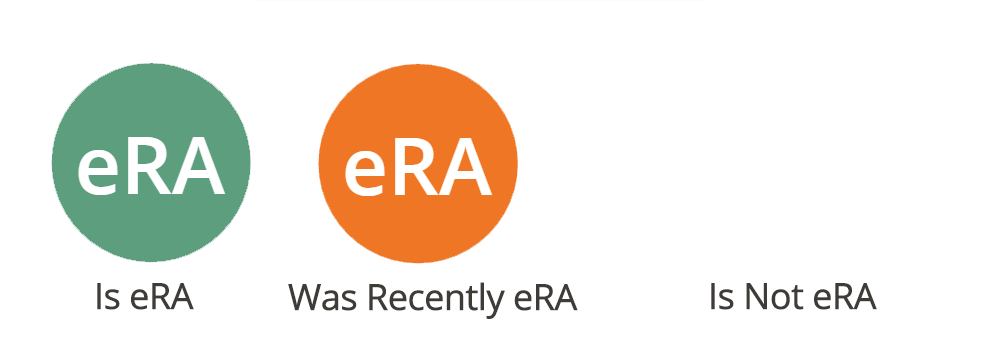
- Is eRA: The person currently is an eRA
- Was Recently eRA: Was an eRA but exited the eRA criteria in the last 30 days.
- Is Not eRA: Does not meet the eRA criteria. This badge is simply blank.
eRA History
It's possible that a family can start and stop being an eRA multiple times. To help you see this
type of activity we log each time a person enters and exits the eRA status on their history
(Person Profile > History Tab).
eRA Workflows
Would it concern you if someone who has had regular activity in the past suddenly becomes
irregular? Of course it would! You’d probably want to be notified or send them a communication,
right? Well, we’ve thought of that for you. The Family Analytics
job can be configured to launch a new workflow (you’ll still need to create the workflow) anytime a family enters or exits from being an eRA.
To help simplify your workflow, the job will pass in the following information:
| Attribute Key |
Attribute Type |
Description |
| Family |
Group |
This is a reference to the family group who has entered or exited. |
| HeadOfHouse |
Person |
The head of the household of the family. |
| Spouse |
Person |
The spouse of the family (could be empty). |
| Campus |
Campus |
The home campus of the family. |
A couple of things to think about as you configure your workflow:
- If the family doesn't have any adults configured, no workflow will be launched.
- Remember the "e" in eRA stands for Estimated. It's not perfect. If you have a
communication as a part of your workflow, be sure not to make any assumptions. It's possible
that they are still attending but are not giving or having kids check in. Try to make the
tone of your communications more of a "Just checking in…" instead of "We miss you…"
See our Blasting Off With Workflows
guide for more information on workflows.
Calculating the Analytics
All these measures rely on the
Family Analytics job to be enabled and scheduled
to run regularly. This job is available for you out of the box but isn’t automatically enabled. To enable it, simply go to
Admin Tools > Settings > System > Jobs Administration.
From there you can select the Family Analytics
job and activate it. You'll also want to consider when and how often it's set to run.
The job can also be configured to launch workflows when a family enters or exits the eRA status.
See the eRA Workflows section for more information on these settings.
Let's look at all the settings of this job in detail.
Family Analytics Job
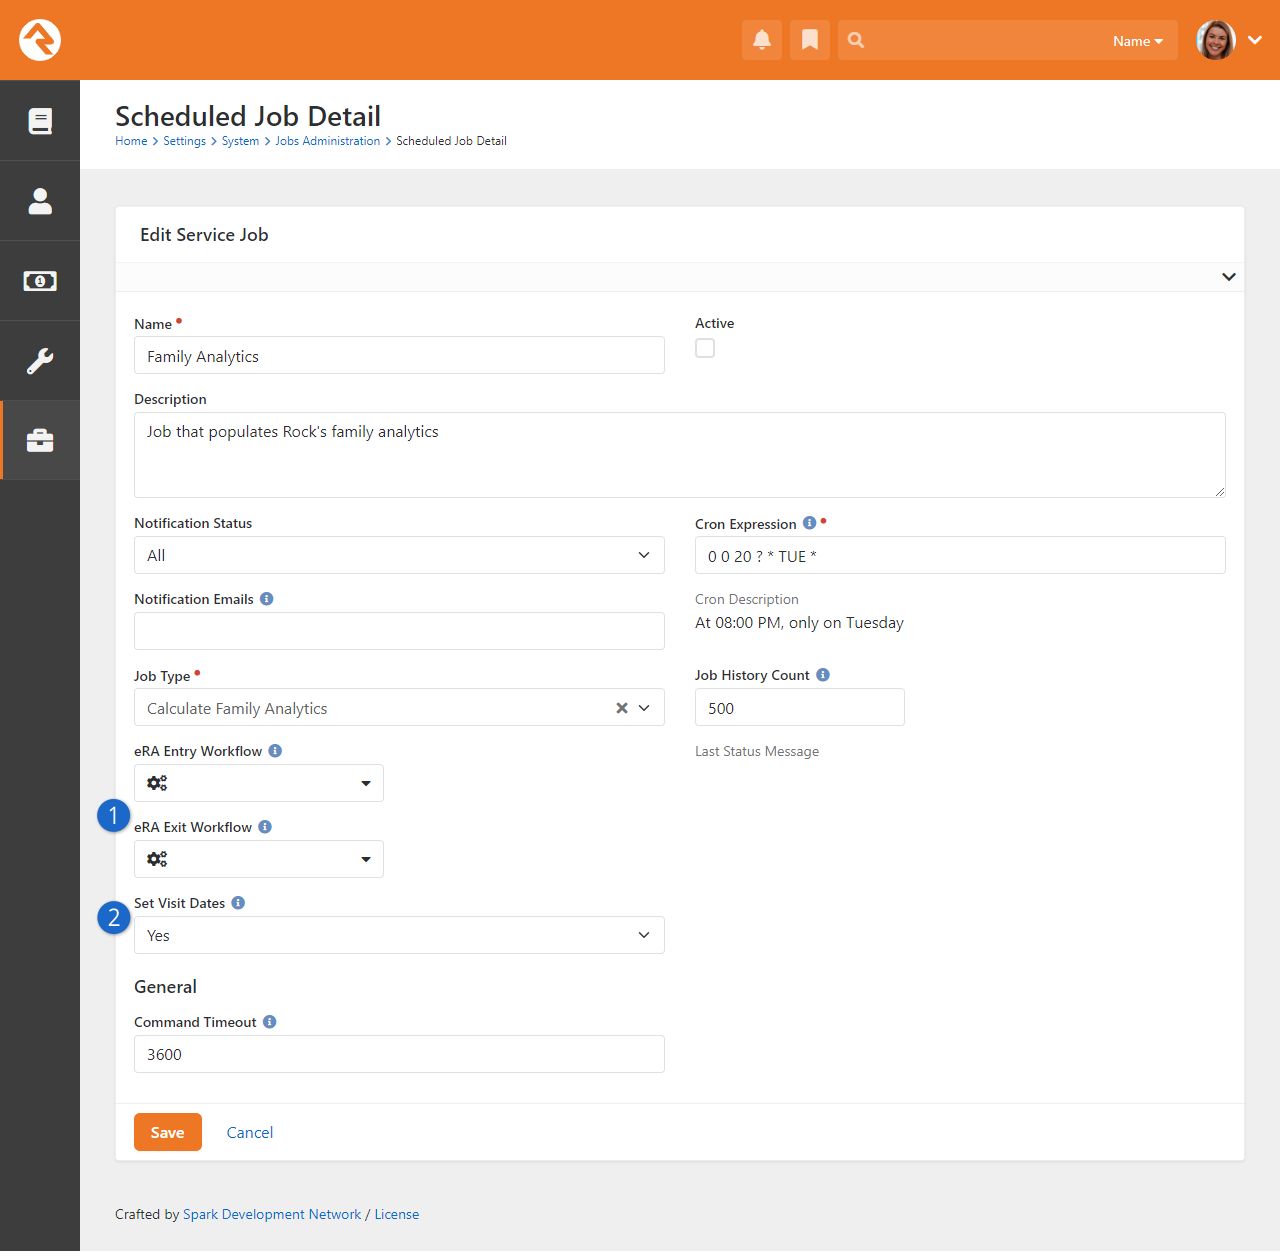
- 1 eRA Entry/Exit Workflows
- Use these fields to select which workflow should launch when someone enters and/or exits eRA.
- 2 Set Visit Dates
- When enabled this will enter the first and second visit person attributes. See below for details.
The logic for setting visit dates is fairly complex as it doesn't only look at attendance.
The job also considers when the person's record was created. This prevents the system from
adding a date to a record that has been around for a while. This could happen when adults
who have attended for some time check in a new child for the first time. So, the first
visit date is only calculated if it's within 14 days of the person's record being created.
Additionally, remember that a child's visit dates will only be calculated using
Weekend Service check-in records. An adult's
dates will be calculated based on the check-in records of all children in the family.
Managing Known Relationships
Known relationships are a great way to pattern real-world relationships in your
database. While Rock comes with several relationship types already configured
(Grandparent, Invited By, etc.),
you can create new relationships as needed.
Creating A New Relationship Type
Known relationships actually use groups to store their values. Each person in the
database has a hidden group that contains all of the individuals with whom the person
has a relationship. When you configure known relationships, you’re really configuring the
Known Relationship
group type.
To add a new relationship type, follow these steps:
-
Navigate to the Group Types
editor Admin Tools > Settings > General > Group Types
and select the Known Relationship
group type.
-
Open the Roles section and
add the new relationship role.
-
Save the group type
-
Optional: If your relationship has an inverse relationship (grandparent <-> grandchild),
you can automate the creation of the inverse relationship by editing the role you created and selecting
the inverse relationship. In order to pick the inverse, you must first create the relationship roles and
save the group type. Then you can go back and edit the inverse types.
When adding a new relationship, you can decide if this type of relationship should allow an individual to
check-in the other. For instance, you may decide that grandparents should be allowed to check in their
grandchildren.
School Grades
Rock provides a customizable system for determining the grade or year of an individual's education and automating promotion
from one grade to the next. For most organizations in the US, the out-of-the-box configuration should meet all their needs.
For international organizations or those in locales where customization is required, it's easy to adjust the system.
When adjusting the grades, the first thing to keep in mind is that Rock only stores the year that someone graduates from the
educational system. In the US, that's their high school graduation. Rock dynamically calculates a person's grade by:
-
Comparing the current date to their graduation year which provides an offset in years. Rock also uses the
Grade Transition Date Global Attribute to help
determine the start of the school year.
-
The year offset from step 1 is then compared with the grades in the School Grades
defined type. The first Defined Value
(grade) whose value is greater than or equal to the offset is selected. For systems that have one grade for each year, this is a simple
setup. The last grade (senior year in the US) would have a value of 0, the next (junior) a value of 1, etc. For systems where a grade
spans multiple years, you would "skip" years. For example, to have a Middle School
grade level instead of separate 7th and 8th grades, you would set the Value
of Middle School to 5, and the next higher grade level (Freshman) to 3.
When adding a new person to the system you're asked to provide their grade. The person’s graduation year is initially determined
by the grade provided, using the reverse of the above logic.
Knowing that not every system uses the term Grade, Rock allows
you to configure the term that’s used by editing the Grade Label
global attribute under Admin Tools > Settings > General > Global Attributes.
So, if you’re more familiar with “year” or “level” it’s easy to adjust accordingly.
Bulk Updates
Sometimes you have to update a little bit of data. Sometimes you need to update a lot. When you find yourself in the latter
situation, you'll want to use Rock’s bulk update capabilities. Bulk update is used to make changes to large populations all
at once, instead of making the same change repeatedly one person at a time.
You may have noticed the icon
at the top and bottom of table grids that list people. Selecting people on the grid and pressing the
icon will take you to the
Bulk Update page.
Select Individuals for Bulk Updates
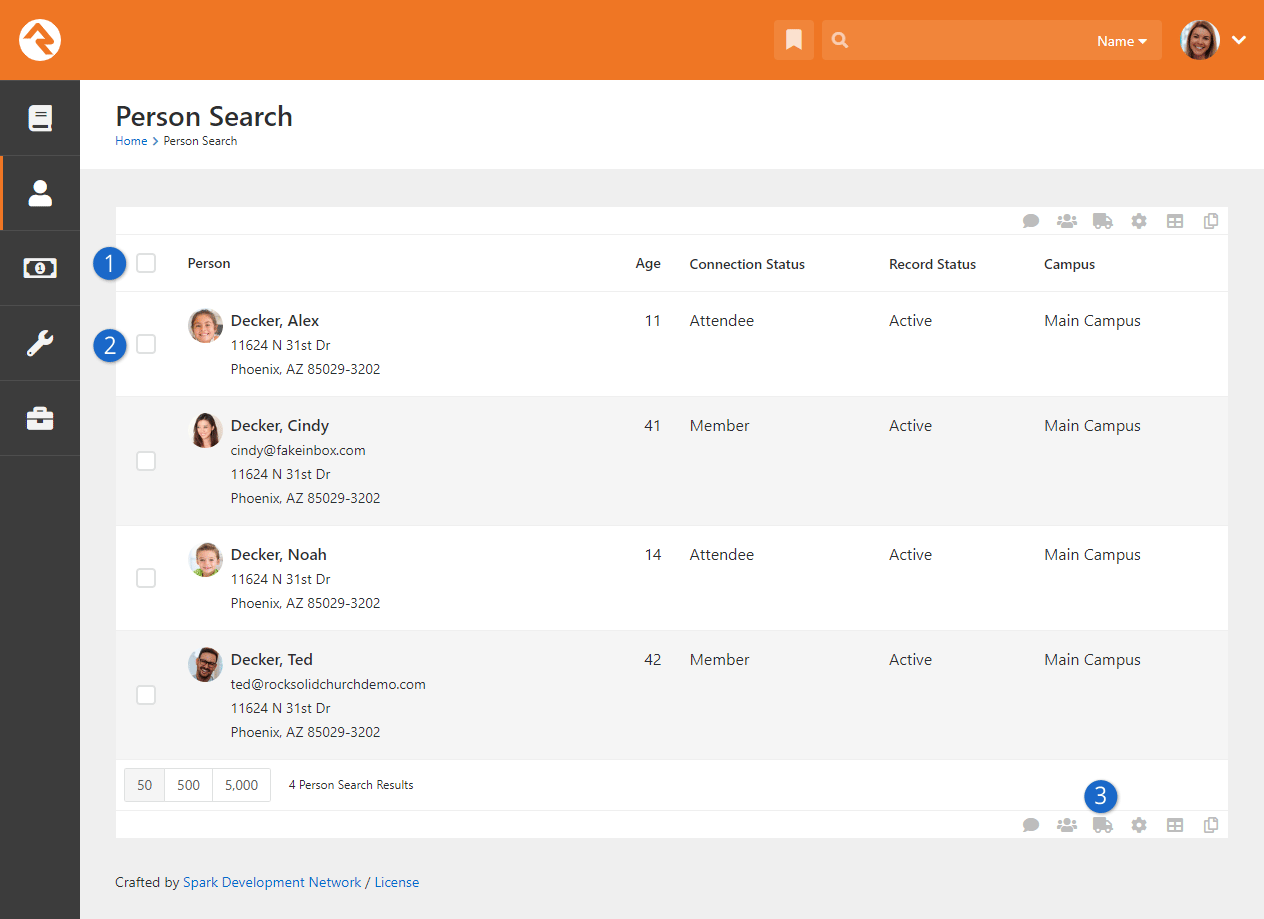
- 1 Select All
- Selects all items visible on the grid. It does not select items on previous or next pages.
- 2 Individual Select
- You can also select specific individuals on the grid. Or you can use the
Select All and then individually unselect items.
- 3 Bulk Update
- Takes you to the Bulk Update page with the individuals
you selected.
Power Tip
If you would like to select all the individuals, even those on previous/next pages, you can leave selection blank (don't
select anyone) and press the bulk update button. This adds everyone in the grid to the
Bulk Update page.
Once on the Bulk Update page, you can select various data
points to update. You must first select the data item you wish to update by clicking the
icon next to the item.
Performing Bulk Update

- 1 List of People
-
You can add or remove individuals from the
Selected Individuals section.
Whoever is listed will receive the updates being performed.
- 2 Details
-
Select data items you would like to edit and then provide a value. Note that you must click the little circle next
to the item to enable it for updating.
- 3 Notes
-
You can add notes using the bulk update tool. In some cases, this may be the only update you make.
- 4 Group
-
You can also add/update/remove individuals from groups. After selecting a group, you can even set any
group member attributes for that specific group.
- 5 Tag
-
Click to add or remove a Tag from individuals in bulk.
- 6 Steps
-
Add/Update/Remove steps for people in a specified step program.
To enable attributes for steps bulk update, see the
Steps Bulk Entry section of the Engagement guide.
- *
-
You can modify the block settings to include workflows in your bulk update options. Simply go to the block settings
and select the workflows you want available from the
Workflow Types dropdown menu.
An additional Workflows section is then displayed here, allowing you to choose which workflows to
perform for the individuals included in your bulk update. You can select multiple workflows for a single update.
Once you've made your updates, click the Next button and
you'll be shown a summary of your changes. If everything looks good, click Confirm
and your changes will be applied.
Bulk Update Confirm
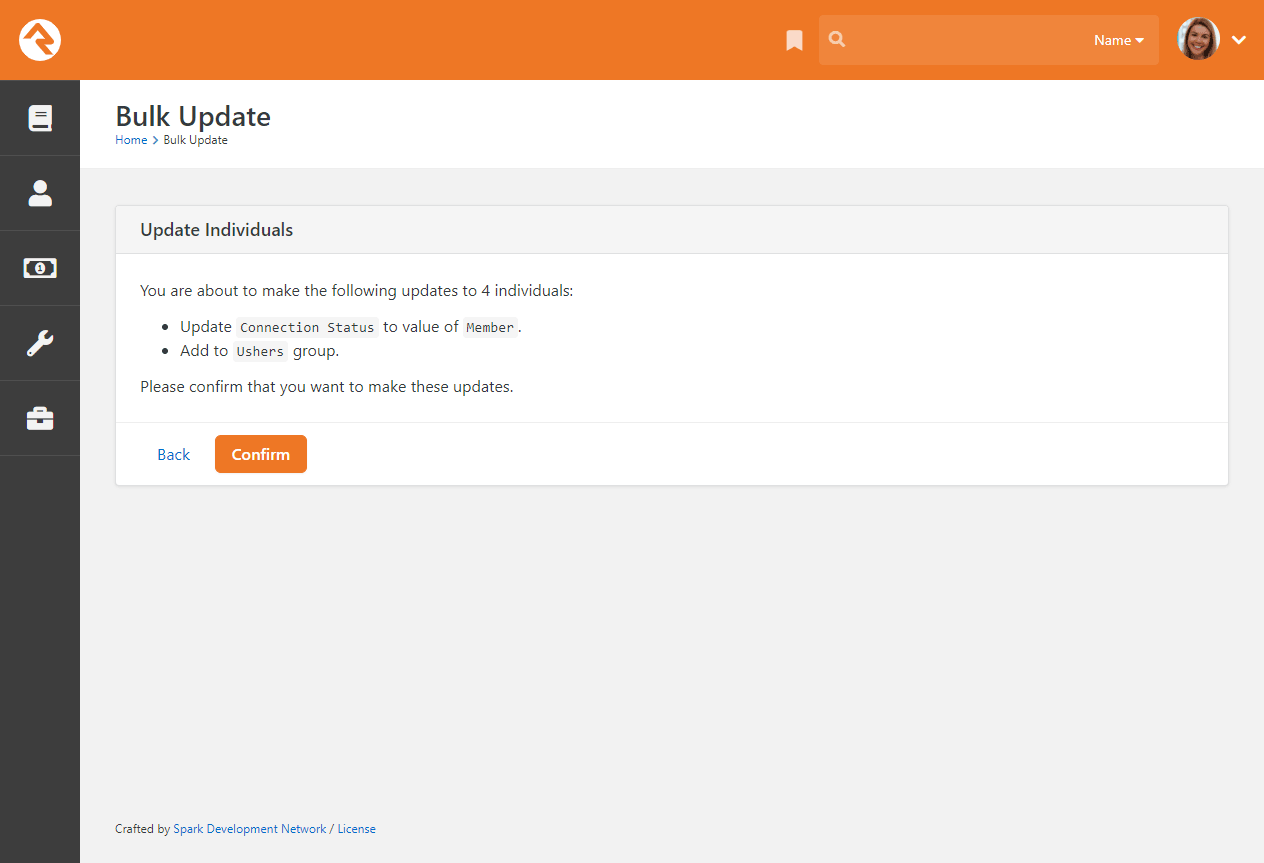
Person Profile Editor
The Person Profile Editor
is an external page that's dedicated to allowing individuals to update their own information.
You can find this page on the external website by selecting
My Account from the
Login Status block.
You'll notice that individuals are able to edit their details at the top of the page. They
can also update each of the individuals in their family.
Person Profile Editor
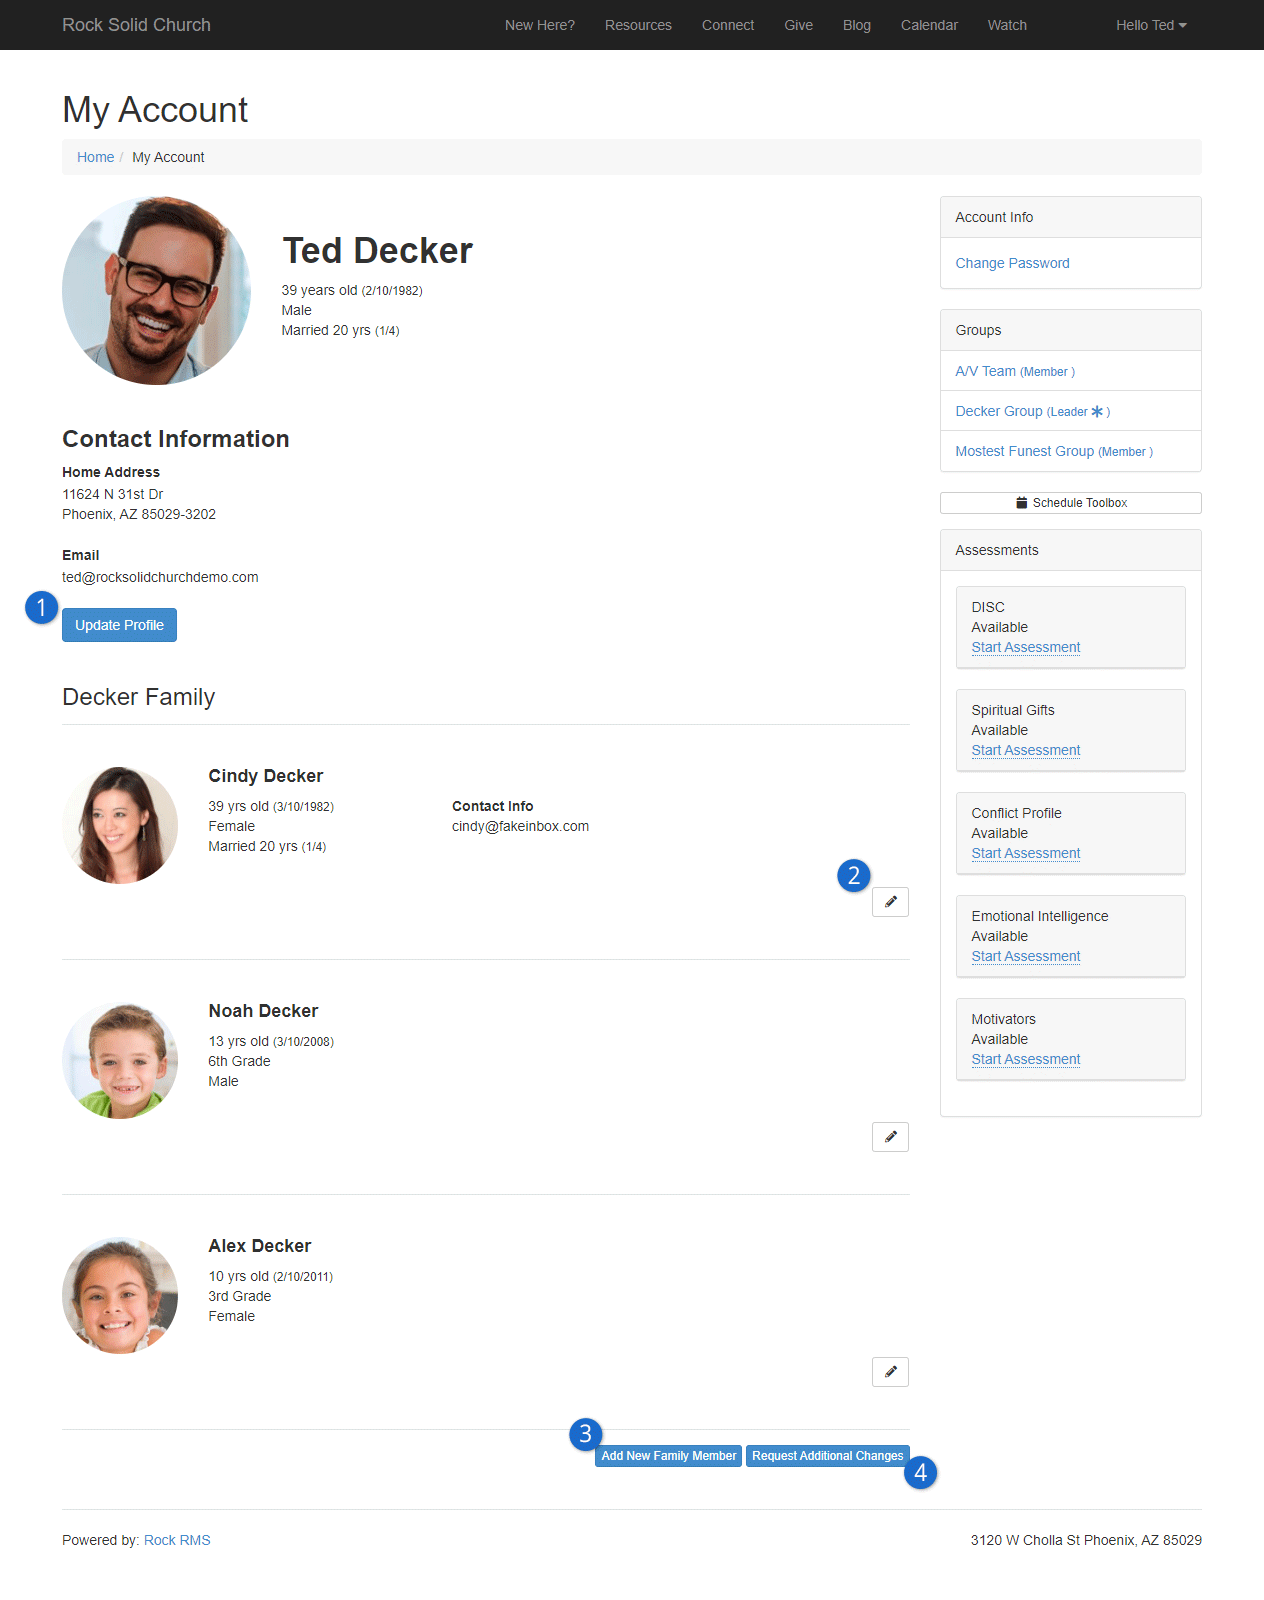
- 1 Update Profile
- In this example, Ted can click here to edit his own information. This is
the easiest way to do things like address changes.
- 2 Edit Family Member
- Ted can also edit the information for each member of the Decker family by
clicking the icon shown here.
- 3 Add New Family Member
- Your guests can add new members to their families by clicking this button.
- 4 Request Additional Changes
- There may be some information that you want to maintain internally only. This button
will launch a "Profile Change Request" workflow that lets your guests request changes to
their profile that they can't make on their own.
There are several block settings that you should be aware of for this block. Some of them
include:
-
Show Family Members: This determines whether the block should
allow viewing and editing of the family members.
-
Address Type: The type of address that should be displayed for
viewing and editing.
-
Phone Types: The type of phone numbers to show for viewing and editing.
-
Workflow Launch Page: This block can be configured to show a button labeled
Request Additional Changes.
When this button is clicked, it will navigate to the page provided to launch the workflow.
-
Family Attributes: The family attributes you would like to configure for
viewing and editing.
-
Person Attributes (Adults): The person attributes you would like to configure
for viewing and editing for adults in the family.
-
Person Attributes (Children): The person attributes you would like to configure
for viewing and editing for children in the family.
-
Require Gender: If this is set to 'No' then the Gender field will still
be required, but an additional option of 'Unknown' will be made available.
-
View Template: The power of Lava
is at your disposal. With this block setting you can use a Lava template to control the view mode
of the page.
These are only some of the options. Again, we strongly encourage you to review all the settings for this
block to ensure it's meeting your needs.
Photo Requests
Rock is about fostering relationships. Nothing helps this more than having
photos in the system. In the past, keeping up with photos was a complex
and time draining task. No longer! Rock makes it easy to populate photos into
the database by asking individuals to upload a photo from an emailed request.
Let's take a look at how it works.
Photo Request Process
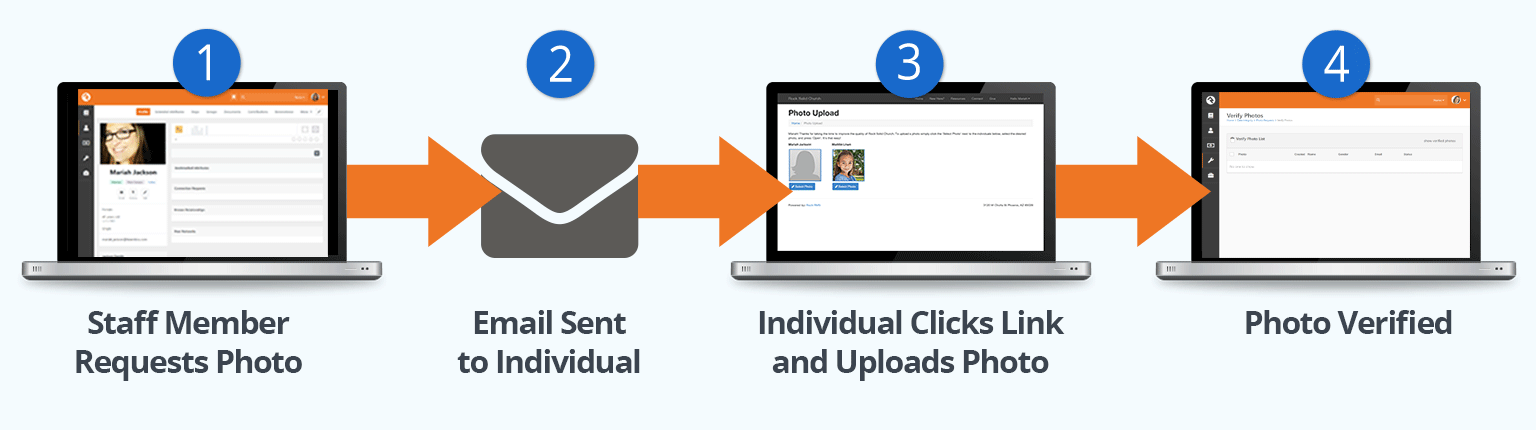
- 1 Request
- Staff sends out a photo request. This request, as we'll learn soon,
can be an individual request to a single person or a bulk request.
- 2 Sent
- An email is sent to the individual asking them to upload a photo.
- 3 Photo Uploaded
- Once they click the link in the email, they'll be taken to a page where
they can quickly upload a photo.
- 4 Verify
- Once the photo is uploaded, it's added to a list for a staff person to verify.
Photo Upload
When the individual clicks the upload link in their email, they'll be taken
to the page pictured below. This page is under
External Homepage > Support Pages > Photo Upload
but it isn't linked into the website, so you'll have to get there from
Admin Tools > Settings > CMS > Pages.
Photo Upload Page
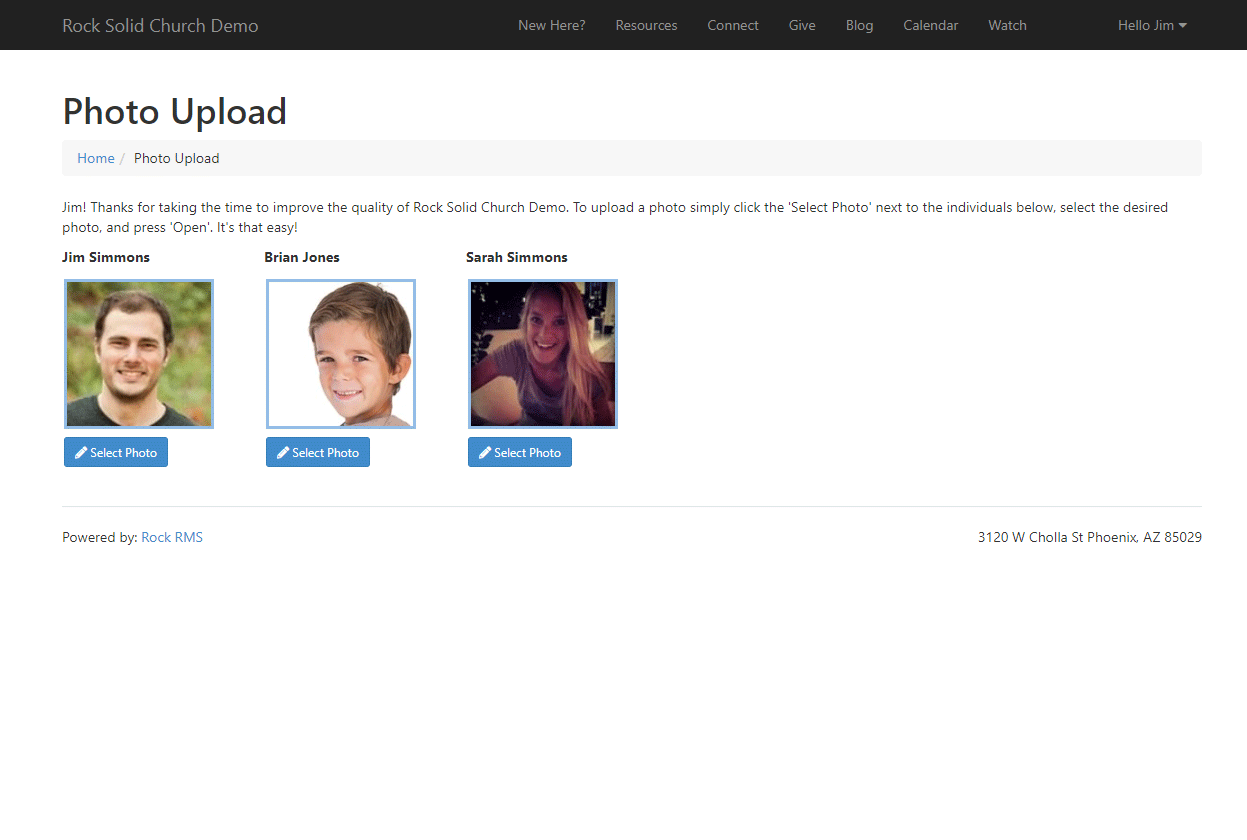
The link they use to get to this page has an embedded security token that
allows them to upload their photo without having to log in.
The block on this page has a couple of settings you can use to alter its
behavior. These settings include:
-
Include Family Members: This setting will allow
the individual to upload photos for their whole family from their
link. The default value for this setting is true.
-
Allow Staff: This setting allows staff members to
change their own photos. Some organizations may not want staff to
update their photos as they have standard staff photos they'd like
to keep consistent. The default value for this setting is false.
Bulk Requests
The easiest way to get a large number of photos into the system is to use
the bulk photo request option. You can make these requests under
Admin Tools > Settings > Communications > Send Photo Requests.
This screen allows you to send an email to a selected list of people asking
them to provide a photo for the system.
Photo Request Send
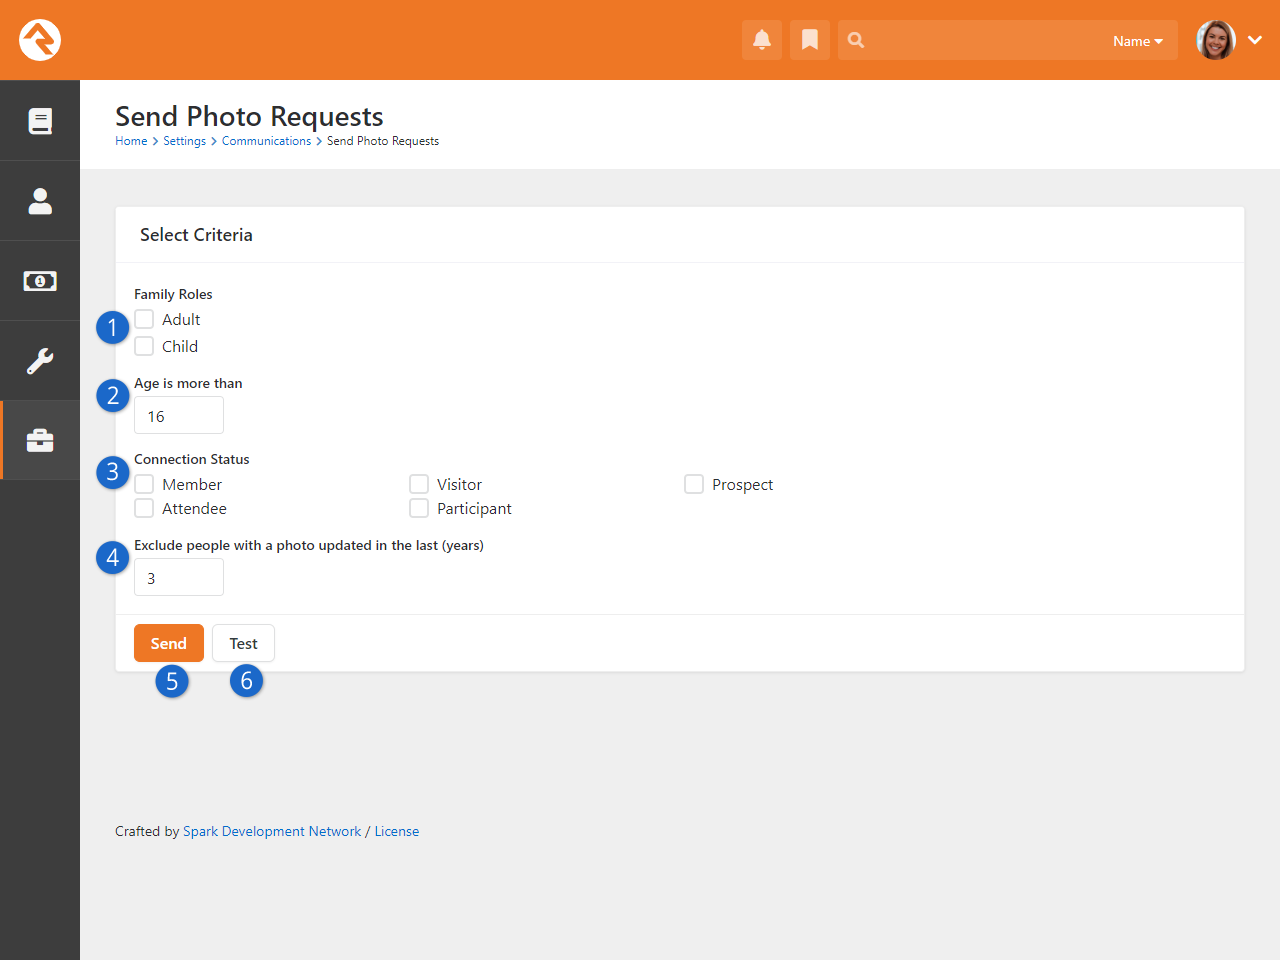
- 1 Family Roles
- Indicate if requests should go out for adults, children or everyone.
- 2 Age is more than
- If you allow requests to be sent to children, you can provide a minimum age.
- 3 Connection Status
- Select the Connection Statuses
you'd like to use as a filter. If none are selected, then the request will go to individuals with any
status.
- 4 Exclude
- It's not helpful to request a photo from someone who already
has one in the system. This feature allows you to exclude those who
have a photo newer than a set number of years.
- 5 Send
- When you're ready, click Send.
- 6 Test
- It's often a good idea to send yourself a test email to see what
the recipients will be sent.
After clicking Send,
the individuals will receive an emailed request to upload their photos. The
contents of this email can be modified under:
Admin Tools > Settings > Communications > Communication Templates > Photo Request Template.
Tip to Limit Abuse
To help minimize the potential abuse of this feature by staff, there's
a block setting that limits the number of photo requests that can be sent without
approval. The default is 300. Feel free to change this number to suit your
needs. The block uses the same approval process as bulk email.
But There's More
Using the bulk photo request screen above is a great way to send out
mass requests for photos. You can also send this same email to a list
of people using the Photo Request
communications template. Let's say you have a report that lists people
for an upcoming event, and you'd like to get their photos before the
event. By clicking the
button in the grid's footer you'll be taken to the
New Communications
page. Click the Use Simple Editor
button near the top right of the block, then select the Photo Request Template
from the Template dropdown and you're off to the races!
See our Communicating With Rock
guide for more information.
Individual Requests
Bulk requests can help you populate your database with a large number of
photos, but sometimes a personal request is needed. From an individual's
Person Profile
page, you can quickly request a photo under:
Actions > Photo Request.
This will launch a short workflow entry screen that allows you to type in
a personal message to the recipient. Rock will add some instructions and
links to your email to enable the upload process.
Verifying Photos
While it's highly unlikely, it's possible that someone could upload an
inappropriate image. To help filter these out, Rock has a photo
verification process. When a person uploads a photo, it's immediately
available for viewing. At the same time, it's also added to a list to be
manually verified. This list can be found under:
Tools > Data Integrity > Photo Requests > Verify Photos.
Verify Photos
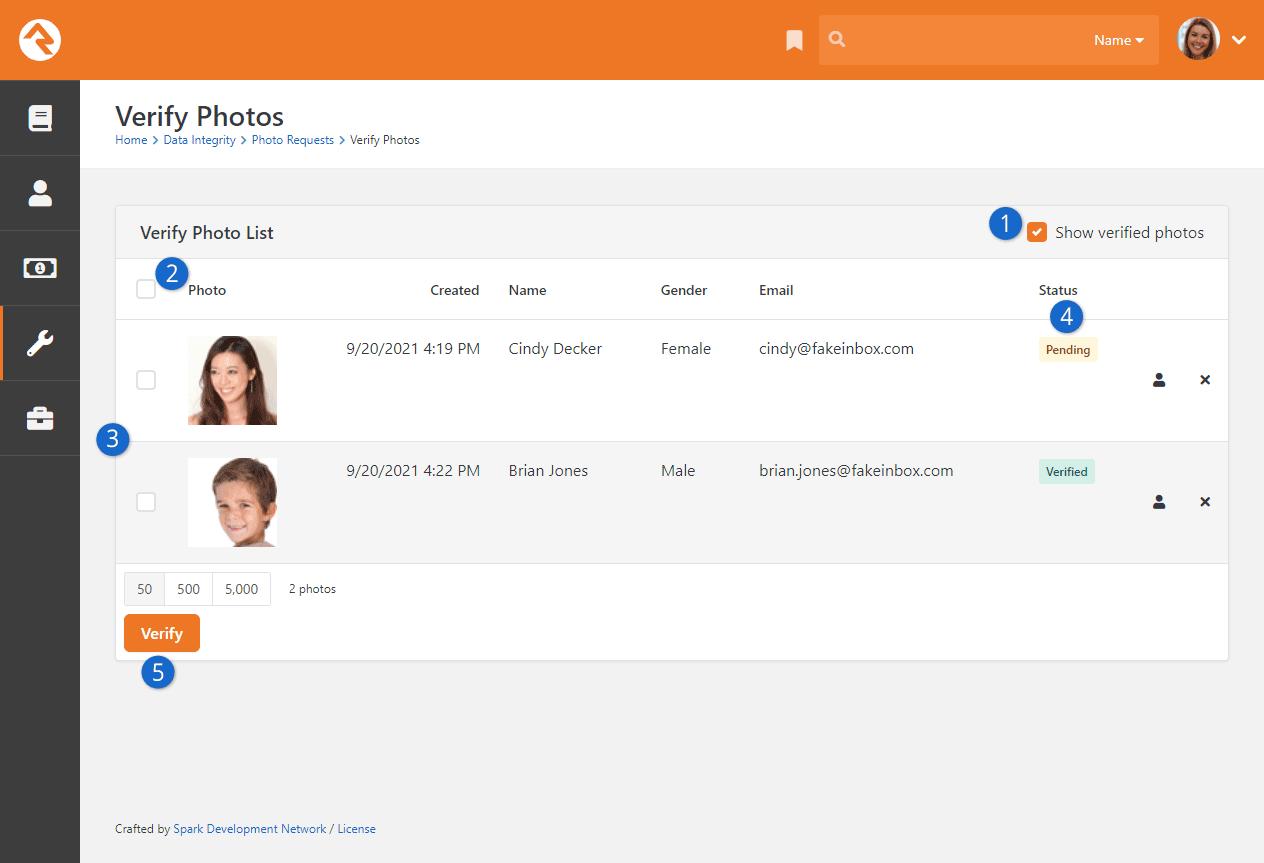
- 1 Show Verified Photos
- By default, this screen only shows photos that need to be verified.
Checking this box will show all photos, even those that have already
been verified.
- 2 Select All
- Checking this box will select all the records visible on the list.
- 3 Photo Records
- Photos that have been submitted are listed here, along with details of the person.
- 4 Status
- You can check the current status of the photo.
- 5 Verify
- After selecting photos to verify, you must click Verify.
Photo Opt-Out
When an individual asks to be opted out of receiving future requests for photos, they are sent
to the opt-out page which is located under:
External Homepage > Support Pages > Photo Opt-Out
They are also added to an application group called
Photo Request
with a member status of Inactive.
You can view and manage this list under:
Tools > Data Integrity > Photo Requests > Photo Request Application Group
To remove someone from the opt-out list, simply remove them from this group.
Following
For most organizations, the database of individuals in Rock will far exceed the number of people a specific staff person will
know. Without tools to help filter relationships, personalizing touch points would be impossible. Rock's
Following features help filter these relationships so that
an individual can be made aware when life events occur with people they know.
Following an Individual
The first step is to identify people you know. You can do this by clicking the
Follow button below an individual's
photo on their Person Profile page.
Following An Individual
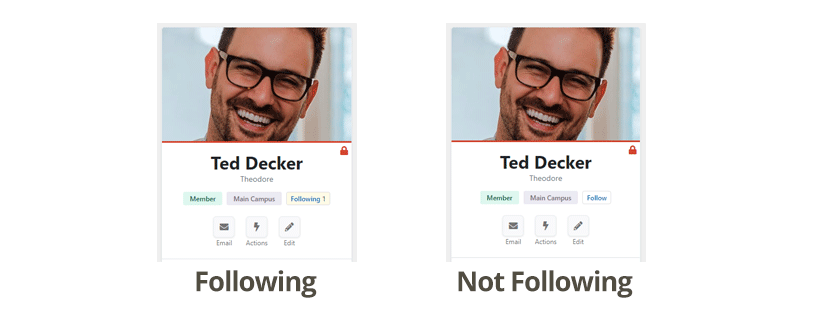
Bulk Following
Don't forget our friend, the bulk update tool. Bulk updates also allow you to add or remove
a list of individuals from your following list.
Following Bulk Update
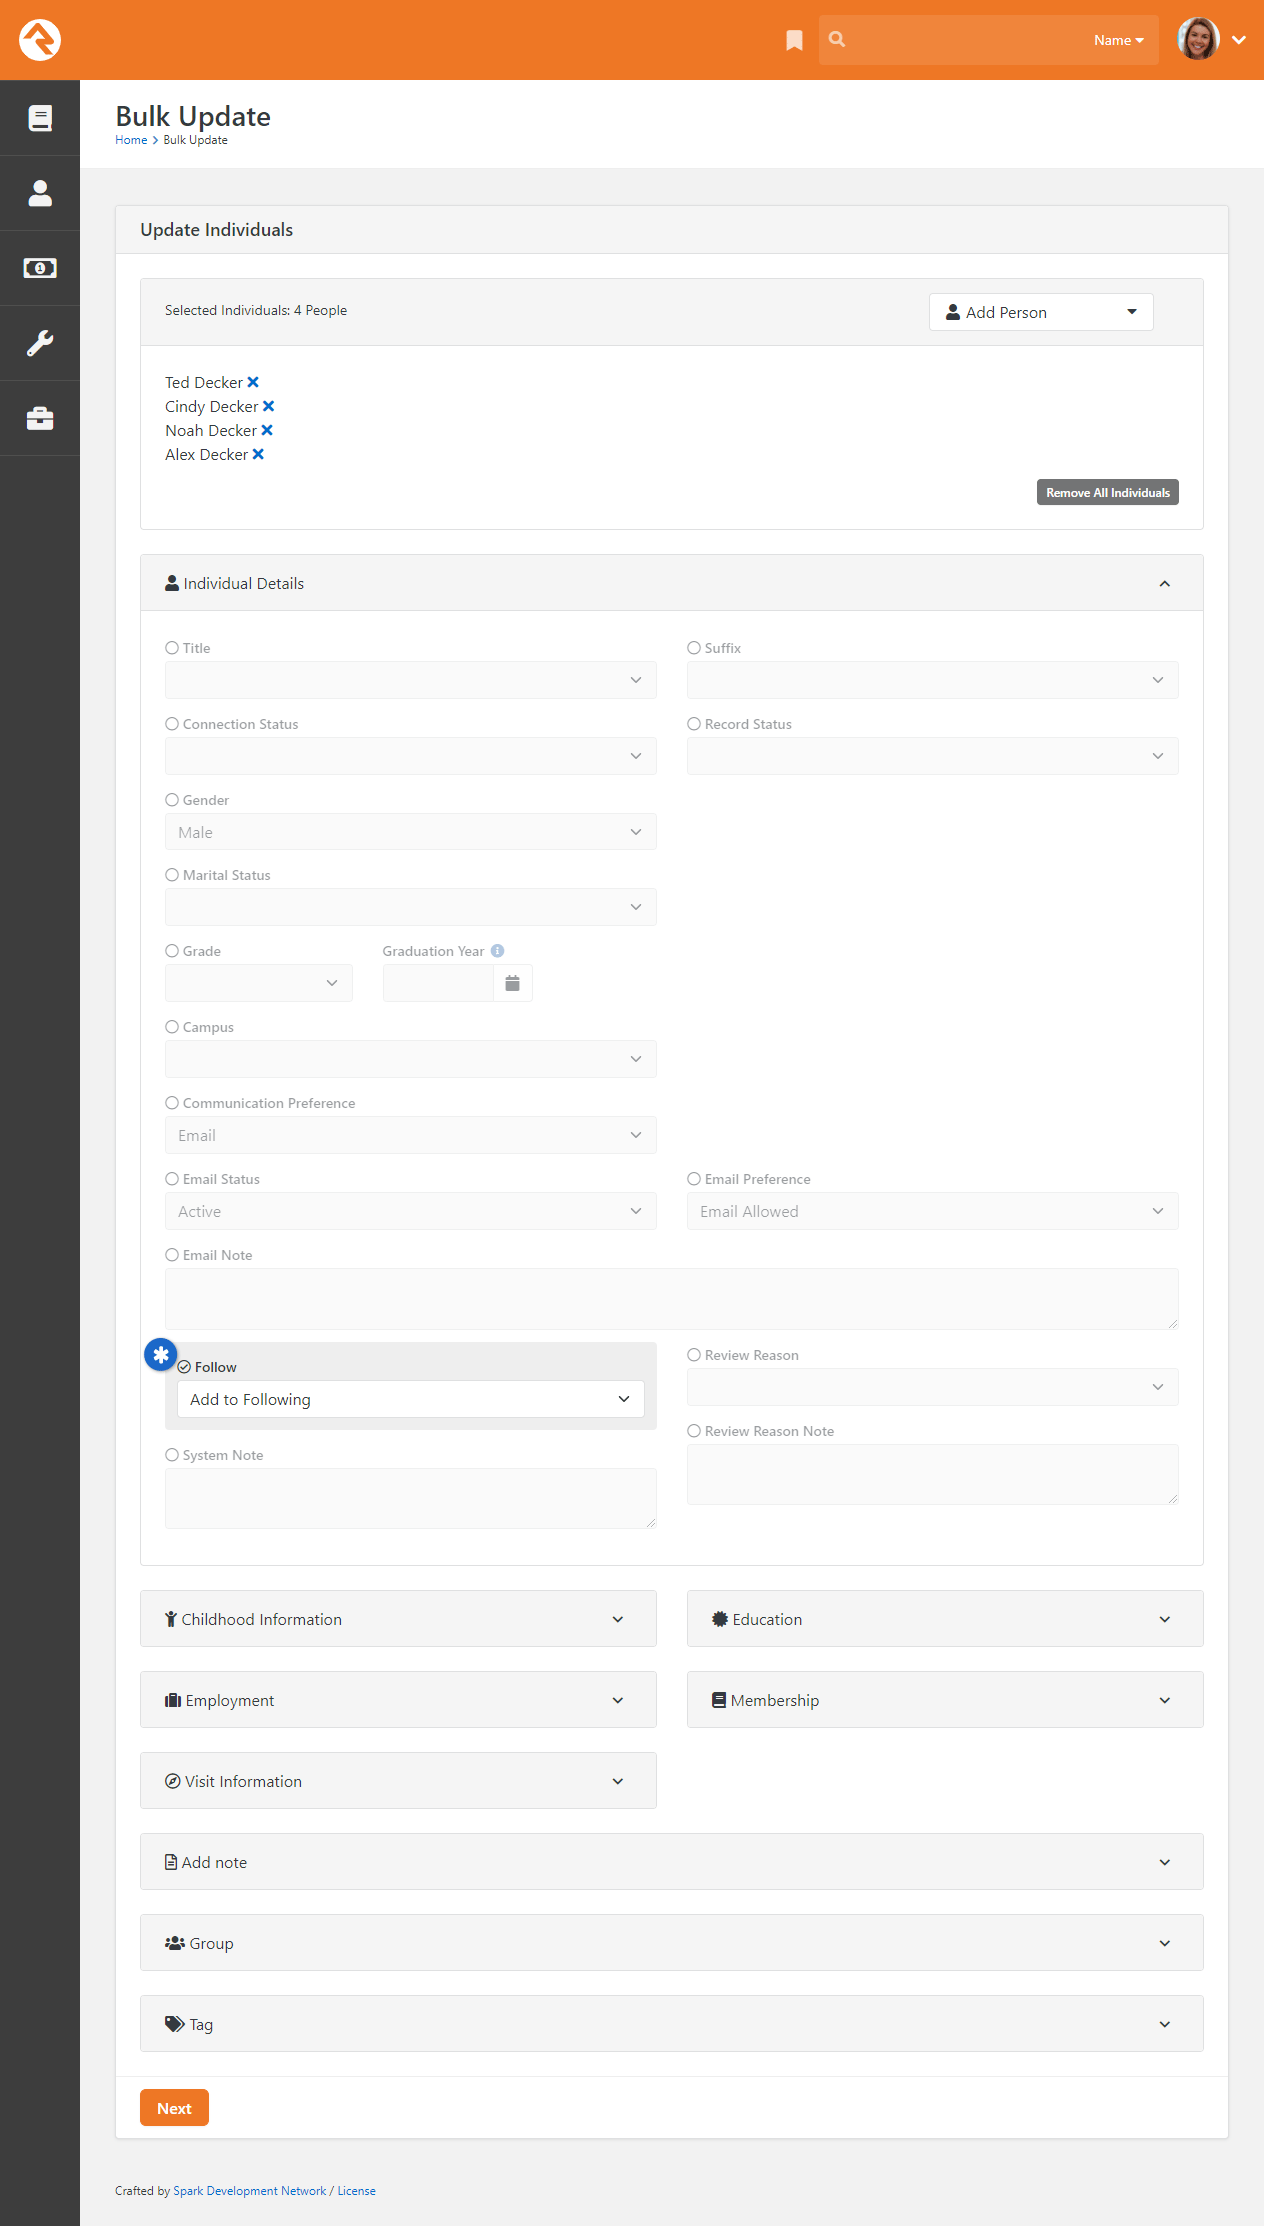
Viewing Those You Follow
You can view a complete list of the people you follow under
Login Status > My Settings > Following (the login status can be found in the top-right
corner of the page). From this list you can manage the people you follow and remove any that may have been accidentally added.
Viewing Followers
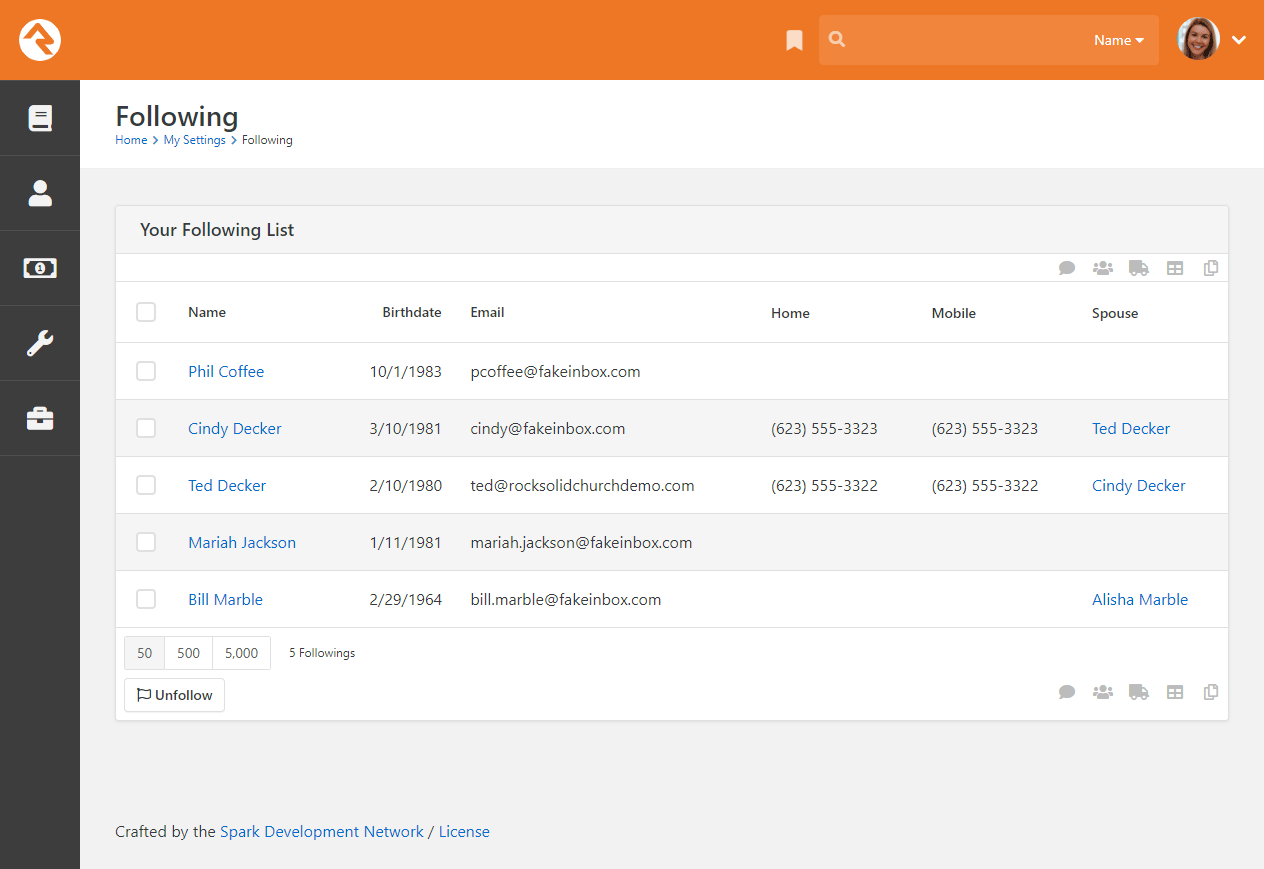
Just the Beginning
Rock's Following feature is just a start. Look for lots of
new capabilities in upcoming releases. We're providing the basics for now to help you start building your following lists.
Engaging Following
OK, now that you’re following people, let's use this data to build better connections. Following a person means you have a special
interest in that person; that you care about what's going on in their lives. So, wouldn't it make sense that you'd want to know
when it's their birthday or wedding anniversary, when they're joining a group or better yet that they were recently baptized? Rock
makes this a snap!
You can configure what types of notification events you're interested in under
My Settings > Following Settings
(found under the login status in the upper-right corner). Here you can see a list of all
the events you can be notified of.
Following Event Settings
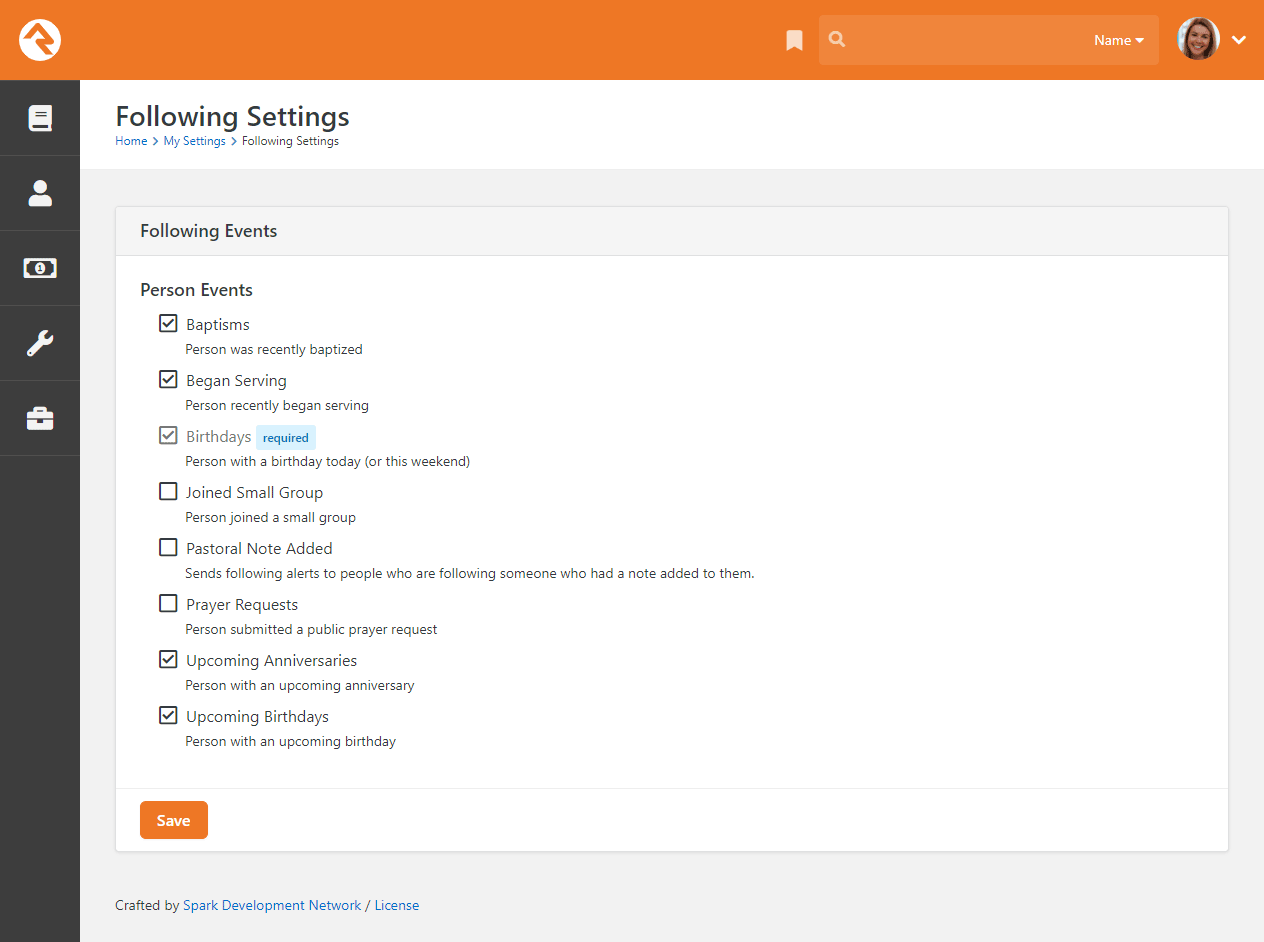
Every day, Rock will determine if anyone on your following list has the configured
notification events and will send you a personalized email of the results.
Following Event Email
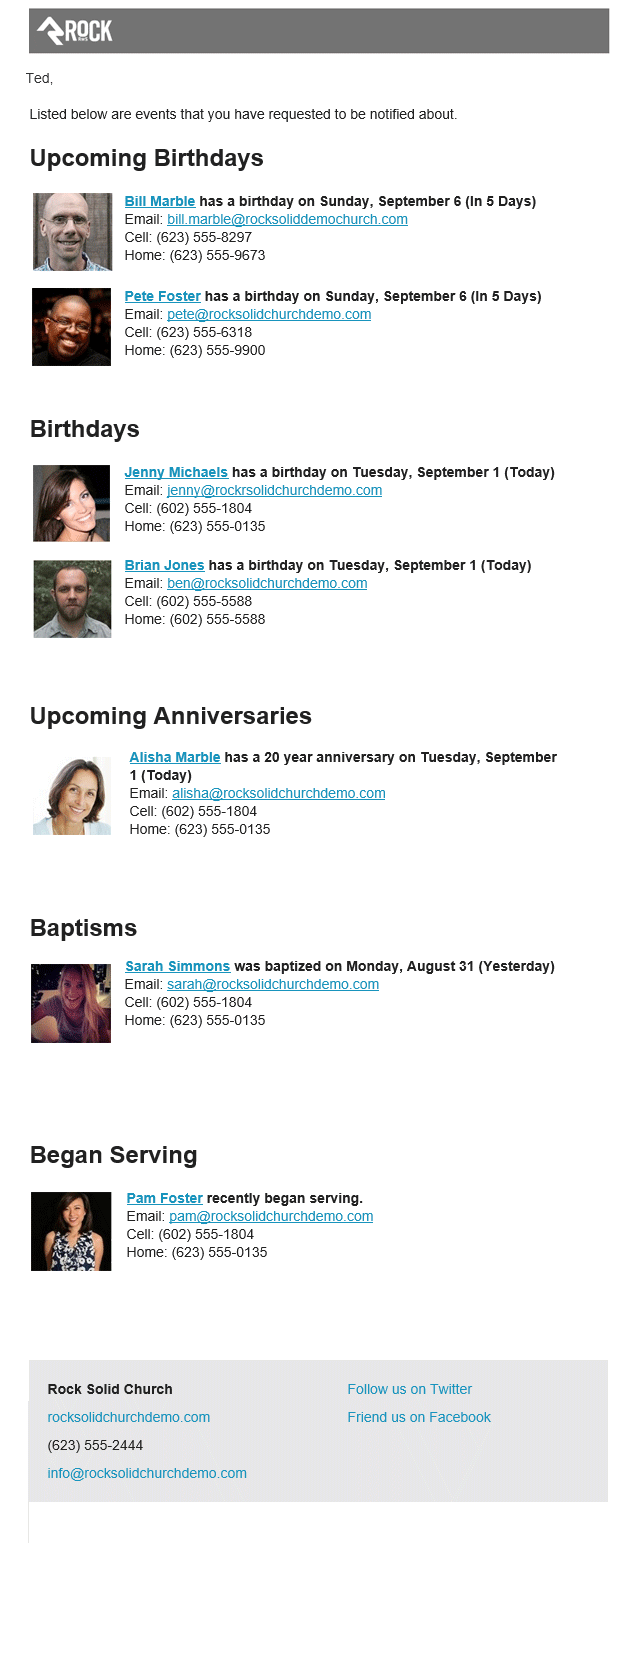
Rock Administrators can even set up new types of events that will be displayed here. But
more on that in a minute.
Configuring Following Events
Rock ships with several following events, but it's easy to set up additional ones
yourself. You can manage these events under
Admin Tools > Settings > System > Following Events.
Following Event Type List
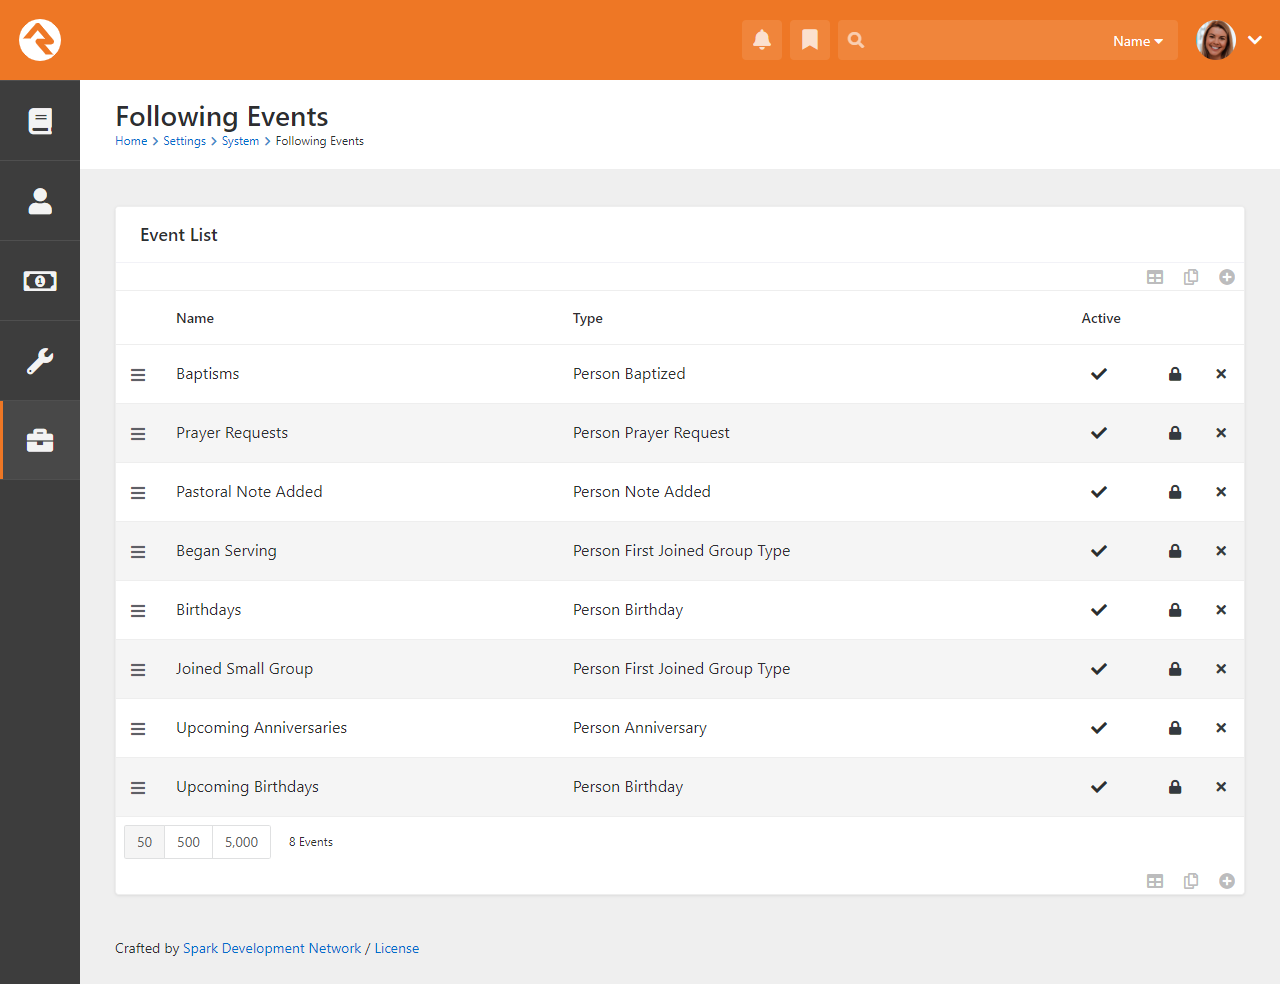
As pictured in the screenshot above, you can apply security to Following Events by clicking
the icon. The Following Settings block (see prior section above)
will only allow subscribing to following events if the person has been granted 'View'
access to that following event. If someone was subscribed to a following event
that they no longer have access to view, when the following event notification is sent that
event won't be included.
Person Note Added and Joined Group Type Security
Because the security of Notes and groups can't be checked when following events are being
determined, each sensitive Following Event should be secured to match its related
security configuration. For instance, if you have restrictions on who can view Pastoral
Notes, then those same restrictions should be applied to the corresponding Following
Event.
To add a new event, click the
from the top or bottom of the grid.
Following Event Configuration
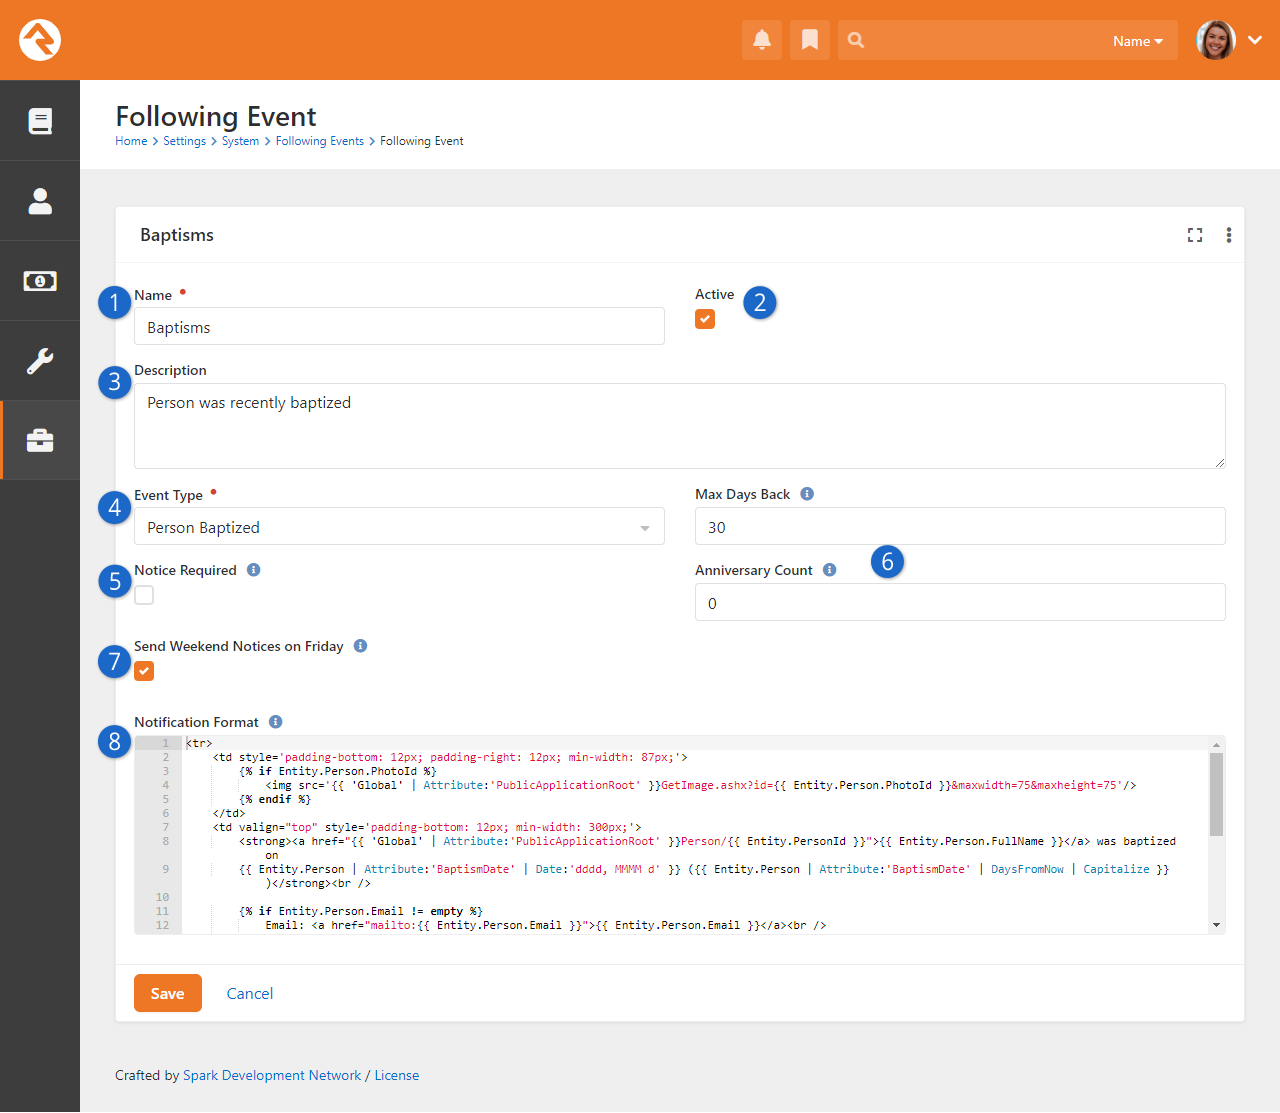
- 1 Name
- Provide the name of the event. This will also be used for the title on the email so it's
best to use a plural form of the word like
Birthdays.
- 2 Active
- Indicate whether the event is currently active.
- 3 Description
- Provide a brief description of the event.
- 4 Event Type
- Indicate the type of event you're configuring. Choose from the following options:
- Person Note Added
- Person Anniversary
- Person Prayer Request
- Person Baptized
- Person Birthday
- Person First Attended Group Type
- Person First Joined Group Type
- Person History
Person History is an advanced tool that can be configured to
provide powerful following recommendations.
To learn more about this option, see the Person History Following Event section.
- 5 Notice Required
- We’ve already seen how people can choose which events to receive notifications for by changing
their Following Settings. The “Notice Required” option means that individuals will always receive
notifications for this event and cannot opt out from their Following Settings. Sometimes they
should be given the option; other times you know what's best for them.
- 6 Additional Settings
- Some Event Types, like
Person Baptized,
provide additional options. See below for more details.
- 7 Send Weekend Notices on Friday
- No one wants their birthday to be missed because it's the weekend. This setting allows you to
send notifications for events that will occur over the weekend on the Friday before.
- 8 Notification Format
- This is the Lava that will be merged into the email for each event. You'll
probably want to copy/paste this from one of the standard events but feel free to
modify it to meet your needs.
Each event type has additional settings you'll want to configure. For instance, the
Person Baptized
event type lets you configure an
Anniversary Count
that you can use to commemorate the person's baptism. The
Person Prayer Request
event type also has an option to include non-public requests in the notification. Be sure
to review the settings for each event type to maximize its usefulness.
Never Forget A Birthday
Following events are great for a personal touch but if you want to have a fool-proof way of sending
your best wishes to every person on their birthday then you may want to consider configuring a job
to send an email to each person celebrating their birthday. Read more about how to do so in the
Rock Admin Hero Guide.
You might also consider setting up a Reminder.
Person History Following Event
The Person History
following event is an advanced setting that gives you the option of being notified when there are changes to a person's history, such as a
change in their membership or marital status. As with other following event types, you can configure any number of
specific events which people can subscribe to and receive notifications for. Let's look at how to set up the
Person History following event option.
Following Event Configuration
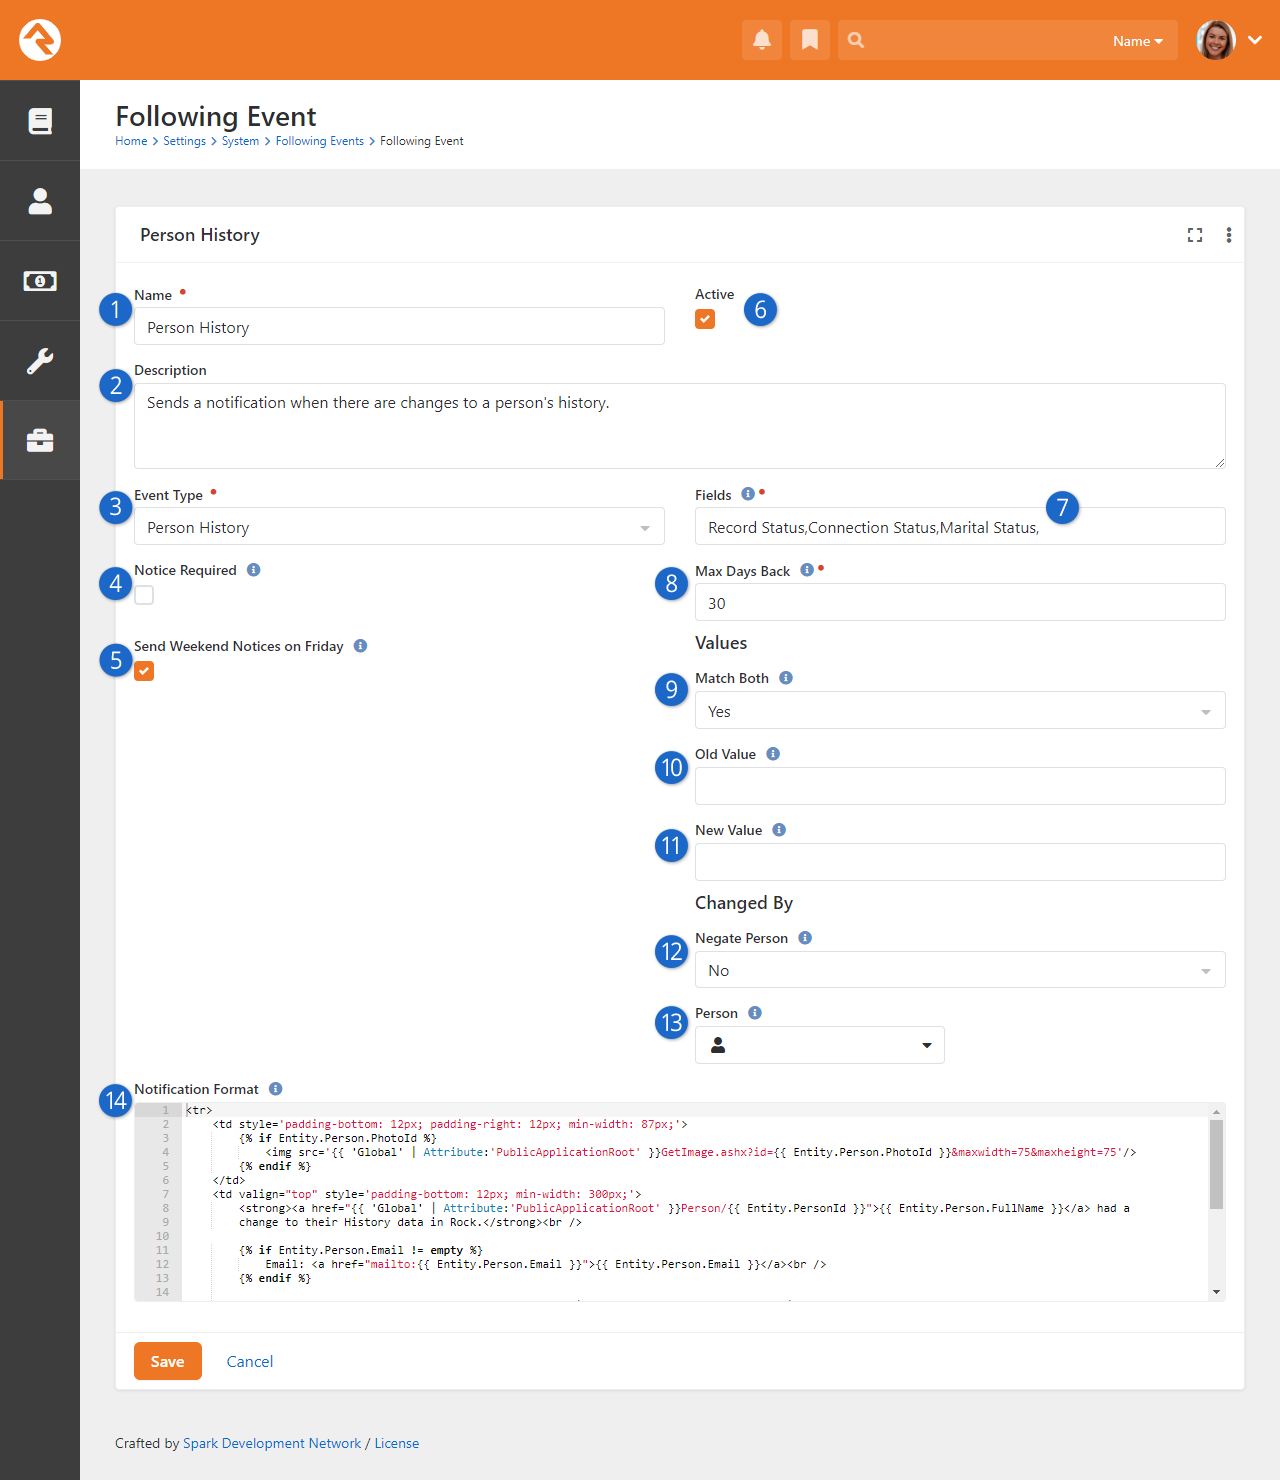
- 1 Name
- Provide the name of the event. This will also be used for the title on the email so it’s best to use a
plural form of the word (e.g., Birthdays instead of Birthday).
- 2 Description
- Provide a brief description of the event.
- 3 Event Type
- Indicate the type of event you're configuring. In this case,
Person History.
- 4 Notice Required
- This setting defines whether the follower gets to choose if they will receive this event. Sometimes they
should be given the option; other times you know what's best for them.
- 5 Send Weekend Notices on Friday
- This setting allows you to notify people of events
that will occur over the weekend on the Friday before.
- 6 Active
- Indicate whether the event is currently active.
- 7 Fields
- This is where you specify which fields in the history data to monitor. Separate multiple items by a comma.
Keep in mind that when viewing the fields in a person's history data, status changes are formatted as: 'Modified
FIELD value from OLD to NEW'. This includes Demographic Changes only, so you can use fields like Connection
Status, Last Name, Birthdate, Communication Preference, and also phone numbers.
- 8 Max Days Back
- Indicate the maximum number of days back to look at a person's history.
- 9 Match Both
- If enabled, requires a match on both the Old Value and the New Value. This equates to an AND
comparison, otherwise it equates to an OR comparison on the values.
- 10 Old Value
- This is the value to be matched as the old value. Leave this blank to match any old value.
- 11 New Value
- This is the value to be matched as the new value. Leave this blank to match any new value.
- 12 Negate Person
- Use this setting when you want to trigger events only when it is NOT the specified person making the change.
This sets the Changed By person match to NOT
a person.
- 13 Person
- This allows you to filter by the person who changed the value. This is always an AND condition with the two
value changes. If the Negate Changed By option
is also set, this becomes an AND NOT condition.
- 14 Notification Format
- This is the Lava that will be merged into the email for each event. You'll
probably want to copy/paste this from one of the standard events, but feel free to
modify it to meet your needs.
Let's look at an example of why and how you might use the
Person History
following event option.
Say you have a care ministry that helps people who are recently widowed. You can use the
Person History
following event to make sure those working in that care ministry are alerted when a person's
marital status changes from 'Married' to 'Widowed'.
To track this change, you would create a new Following Event set with the basic information: Name, Description, Event Type (Person History) and
Notification Format. Then you'd set the following options to capture the change in marital status:
- Fields = Marital Status
- Match Both = Yes
- Old Value = (blank)
- New Value = Widowed
These settings will cause a notification to be sent whenever a person's
Marital Status
field changes from any value to 'Widowed'.
This is just one of many uses for the Person History
following event. You can see what a powerful and useful tool it can be.
Following Suggestions
Knowing who to follow can turn into a full-time job if you let it. But why? Rock can
do the work for you. Administrators can set up suggestion criteria under
Admin Tools > Settings > System > Following Suggestions.
Following Suggestion Type List
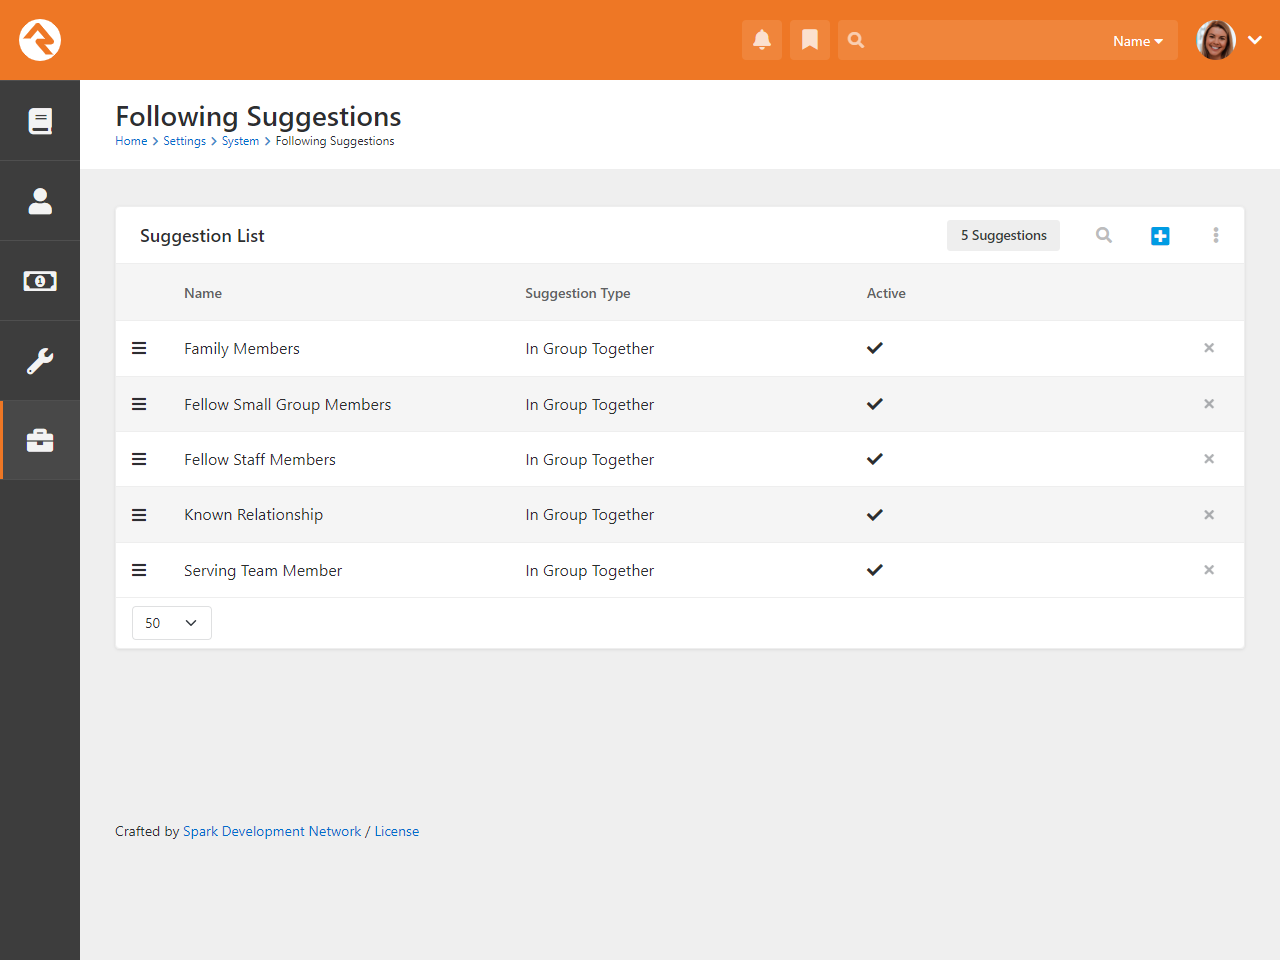
Rock ships with two suggestion types: In Group Together
and In Followed Group. You can see how these types can be
used in several different ways. You can even add your own suggestion types with a little bit of light development.
To add a new following suggestion, click the
button at the top or bottom of the grid. This will bring up the page pictured below.
Following Suggestion Configuration
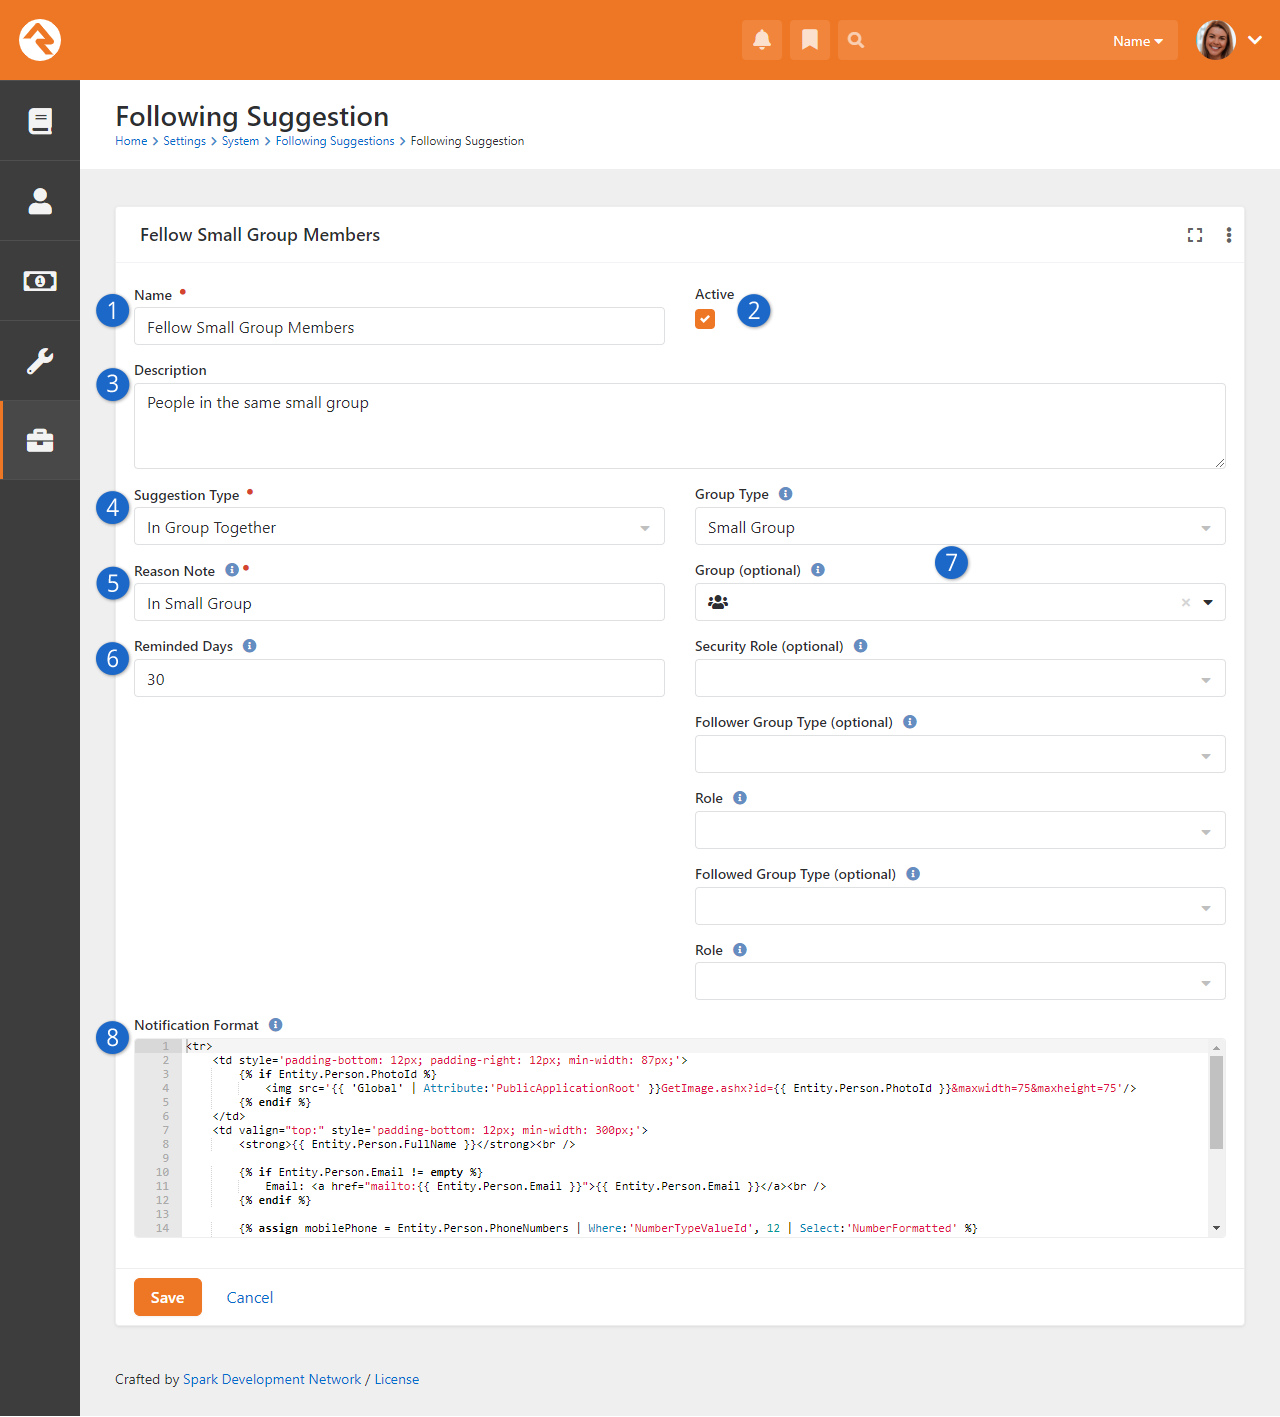
- 1 Name
- This describes the suggestion and will be used as the title in the daily suggestion email that’s sent out.
- 2 Active
- The suggestion must be Active in order to be used.
- 3 Description
- A brief description of the suggestion can help clarify its purpose or intent.
- 4 Suggestion Type
- Select the type of suggestion that’s being configured. As noted above, two suggestion types are shipped
with Rock.
- 5 Reason Note
- A brief message that's shown to the individual, describing why the person is being suggested to them.
- 6 Reminded Days
- The number of days to wait before notifying the person of this suggestion again
if they haven't followed the suggestion. Leave it blank if the person should never
be reminded.
- 7 Suggestion Type Settings
- Note that each suggestion type will have its own setup options. The sample pictured above shows the
In Group Together settings. The next section
below is a guide to what these settings mean.
- 8 Notification Format
- This is the Lava that will be merged into the email for each person being
suggested. You'll probably want to copy/paste this from one of the standard suggestions
but feel free to modify it to meet your needs.
In Group Together and In Followed Group Settings
The settings below are available to the In Group Together and
In Followed Group suggestion types.
-
Group Type: The group type that's used.
-
Group: The optional group that the person must belong to
for the suggestion. Make sure to pick a group of the same type that was
selected above.
-
Security Role: This is similar to the group limiter above, but for a specific security role.
-
Follower Settings: Next, we can limit who the follower role will be. To do this we need to provide both
the group type and role (we must provide the group type again as this helps to limit the roles that will be
displayed in the role dropdown).
-
Following Settings: Lastly, we can limit who will be suggested according to a security role. Only
individuals assigned the role provided here will be suggested. Again, we must provide both the group type and the
role.
Reducing the Confusion
The settings above can be a bit confusing. If you're feeling overwhelmed, looking at the settings for the
suggestions that ship with Rock can help reduce this confusion.
Strategies for Blended Families
Families come in all shapes and sizes. Managing the complexities of relationships,
whether in real life or a database, can be complicated. Luckily, Rock is very
flexible. Below we discuss some of the options for entering blended families.
Dual Family Approach
When parents have dual custody and both parents are involved with your organization,
you may wish to use the dual family approach. In our example below Ben and
Sarah Jones divorced a couple of years ago. Both have joint custody of
their son Brian. Sarah went on to marry Jim Simmons. This is one way to set
up these two families.
Dual Family Approach to Blended Families
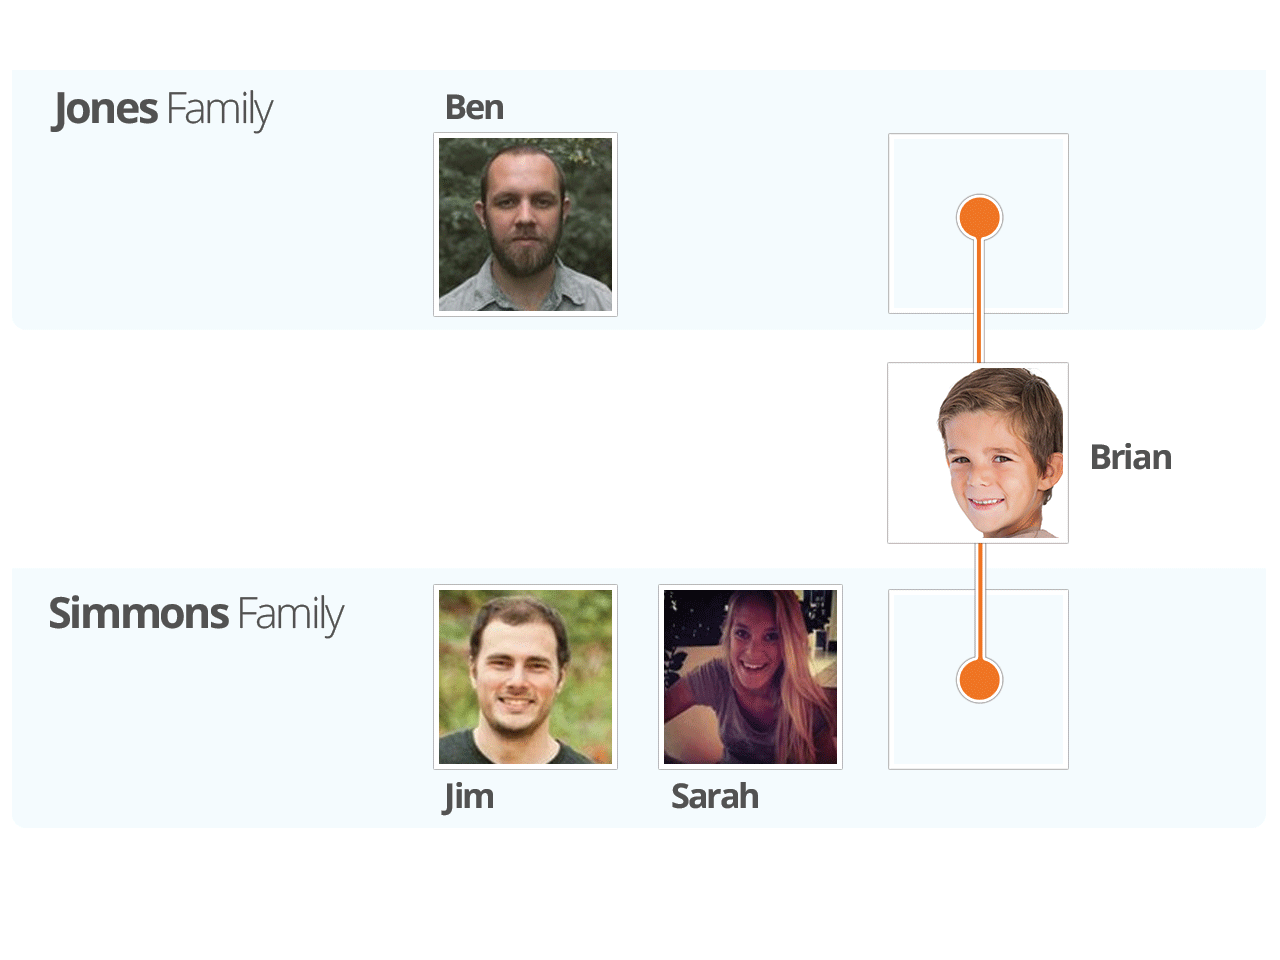
In this example Brian, the child, is in both families. He is still one
record in the database, but he is a member of both families. This approach
has some details you should know about.
-
In reporting, Brian will be listed as a single record. However,
if your reports list families, this pattern will add two families
to the results.
-
Brian can be checked in using either family’s contact information.
-
Mailings will be sent to both home addresses.
-
A report showing the parents of Brian will include Ben Jones as
well as Jim and Sarah Simmons. Each family will be listed as
separate rows on the report.
Single Family with Relationships Approach
In the single-family approach the children of blended families are only
connected to a single family and relationships are used to link them to
other individuals (e.g., for check-in).
Single Family Approach to Blended Families
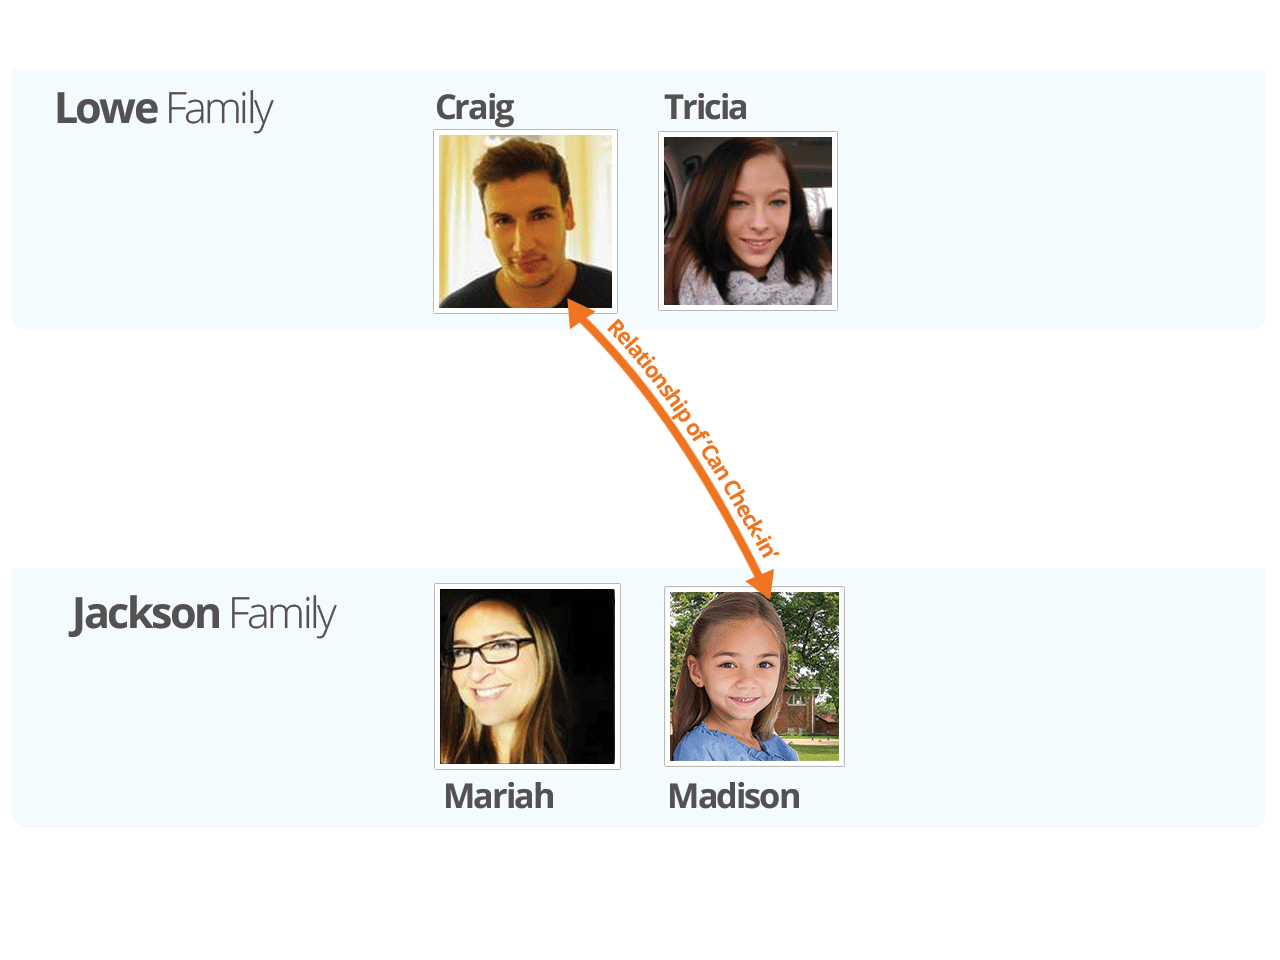
This approach may be preferable in cases where one parent has sole custody
or if the other family doesn't participate in your organization. In this
approach, reporting and most other features act just like a typical family.
Check-in can be allowed by other individuals using the relationship of
Can Check-in.
What About Foster Families?
Rock's flexibility also comes in handy when adding foster families. The best approach
is to add the children to the family, and then create a
new Known Relationship type that
designates them as fosters.
Reminders
Reminders are for those things we always want to do, but often forget. We truly intend to follow up with people or write them a card or send them an email, but then life
happens and these things get pushed to the back of our minds where they're eventually forgotten. It happens to all of us.
But with Reminders, staying organized and on top of all your commitments has never been easier.
By setting up reminders for key events and tasks, you'll never miss an opportunity to make a positive impact on those around you.
For instance, by reminding yourself to check in with someone regularly, you're demonstrating that you value relationships.
Whether you're a busy volunteer or a church leader, reminders are the perfect tool to help you stay organized and build deeper connections.
Viewing Reminders
To start, you can access your reminders from any page in Rock by clicking the
icon in the header. This is also where you'll add new reminders, but we'll get to that later.
Current Reminder Alert

From there you can choose to
View Reminders
and see a filterable list of your reminders.
Reminders can be in different states. For instance, you either still need to be reminded
(Active)
or you've already been reminded and taken action
(Complete).
Active
reminders can be
Due
or
Not Due.
This is determined by the
Reminder Date
you select when creating the reminder, which we'll look at shortly.
- Active: If a reminder is Active, it means you haven't been reminded yet or you haven't taken action on it yet
- Complete: A reminder is Complete if you've already been reminded and taken action
- Due: This means that it's time to take action on the reminder, and that you've been reminded via communication or workflow
- Not Due: These are Active reminders that have Reminder Dates in the future
Reminder List

In the screenshot above we see three reminders.
All of them are both Active and Due,
which we can tell from the filter selections near the top of the block.
These are reminders on which you want to focus and take action.
With filters like this you won't see Not Due reminders, so your screen isn't cluttered with every reminder due in the future.
You can change the filters to see items that aren't due yet.
After you've been reminded and have done what you need to do, you'll Complete the reminder, taking it off your list.
Adding Reminders
There are two ways to add reminders. You can add a reminder manually from pages with context,
or you can add a reminder in an automated way using a workflow action. We'll look
at each method below.
Adding Reminders Manually
You can view your current reminders from anywhere in Rock by clicking the
icon. This is also where you'll go to add new reminders. You can add reminders
from just about anywhere, all you need is a reminder type and a page with context.
To add a new reminder for an entity you need to be on a page that has context for that entity.
There will also need to be a corresponding reminder type for the entity.
For instance, a reminder of type "Hospital Visit" has an entity type of
Person, so
you can add that reminder from the
Person Profile
page. Similarly, you can add group reminders from the
Group Viewer page
when you have a group selected.
Add New Reminder
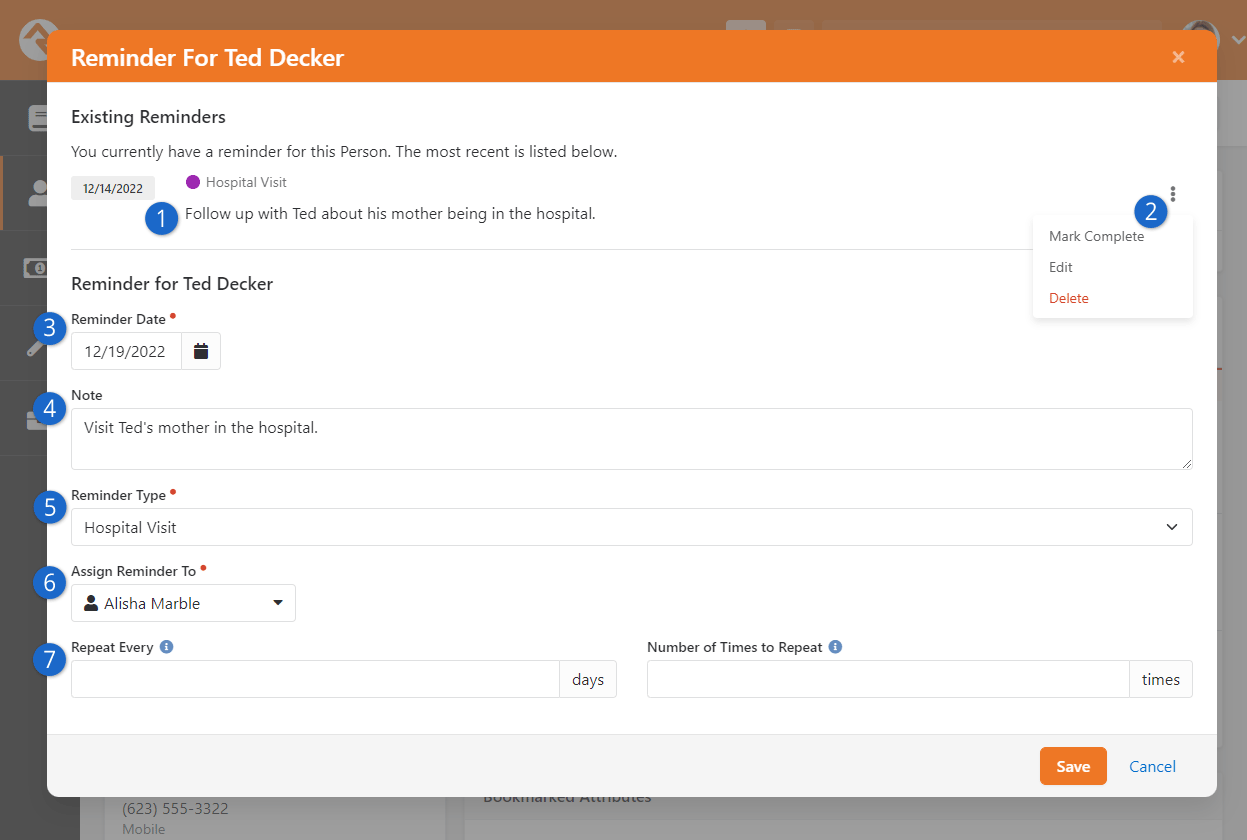
- 1 Existing Reminders
- If you have any reminders for the item (e.g., person, group) you're looking at, Rock
will let you know at the top of the screen. This gives you some context but also helps
avoid duplicate reminders.
- 2 Update Existing Reminders
- If you click the three dots to the right of the existing reminder you can choose to
mark it as complete, edit it or delete it.
- 3 Reminder Date
- This is where you'll select the date on which you want to be reminded. When this
date hits, the communication or workflow configured for the reminder type will be processed.
It is based on this date that the reminder is either Due (the date has arrived or passed)
or Not Due (the date is in the future).
You can also filter your reminders by date when viewing your reminders list.
- 4 Note
- You can provide an optional note, to help specify why this specific reminder is
being placed on the entity.
- 5 Reminder Type
- As described in the prior section, the reminder type controls things like which
notification settings (communication or workflow) the reminder will use when the
reminder date arrives. You'll want to choose the reminder type most applicable to the
reminder you're adding.
- 6 Assign Reminder To
- By default, the reminder is assigned to yourself, but it can be assigned to other
people. You won't be able to see the reminder after it's created if you assign it to
someone else.
- 7 Repeat Settings
- These repeat settings allow you to have the reminder repeat itself. For instance,
you can set it to repeat every seven days with nothing in the
Number of Times to Repeat
field to have a weekly reminder that repeats indefinitely. Just remember that the
clock starts ticking only after you've
Completed the
current reminder. So, if a weekly reminder was due on 3/7 and you completed it on
3/10 then the next reminder would be due on 3/17.
Adding Reminders via Workflow
Reminders can be added in an automated way using workflows. There's a workflow action type
dedicated to this. You can find information about this action in our
Workflow Actions
documentation.
Workflow Action
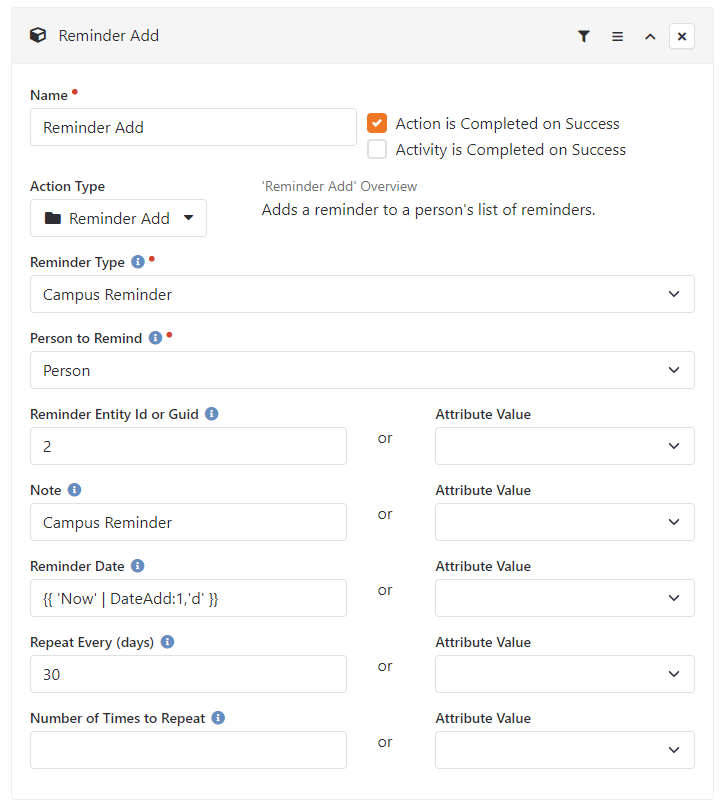
Reminder Types
Reminder types help group, secure and organize individual reminders. Each reminder type is
associated with an entity in Rock, so you can have reminders for just about anything.
There are a few examples in the screenshot below to help get you thinking about what
reminder types you might configure. To configure reminder types, navigate to
Admin Tools > Settings > General > Reminder Types.
Reminder Type List
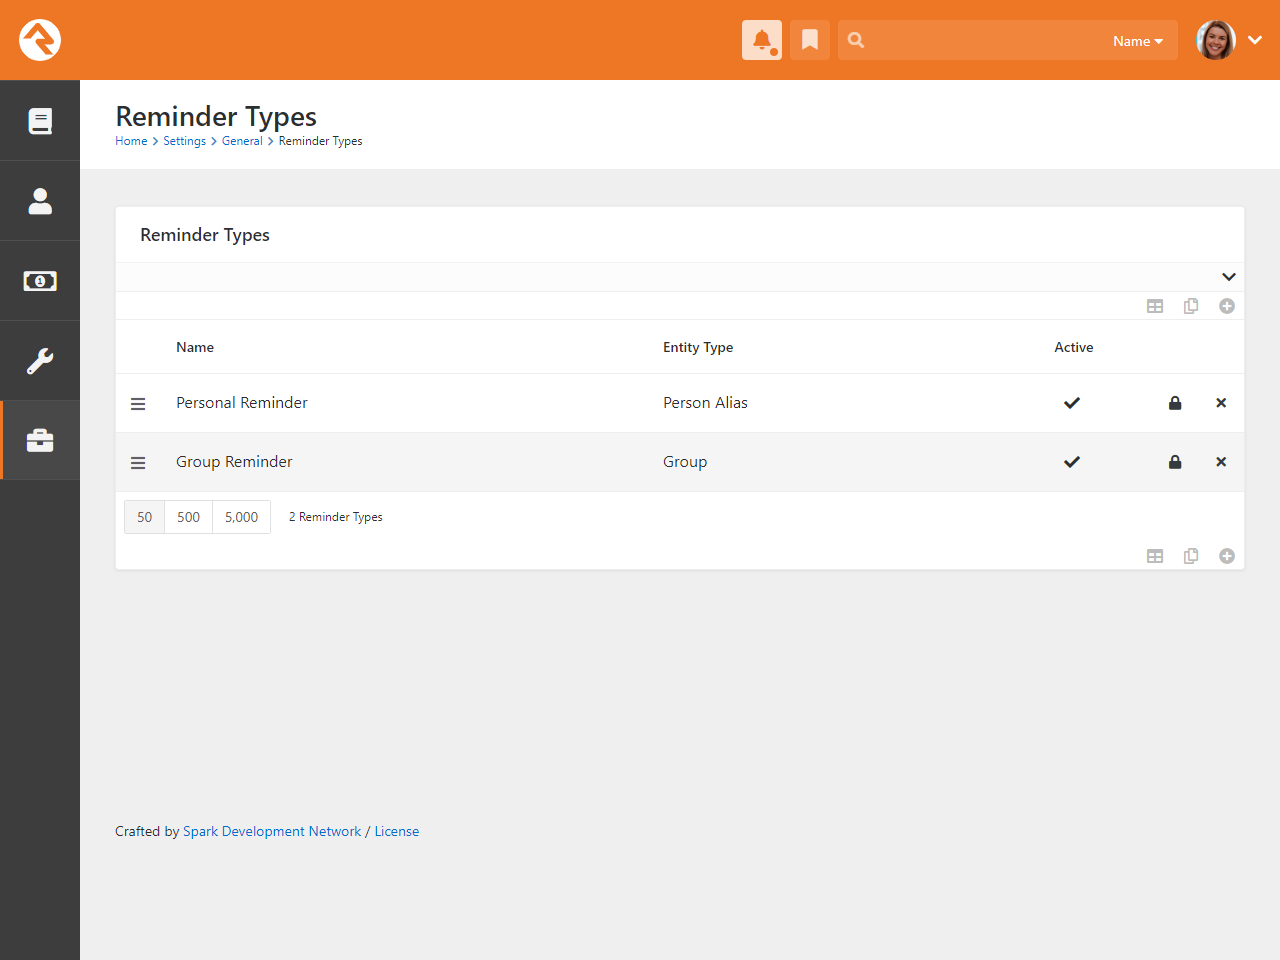
You have many options for setting up reminder types. For instance, do you
want to receive a communication when the reminder becomes Due, or should a workflow launch and do
something for you? Remember, you can set up reminder types for any entity type. All you need
to make a reminder is a reminder type and a page with context.
Edit Reminder Type
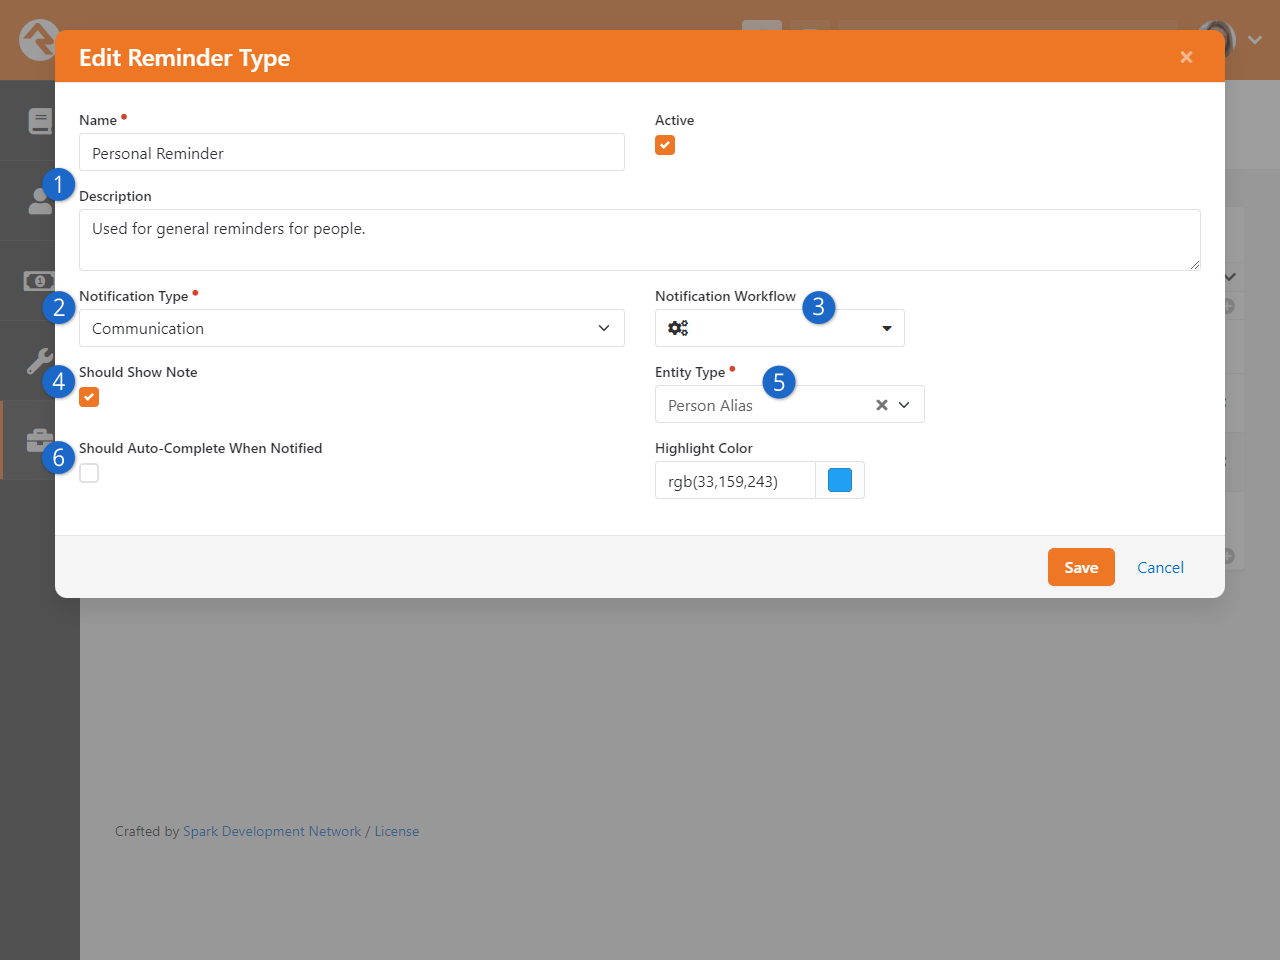
- 1 Name and Description
- It's helpful to give your reminder types a meaningful name and clarifying description,
especially as your list of reminder types grows.
- 2 Notification Type
- You can choose to be notified (i.e., reminded) by receiving a communication, or via a
workflow. We'll talk more about Notification Types
below.
- 3 Notification Workflow
- This is where you select the workflow to launch when it's time to be reminded. This
is optional unless you selected "Workflow" as your
Notification Type
- 4 Should Show Note
- This controls whether the note associated with the reminder should be
included in the reminder email system communication. We'll talk more about this below.
- 5 Entity Type
- This is where you decide if the reminders are going to be for people, groups,
campuses or any other entity. You might have multiple reminder types with similar names and
purposes for different entities.
- 6 Should Auto-Complete When Notified
- The reminder will stay active after you've been notified unless this is checked.
You might select this if all you need is to be notified.
Every reminder you create will be of one of the types you configure as
described above. You can create as many as you need, and you can assign security
to each one if it's only available for certain roles or individuals. In the next
section, we'll see how these reminder types get used to create reminders.
Notification Types
You can be notified in one of two ways when a reminder's date arrives. You can be sent an
email, or you could launch a
workflow that performs certain actions and then perhaps notifies you in a different way. We'll look at
both of these methods below.
Communication
If you choose a
Notification Type of
Communication when configuring your reminder type, the person assigned to the reminder will
receive a system communication when the reminder date arrives. The template for this
communication can be found under
Admin Tools > Settings > Communications > System Communications
and is called
Reminder Notification.
System Communication
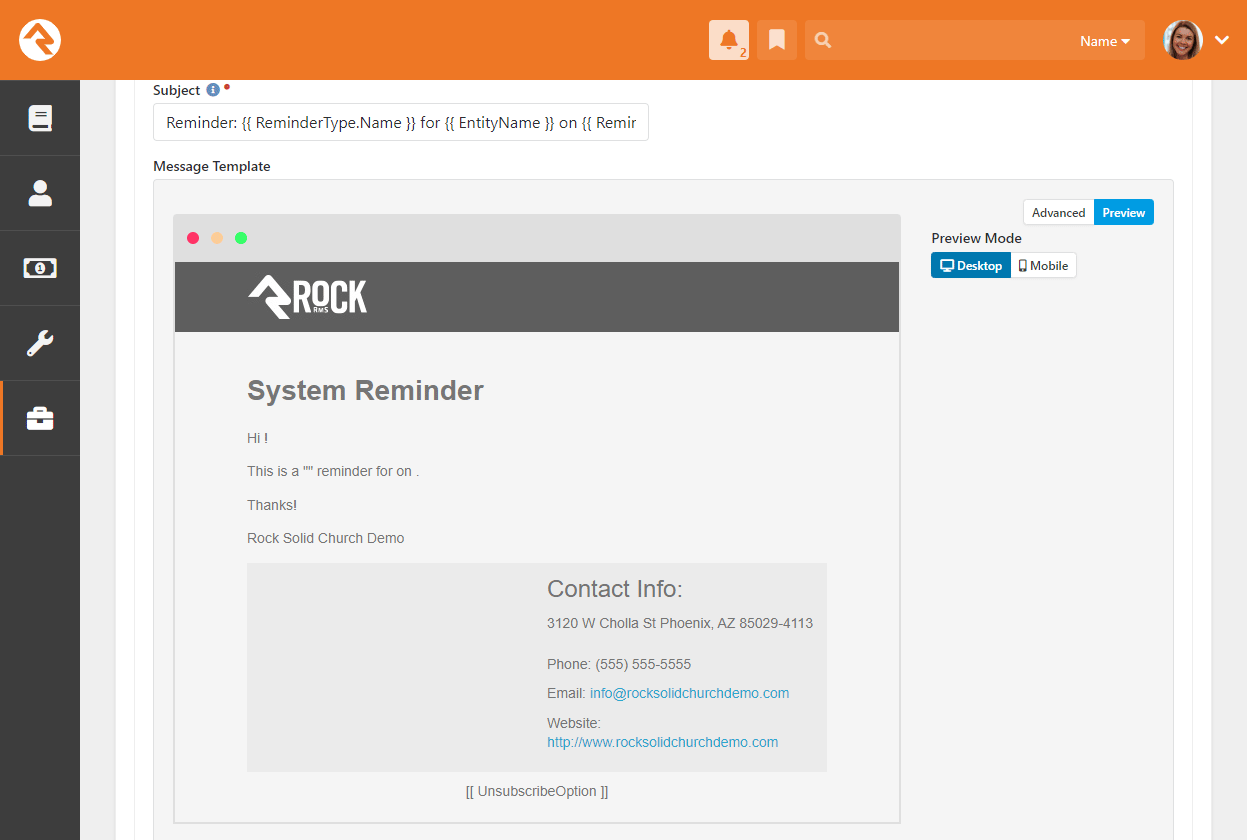
If you want to use a different system communication than the one provided,
you can change which one is used by updating the
Process Reminders job
configuration. We'll talk more about that below.
Workflow
You can choose to have the reminder launch a workflow instead of sending you a
communication. Of course, you can configure the workflow to send you a communication. When
the reminder date arrives for a reminder configured to launch a workflow, the workflow will
launch and will be passed the following items if the workflow has matching keys:
- Reminder
- ReminderType
- Person
- EntityType
- Entity
Workflow Attributes
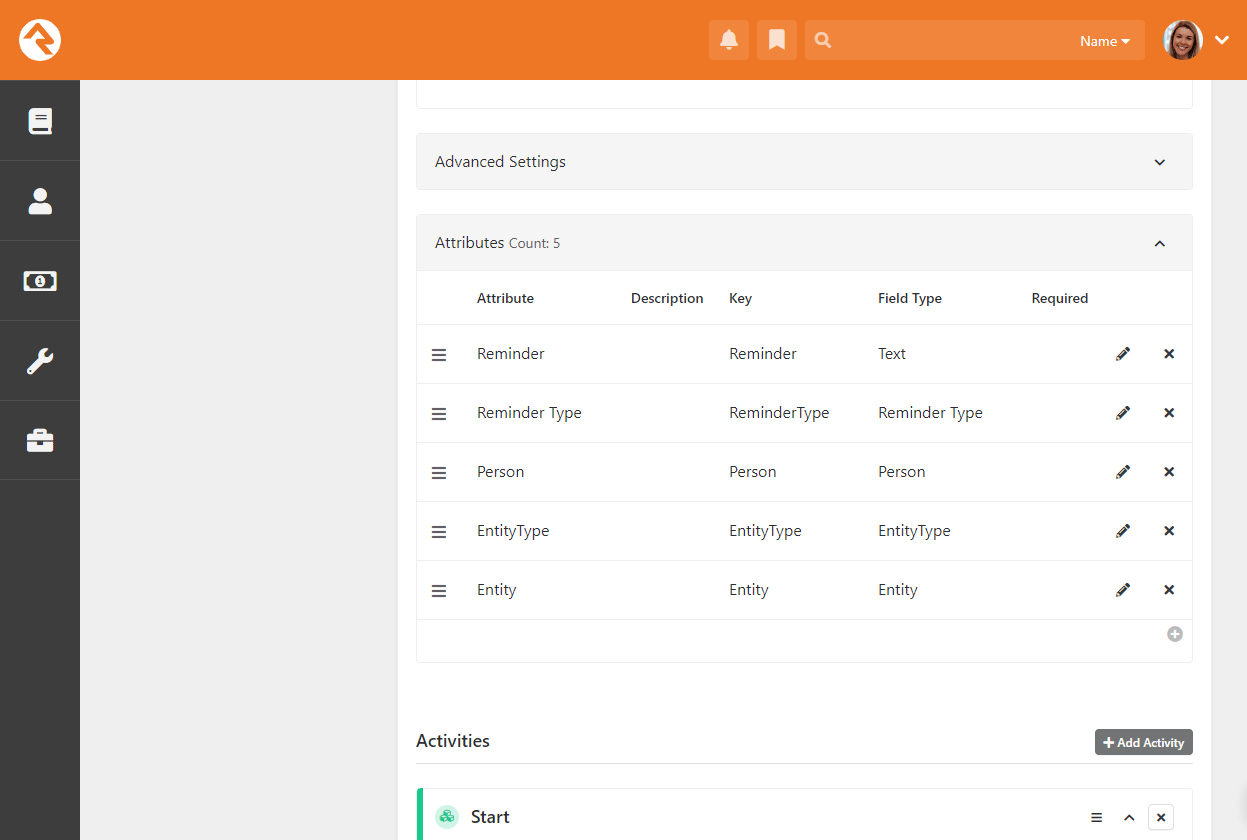
Process Reminders System Job
The Process Reminders job
is what will trigger the communication or workflow that's configured for your reminder type.
Depending on the configuration of your reminder type, the job will also mark reminders complete
after their notification has been processed. Lastly, the job will
recalculate the active reminder count shown near the
icon in page headers.
Process Reminders Job
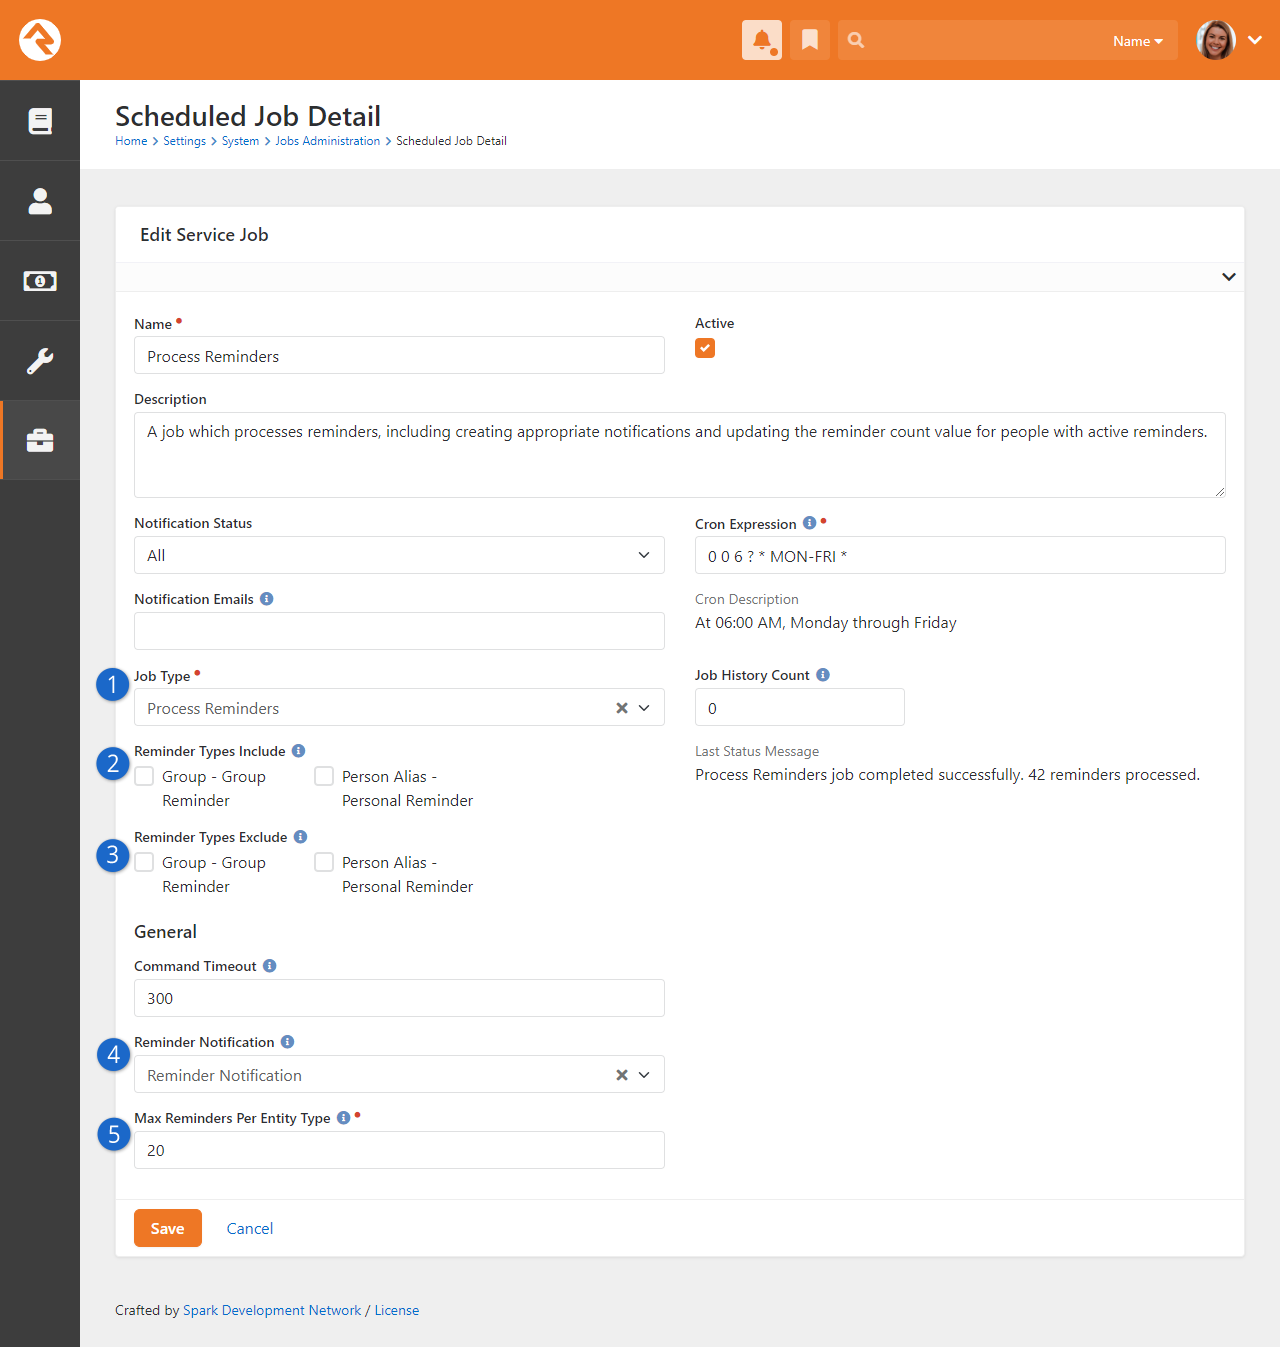
- 1 Job Type
- You'll want to ensure this is set to Process Reminders.
Rock ships with a Process Reminders job configured for you out of the box, so it's unlikely you'll need to change this.
- 2 Reminder Types Include
- You might only want to include certain Reminder Types in this job. This lets you set up different jobs to process different reminders. By default, all Reminder Types are included.
- 3 Reminder Types Exclude
- This is similar to the above setting but excludes Reminder Types rather than includes them. By default, no Reminder Types are excluded.
- 4 Reminder Notification
- Rock ships with the Reminder Notification System Communication, which is configured for use by this job.
- 5 Max Reminders Per Entity Type
- You don't want people to be overwhelmed with an excessively long list of reminders in an email. This setting helps you limit how many reminders the communication contains, by entity type.
Rock ships with this set to 20, which means you could have an email containing 20 reminders for People and 20 reminders for Groups.