Improve
Updates for Rock 18.1
No updates made.Updates for Rock 7.0
Learn the ins and outs of this new feature in v7.Updates for Rock 8.0
Below is a summary of the updates for this version.
- Added Lucene search enging documentation.
Updates for Rock 9.0
No updates made.Updates for Rock 10.0
Below is a summary of the updates for this version.
- Added details related to indexing of sites
Updates for Rock 11.0
No updates made.Updates for Rock 12.0
Below is a summary of the updates for this version.
- Event Items have been added to Universal Search
Updates for Rock 13.0
No updates made.Updates for Rock 14.0
Below is a summary of the updates for this version.
- Updated instructions for installing version 8 of Elasticsearch
Updates for Rock 15.0
No updates made.Updates for Rock 16.0
No updates made.Updates for Rock 17.0
No updates made.
Welcome
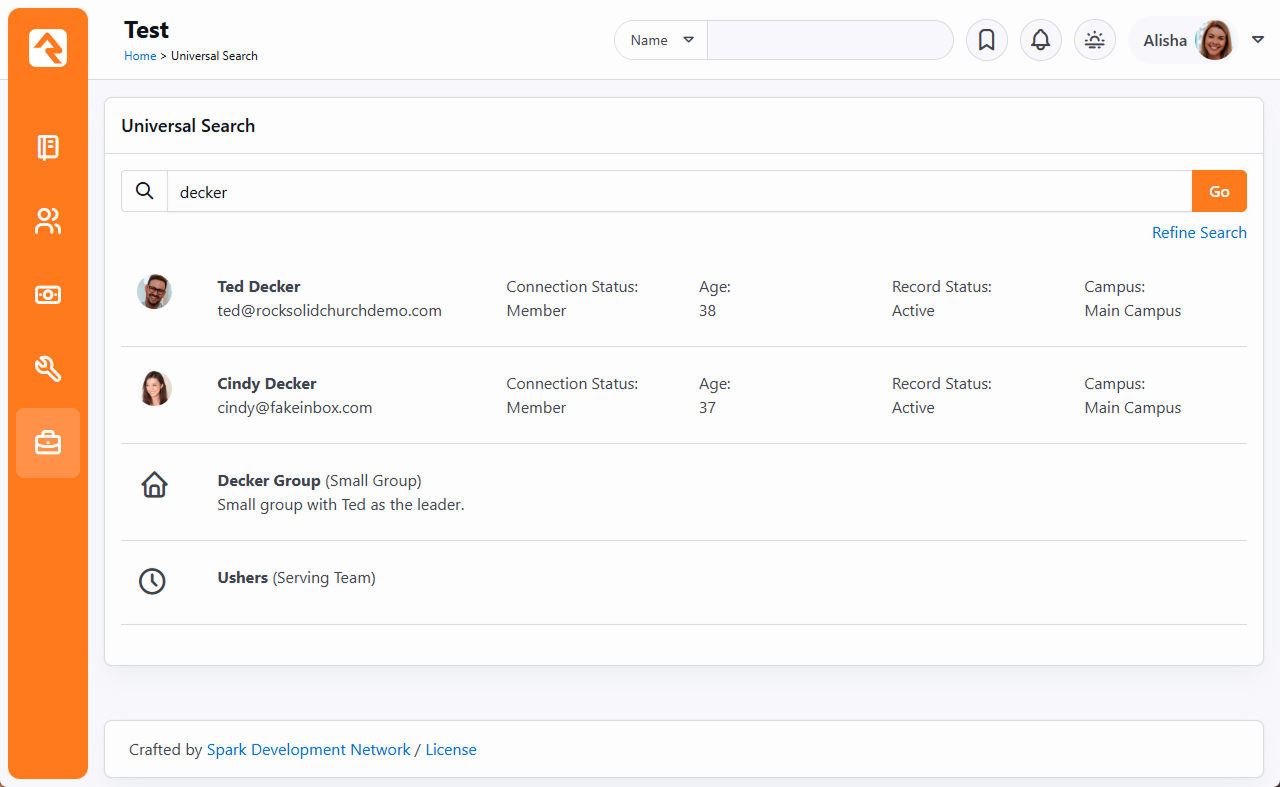
The basic search capability in Rock is quite powerful, but sometimes you may need more. That's where
Universal Search comes in. Universal Search allows you to search multiple types of data at once in a
full-text manner. In a sense, it's like Google for Rock. With this great power comes some additional
technical knowledge, but don't worry we'll unpack it all here in this guide.
Overview
The first thing that you'll need to enable Universal Search is a search provider. All data in Rock is
stored in a SQL Server relational database. Relational databases are great for storing and retrieving
large amounts of data stored as records, but they're not so great for doing full-text search. Rock's
Universal Search feature relies on a different type of software for hosting the search. We currently support two options: Lucene and Elasticsearch.
Lucene Provider
Lucene is your go-to for universal search because it requires no additional software to use. Just activate and you're done.
Elasticsearch Provider
Elasticsearch is an open-source search index used by many of the largest websites including Netflix,
eBay and the New York Times. It's free to use but does require that you have the ability to install
software on your server. We provide a guide to installing Elasticsearch
in the appendix of this guide.
If Lucene is the recommended provider, you might ask, "Why would I ever need Elasticsearch?" Good question! Elasticsearch
allows you to pass the overhead of indexing and searching to another server. It's also the recommended approach if you are
running in a clustered environment. For most organizations, however, it is overkill.
Understanding How Universal Search Works
Rock is made up of numerous types of data called entities. Entities are things like Person,
Group, Group Member, etc. Universal Search supports indexing the following entity types (more
could be added in the future based on community response).
- Site
- Person
- Group
- Content Channel Item
- Event Item
- Document
- Business
You might ask, why not index all entities? Working with search is a delicate balance between
providing the information the user wants and overloading them with random results. For instance, does
anyone want to see results for Workflow Action Types in their search response?
Custom Entities Are Supported
As a developer, you can enable your own entities to participate in Universal
Search. More information on this will be coming in the future.
Avoiding Global Items, Tags and Repetitive Items
You can use the following CSS classes to tell Rock not to crawl content that is wrapped by the element using them:
Content within HTML tags that use these as CSS classes will not be indexed.
Getting Started
Ready… set… let's get started! (Note: if you choose to use Elasticsearch, it will need to be installed before continuing.)
Enable a Search Provider
First, we'll need to tell Rock which search provider we'd like to use and provide the configuration
details needed to connect. We do this under
Admin Tools > System Settings > Universal Search Index Components.
Provider Component List

Next, select the provider type you'd like to enable.
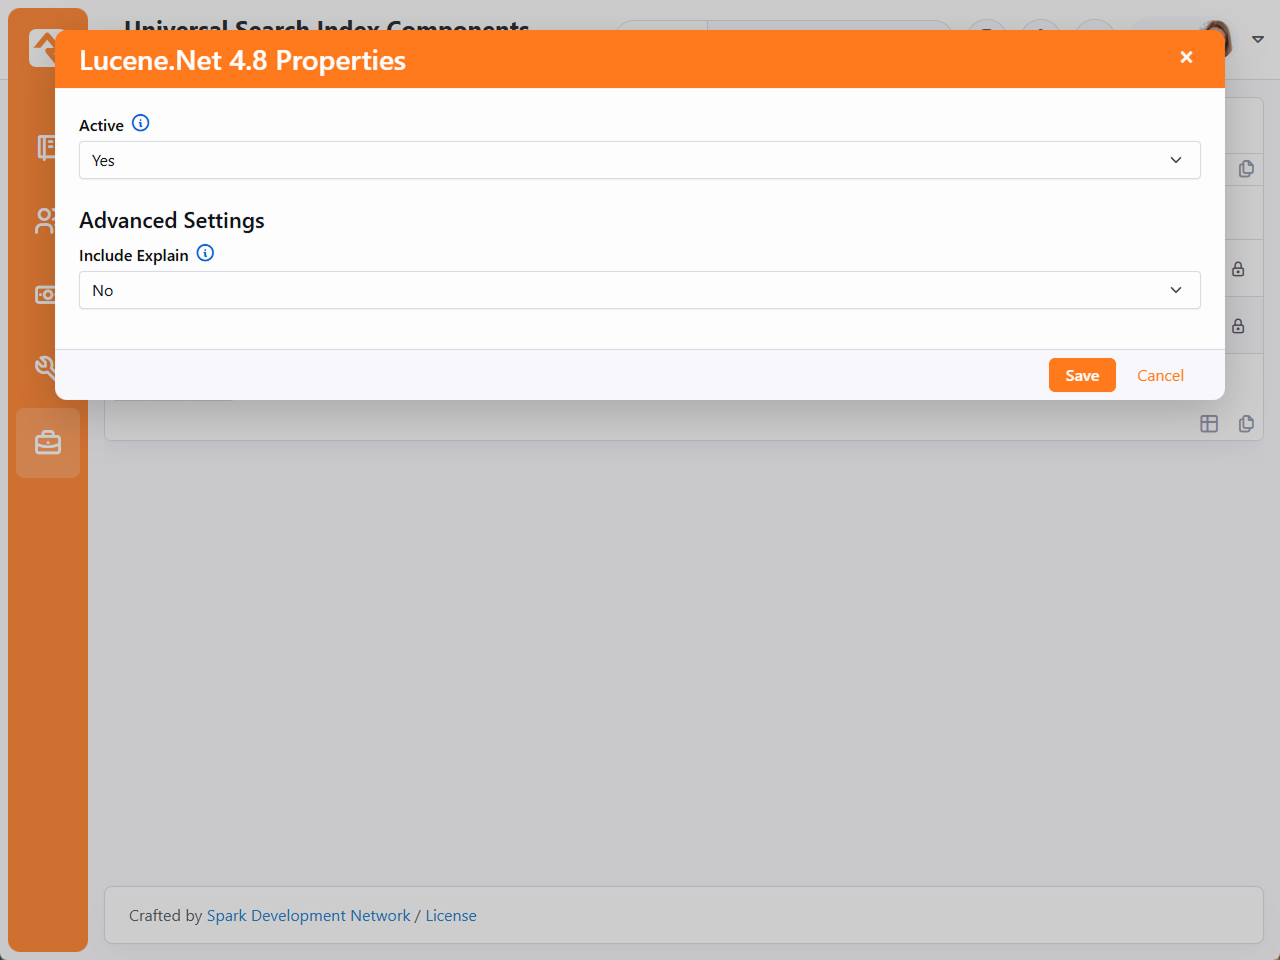
If you choose Lucene as your search engine, Rock displays the following configuration window.
Lucene
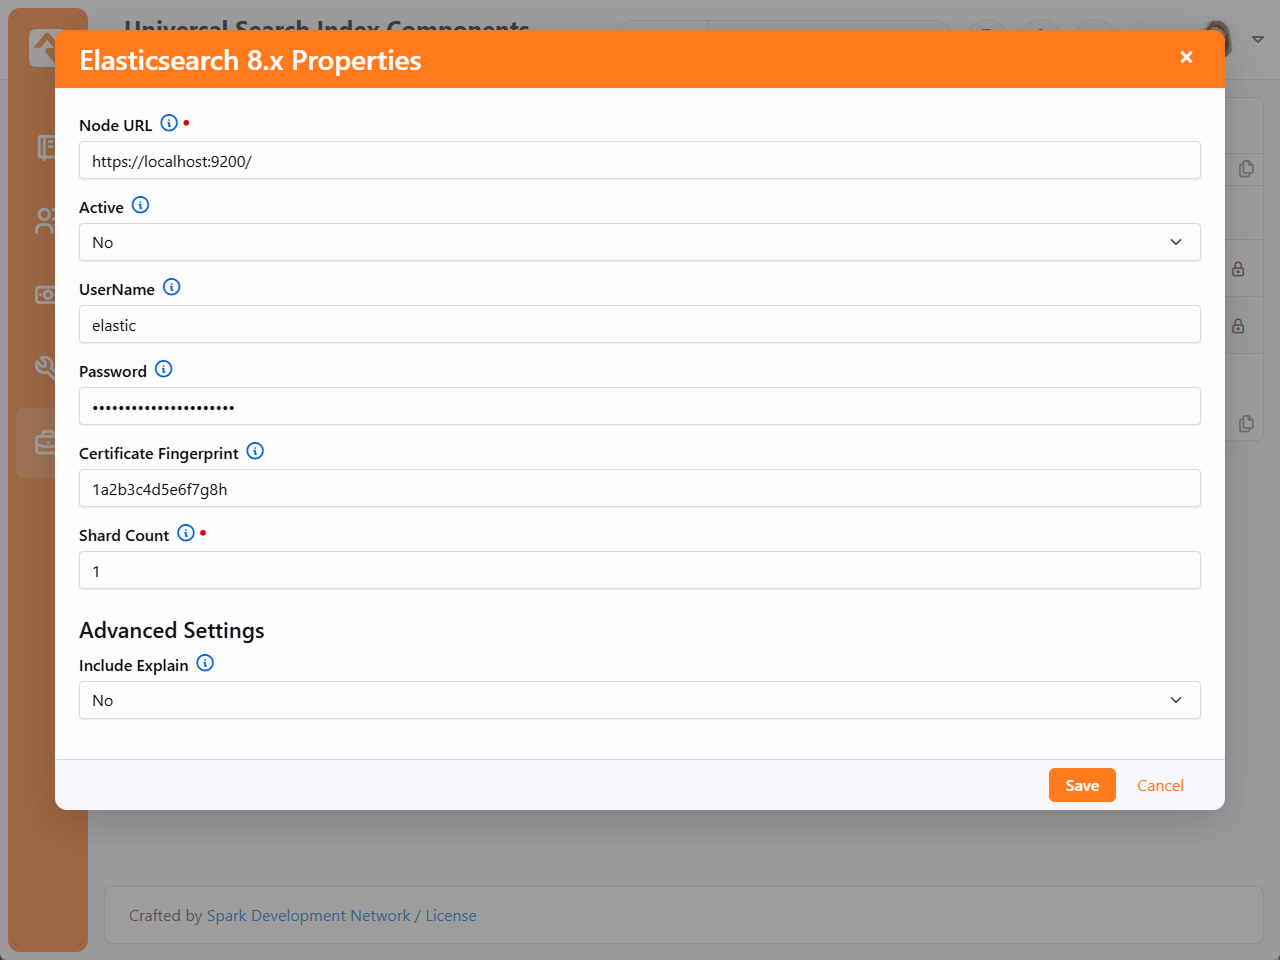
If you choose Elasticsearch, Rock displays the following configuration window.
Elasticsearch
Enabling Entities for Universal Search
Now that we have a provider configured, we're ready to enable entities to be indexed. To do this,
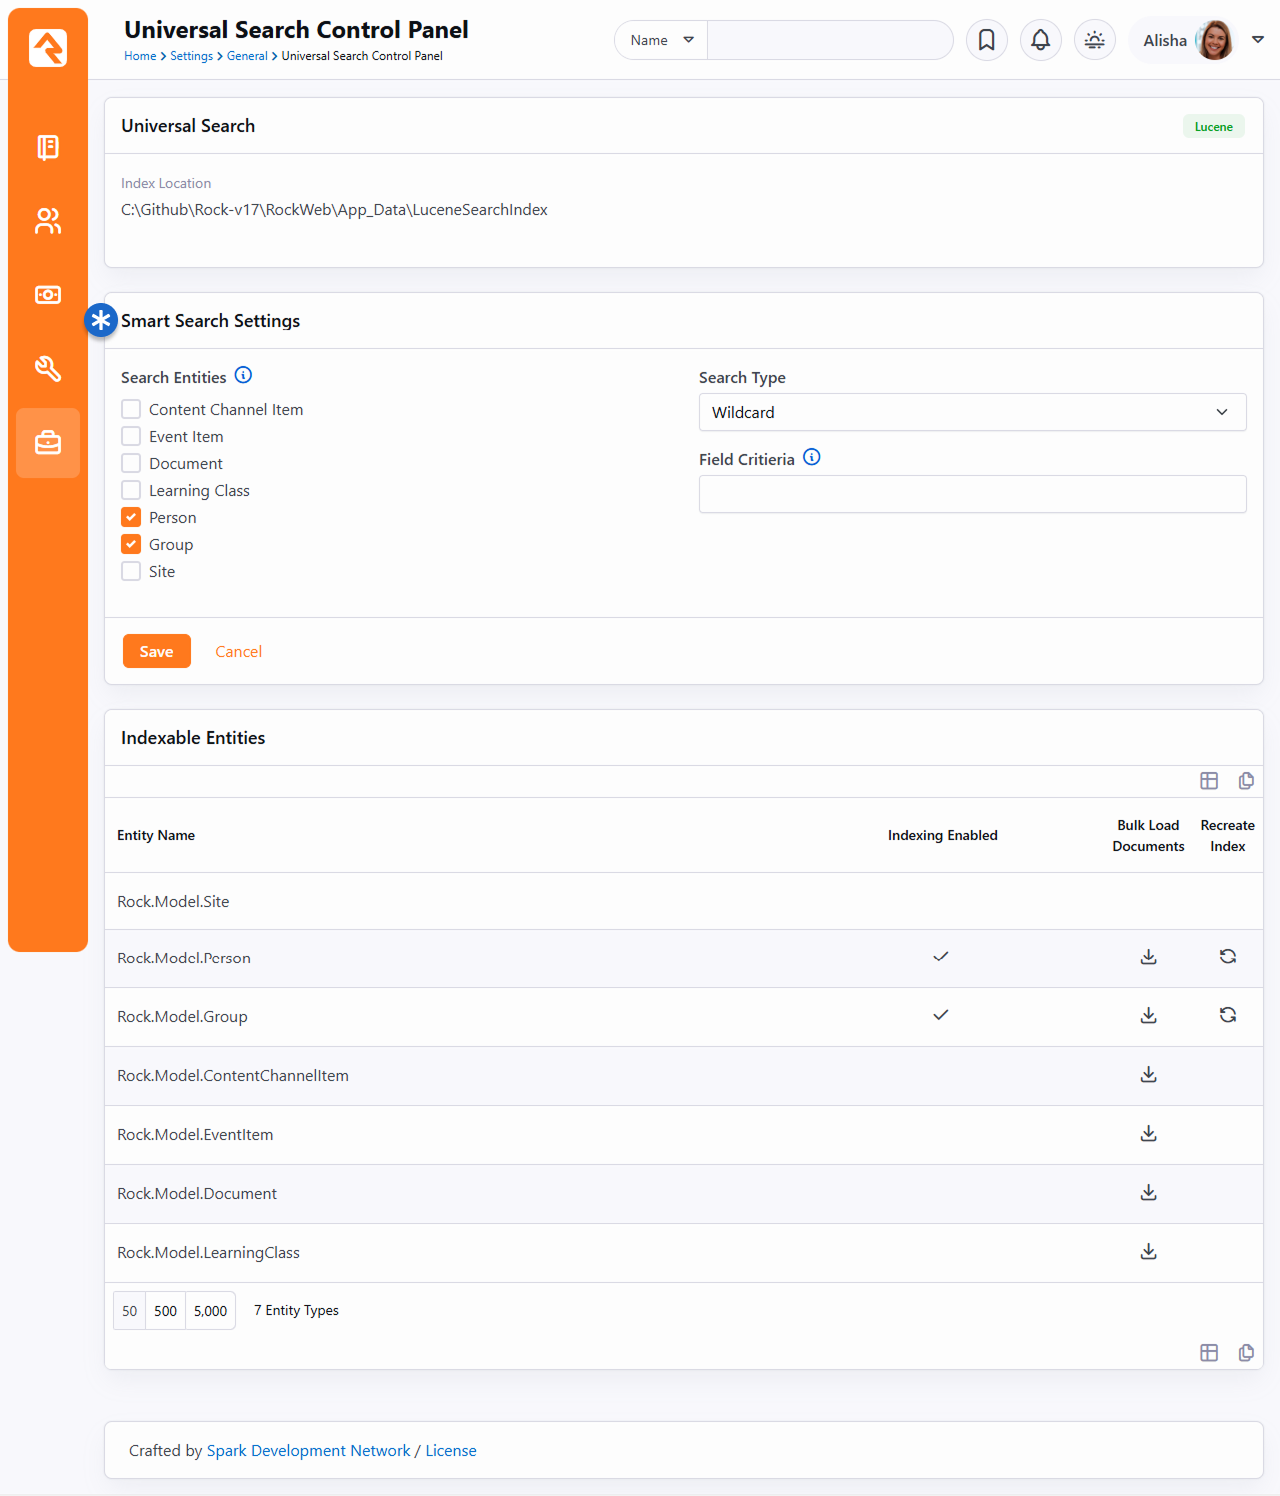
navigate to Admin Tools > General Settings > Universal Search Control Panel.
Universal Search Control Panel
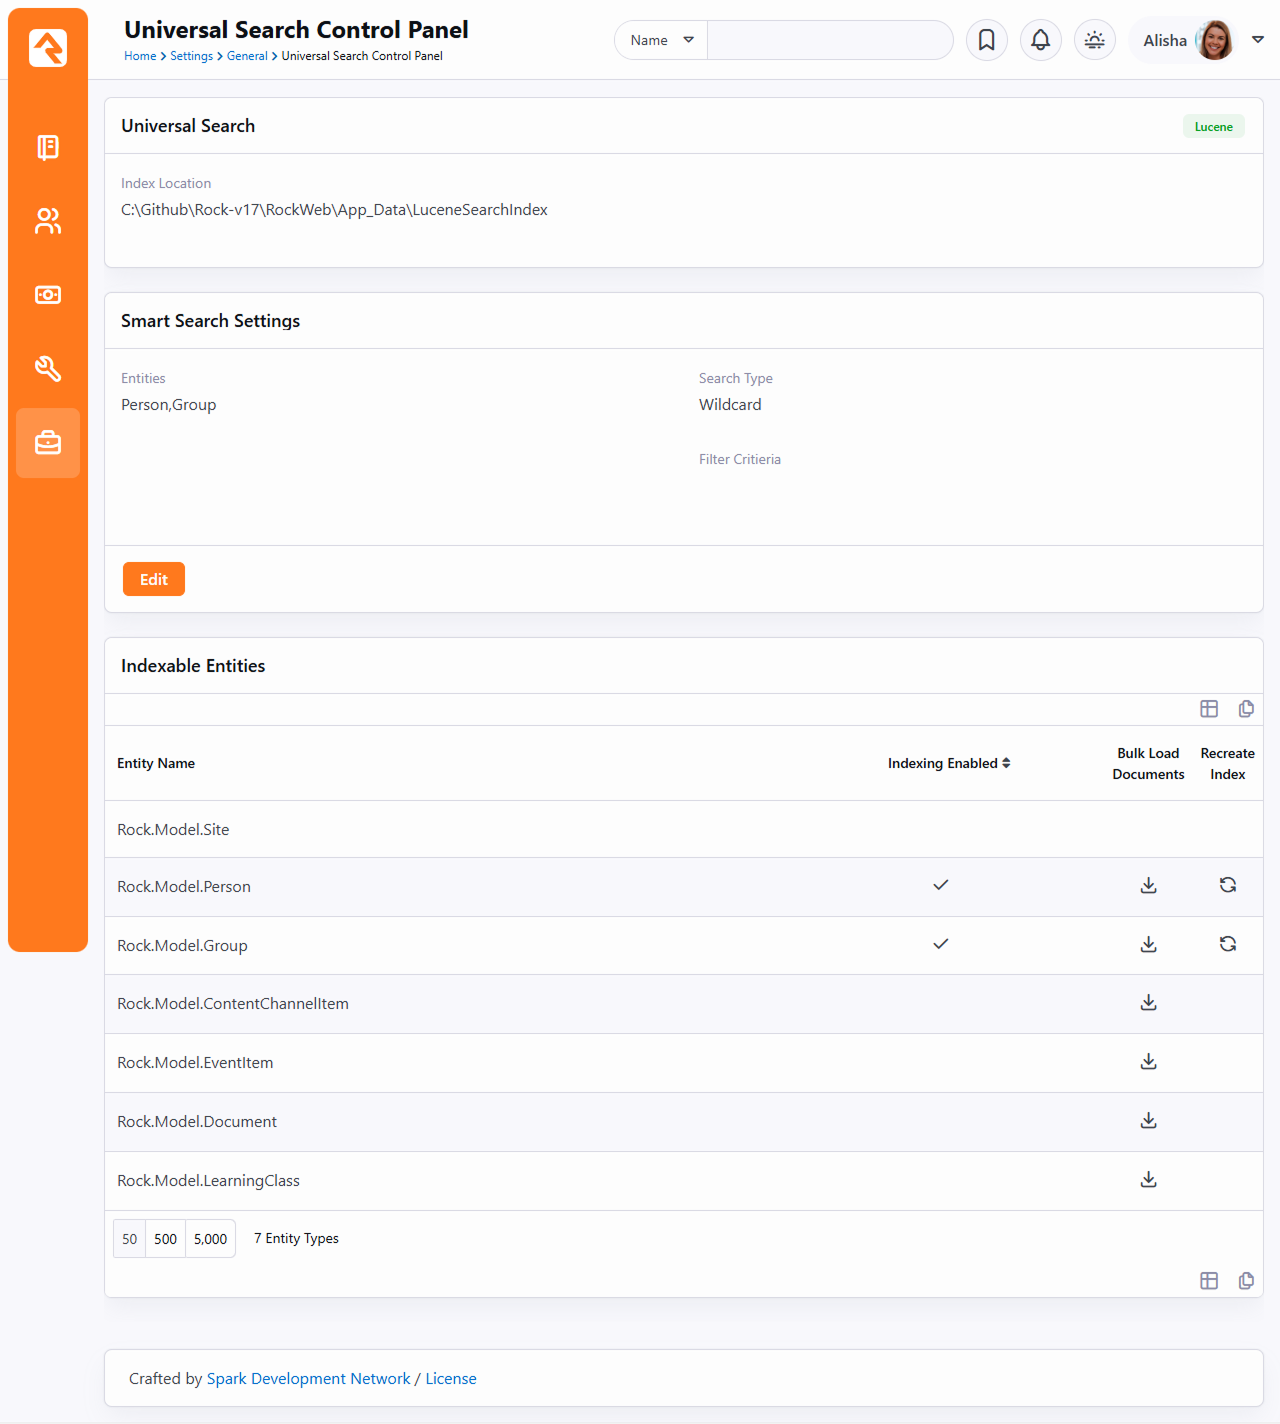
At the top of this page, you'll see a few details about the provider you selected. Below
you'll find a list of the entities that are able to be indexed.
To enable a new entity type, click the row of the entity and select
Enable Indexing on the dialog that
pops up. This entity is now enabled for Universal Search and a request has been queued to bulk index this entity.
|
This button will do a bulk re-index of all the documents. |
|
This button will delete the index and re-create it. This is good if you want to ensure
all of the previous attributes have been purged from the index. |
Keeping Entities in Sync
As you'll read later, the entities should keep the index up-to-date as changes are made. A system
job has also been created to re-index every night (this ensures that items added through SQL or other
means are addressed). The settings of this job can be adjusted under
Admin Tools > System Settings > Jobs Administration > Universal Search Re-Index.
Site Entity
The Universal Search Re-Index job will keep all entities except the Site indexed.
The Site entity is a bit different and is discussed in detail below.
Specifics for Entities
Person
The person entity is pretty basic. Once enabled, all individuals in the database will be sent to the
index. You can add specific person attributes to be indexed as well
(Admin Tools > General Settings > Person Attributes).
When you add/delete attributes to the index, you'll want to run a bulk load on the Person index to
ensure they are available right away. Otherwise, you'll need to wait until the bulk re-index happens
that night. Don't forget; bulk loading is done from
Admin Tools > General Settings > Universal Search Control Panel.
Security Warning
Be careful when indexing person attributes because attribute security is not available in Universal Search.
Business
Businesses don't have their own entity. In Rock businesses actually share the Person entity (which
makes sense when you consider how businesses relate to things like giving). In Universal Search
we do break them out, so they look like a separate entity to allow you better filter options (sometimes
you want businesses in your results; sometimes you don't) but when it comes to setting up indexing
and settings, remember that they share with people.
Group
When you enable groups to be indexed, you may wonder why nothing is displayed. Before groups are
displayed, you'll need to configure which group types you want added to the index. You can configure
this with the Group Type Editor
(Admin Tools > General Settings > Group Types).
Once you enable a group type, a call will be sent to immediately start bulk updating the groups (no extra
steps required on your part).
When new groups are added or an existing group is modified, it will be immediately sent to the index.
You can also determine which group attributes you would like indexed. Changing the attributes will
require a manual index re-load.
Applying a custom icon to the group type is a good idea, as it will be displayed in the results.
Content Channel Items
Content Channel Items work much the same way as groups. You'll need to configure which content
channels you'd like to be indexed. You can also determine which attributes to include in the index.
One other property to note is the
Content Channel Item Publishing Point
for the channel. This setting allows you to determine how to link to the resulting item. When left
blank, the internal channel item page will be used. More commonly though, you'll want to provide a
template to a custom page (like a blog detail page).
Site
Sites are quite different from the other entities discussed here. When you index a site, you
are really interested in searching all of the pages of the site. To do this, one must crawl
the site looking for all of the content of the pages. For instance, a single
Blog Item Detail page will need
to be crawled several times to retrieve each of the blog posts. When you enable the Site
entity, you'll need to complete the following steps:
-
Enable each site that you would like to add to the index under
Admin Tools > CMS Configuration > Sites.
Edit the site's Advanced Settings to allow indexing.
-
Once enabled, be sure to add the Crawling Starting Location
for the site. This is the URL that the crawler will use to start the index process.
-
Set up a new Rock Job to crawl the site on a schedule that you determine is best for your needs.
This can be done under Admin Tools > System Settings > Jobs Administration.
The job type will be Index Rock Site.
Indexing processes, even Google’s, use hyperlinks to find and index all the pages on site. So, if a link to a
particular page doesn’t exist anywhere on your site, crawlers can’t find that page. To ensure all pages on your
site are found and indexed, you could create a new page for the purpose of indexing. The page would contain nothing
but links, including the home page of the site. The URL for the links page would then be used as the
Crawling Starting Location referenced above.
Securing The Index Page
If you want to keep your page of links (as described above) obscured from public view, we recommend the following procedure:
- Create a new account called “Rock Crawler” or similar.
- Give the account a login and password.
- Create the Crawling Starting Location page full of links.
- Restrict security on the page to the new Rock Crawler account and your Rock Admins.
- Add the Rock Crawler ID and Password to the Index Rock Site job.
This will allow the Index Rock Site job to find the links page, while keeping the page obscured from the general public.
Logout Links Can Break Crawling on Secured Sites
If the crawler hits a Logout link while crawling a site behind a login, the Rock Crawler user will be logged out. After that, all remaining pages redirect to the Login page and won’t be indexed.
Simply unchecking Allow Indexing on the Logout page won’t prevent this. The crawler logs out before it can evaluate the no-index header. In some cases, wrapping the Logout link in a no-index class may help—but that won’t work if the link is inside a menu with other items that should be indexed.
To avoid this, consider removing Logout page permissions from the Rock Crawler user or role.
Event Item
Indexing for event items is set at the calendar level. Edit the calendar under
Tools > Calendars to turn on
the Indexing Enabled
setting. With indexing enabled, you can search for keywords that come from the event item’s
title, description or summary.
Document
Documents can also be searched for and included in your search results. Unlike some of the
other entities, there isn't a specific
Indexing Enabled setting
you'll need to turn on for different Document Types. Just enable indexing for Documents in the
Universal Search Control Panel
and you're off to the races. You can search for documents by Name or Type.
Customizing Results for Entities
How results are returned from the search is important. Luckily, there are numerous ways to customize the
results from the search. We cover all the options below.
Default Entity Results
Each entity has a default result template that you can change. This is a great place to modify what
you'd like to be returned across multiple search interfaces. You can edit these templates on a
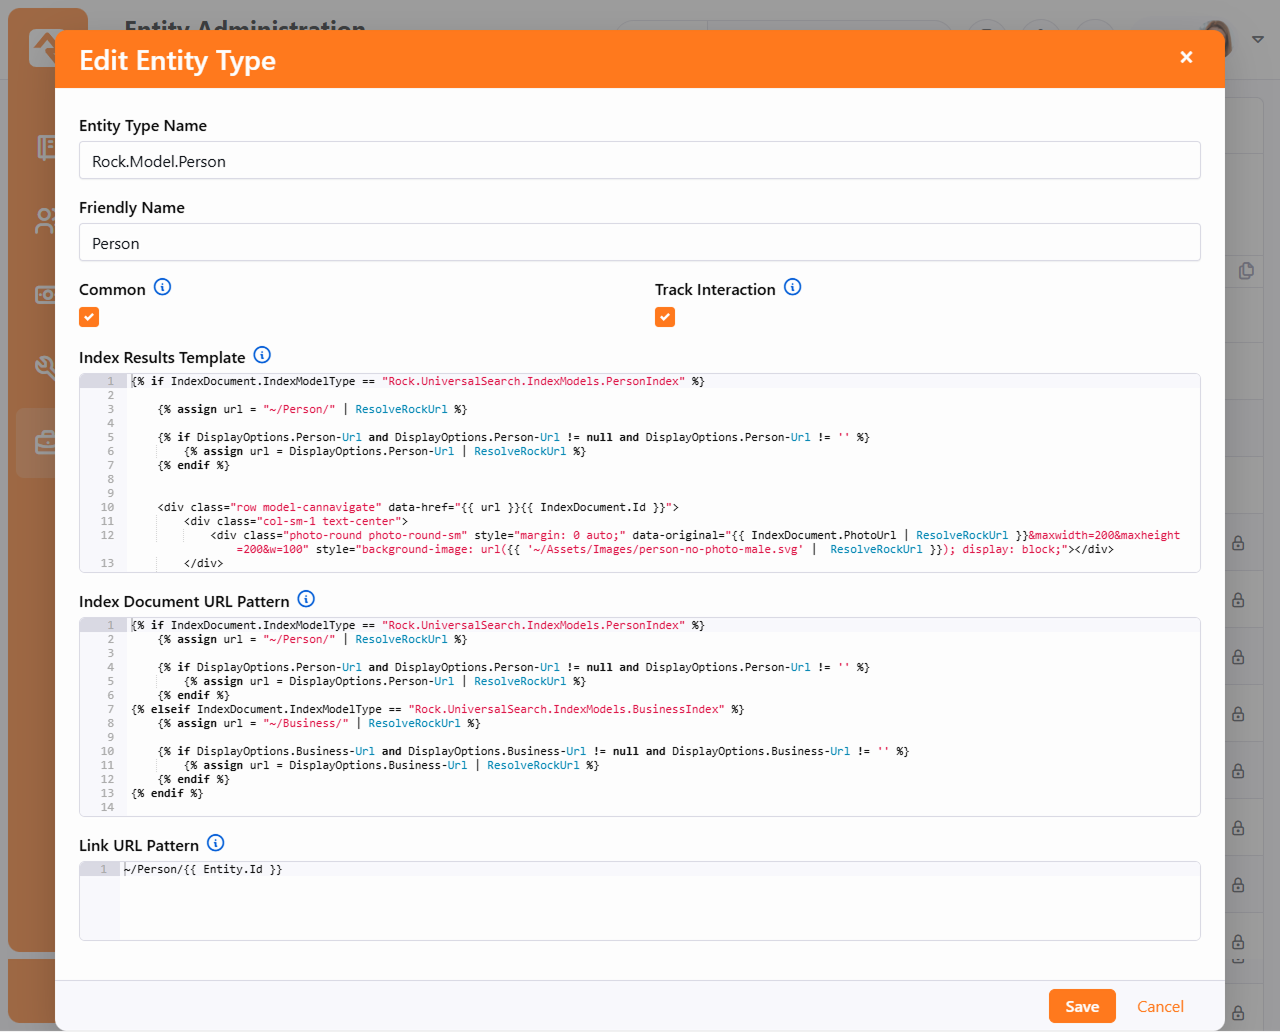
per-entity basis under Admin Tools > Security > Entity Administration.
There are two templates available for your customization. The first,
Index Results Template, is the
template for the result row of the search. The other,
Index Document URL Pattern, is the
Lava template for determining the URL for the specific result when used in the Smart Search.
Entity Configuration
Let's consider a use case for how you might want to modify these templates. Say you have a custom group
type in Rock that you would like to display differently than the normal group result. Perhaps you'd
like to add a specific attribute value for the group and link to a different group detail page. This
is all possible by updating these two Lava templates.
Sample Results Template
{% assign url = "~/Group/" | ResolveRockUrl %}

{% assign groupTypeId = IndexDocument.GroupTypeId %}
{% if groupTypeId == 24 %}
    {% assign url = "~/Organization/" | ResolveRockUrl %}
{% endif %}

{% if DisplayOptions.Group-Url and DisplayOptions.Group-Url != null and DisplayOptions.Group-Url != '' %}
    {% assign url = DisplayOptions.Group-Url | ResolveRockUrl %}
{% endif %}

<div class="row model-cannavigate" data-href="{{ url }}/{{ IndexDocument.Id }}">
    <div class="col-sm-1 text-center">
        <i class="{{ IndexDocument.IconCssClass }} fa-2x"></i>
    </div>
    {% if groupTypeId == 24 %}
        <div class="col-sm-4">
            <strong>{{ IndexDocument.Name }}</strong> <small>({{ IndexDocument.GroupTypeName }})</small>
            {% if IndexDocument.Description != null and IndexDocument.Description != '' %}
                <br>
                {{ IndexDocument.Description }}
            {% endif %}
        </div>
        <div class="col-sm-7">
            {{ IndexDocument.MemberList }}
        </div>
    {% else %}
        <div class="col-sm-11">
            <strong>{{ IndexDocument.Name }}</strong> <small>({{ IndexDocument.GroupTypeName }})</small>
            {% if IndexDocument.Description != null and IndexDocument.Description != '' %}
                <br>
                {{ IndexDocument.Description }}
            {% endif %}
        </div>
    {% endif %}
</div>
Notice the checking of the group type to customize the URL and the results.
Sample URL Template
{% assign url = "~/Group/" | ResolveRockUrl %}

{% assign groupTypeId = IndexDocument.GroupTypeId %}
{% if groupTypeId == 24 %}
    {% assign url = "~/Organization/" | ResolveRockUrl %}
{% endif %}

{% if DisplayOptions.Group-Url and DisplayOptions.Group-Url != null and DisplayOptions.Group-Url != ' %}
    {% assign url = DisplayOptions.Group-Url | ResolveRockUrl %}
{% endif %}

{{ url }}/{{ IndexDocument.Id }}
Custom Lava
When using the default search block, you can process your results through custom Lava you produce.
This Lava is provided as a block setting. You'll need to both enable the usage of the custom Lava
and provide a Lava template. A very basic template is provided as a starting point.
Search Results
Search Lava Command
When you want 100% control, you can drop down and use the "search" Lava command. This command works
very similarly to the entity commands and allows you 100% control of the formatting of your results.
See the documentation for this command in the Lava docs at
community.rockrms.com/lava.
Smart Search Integration
If you've been using Rock for more than a day, you've used the Smart Search block at the top of the page.
Universal Search can be configured to participate in Smart Search, and once it is, you'll find that it's
your go-to search type.
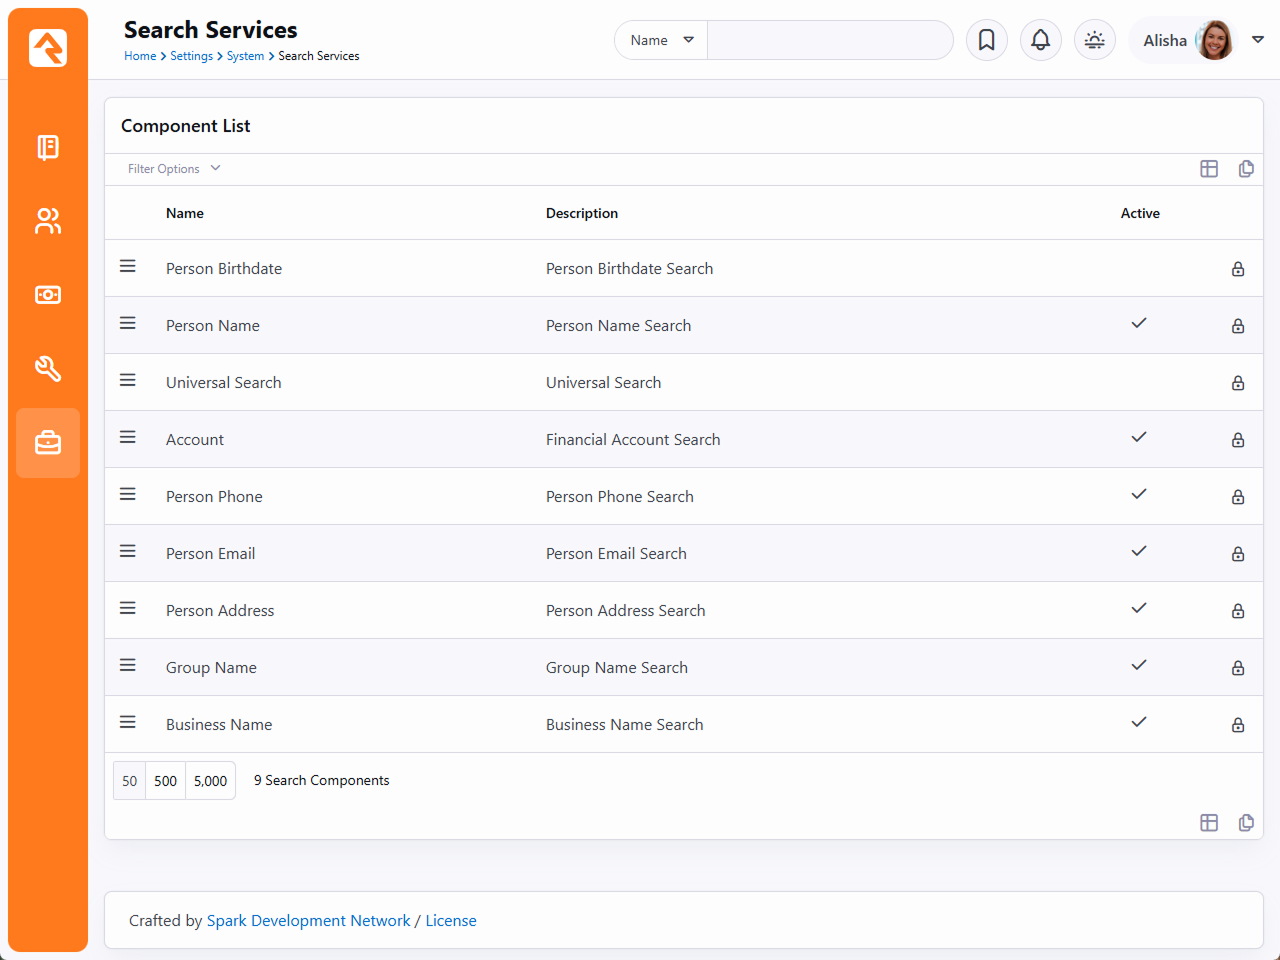
Once you have Universal Search up and indexing, you'll need to enable the Smart Search integration. You'll
do this under Admin Tools > System Settings > Search Services.
If it isn't already, move Universal Search to the top of the Component List so it will be the default search option.
Search Services
Select the Universal Search item to
configure its settings.
Universal Search Settings
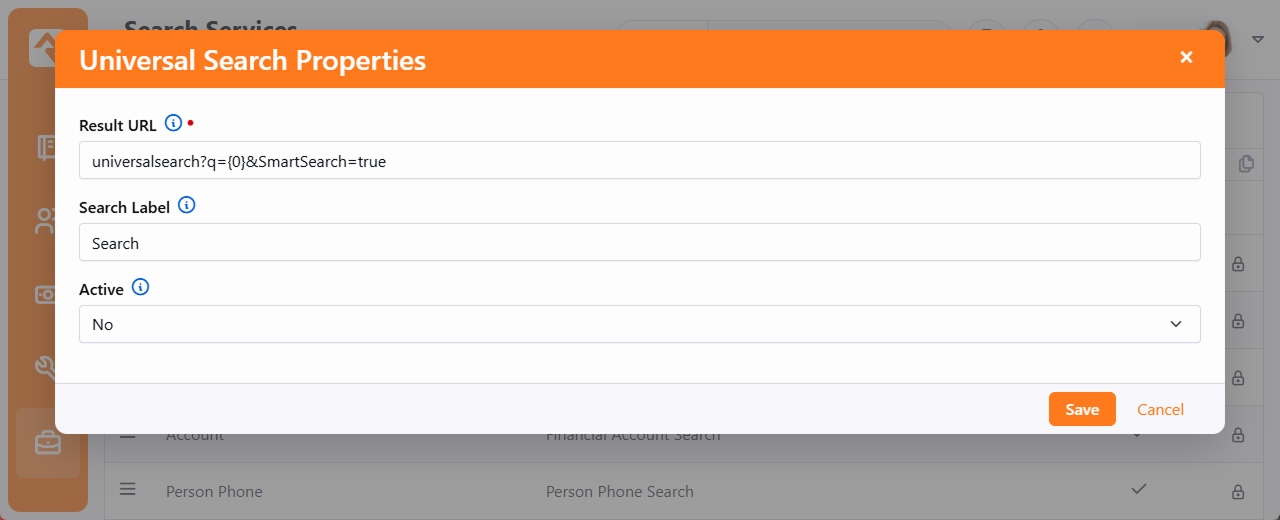
From here you'll provide the results URL. This should point to a page hosting the
Universal Search block. The URL should
be configured to append the SmartSearch=true
parameter to tell the block the request came from the Smart search feature. An example URL would be
universalsearch/{0}?SmartSearch=true.
Note that passing in a parameter of
SmartSearch=true in the query string
also disables the Refine Search
option on the results page. If you want to show the
Refine Search
option on the search results page, add
ShowRefineSearch=true
to the results URL. An example URL would be
universalsearch/{0}?SmartSearch=true&ShowRefineSearch=true.
Additional Smart Search settings can be found on the Universal Search Control Panel
(Admin Tools > General Settings > Universal Search Control Panel).
Search Services Settings
Here you choose the entities for which you'd like to show results and optionally provide advanced options.
Installing Elasticsearch
To install Elasticsearch you will need to follow the steps below. Detailed instructions for
installing and running ElasticSearch can also be found on the
elastic.co
website.
Windows Service
If you want to install and run Elasticsearch as a service on Windows,
follow the instructions found
here.
-
Download Elasticsearch for Windows from
https://www.elastic.co/downloads/past-releases/#elasticsearch. At this point we are
recommending you search for and install version 8.x and not other versions. The instructions here are for version 8.1.2 but can be applied to other 8.x versions.
-
Unzip the downloaded file into
C:\Program Files\.
-
Open the Command Prompt as an administrator and change the directory to
C:\Program Files\elasticsearch-8.1.2 folder. Note that your elasticsearch folder name may be different depending on which version you've downloaded.
-
Switch to the
C:\Program Files\elasticsearch-8.1.2\bin folder, then run elasticsearch.bat.
For instance, the command line would be C:\Program Files\elasticsearch-8.1.2\bin>elasticsearch.bat. If you get a firewall warning, click "Allow access".
-
When the batch process is complete, the screen will show you a password under
Password for the elastic user and a fingerprint code under
HTTP CA certificate SHA-256 fingerprint.
Make note of both the password and fingerprint because both will be needed in Rock.
-
In Rock, navigate to Admin Tools > System Settings > Universal Search Index Components
and then click on the row for Elasticsearch 8.x.
-
You'll need to fill in each of the provided fields:
- Node URL: Use
https://localhost:9200/ for local installs
- UserName: Set this to "elastic"
- Password: This will be the password you collected in step 5 above
- Certificate Fingerprint: This will be the fingerprint provided in step 5 above
At this point you should have a running version of Elasticsearch. You can confirm this
by entering http://localhost:9200 into your browser. If prompted to log
in, use the
UserName and
Password
from the above steps.
You should then see something like the text below in your web browser.
{
  "name" : "Tarantula",
  "cluster_name" : "elasticsearch",
  "cluster_uuid" : "AAbbCCdd1AAbbCCdd-A",
  "version" : {
    "number" : "2.3.1",
    "build_flavor" : "default",
    "build_type" : "zip",
    "build_hash" : "bd980929010aef404e7cb0843e61d0665269fc39",
    "build_date" : "2016-04-04T12:25:05Z",
    "build_snapshot" : false,
    "lucene_version" : "5.5.0"
    "minimum_wire_compatibility_version" : "7.17.0",
    "minimum_index_compatibility_version" : "7.0.0"
  },
  "tagline" : "You Know, for Search"
}
With all of the above in place you can now configure entities for search using the
instructions provided earlier in this guide.
Elasticvue
Once you're done setting up Elasticsearch, you may want to consider installing
Elasticvue. It's a nice
administrative console for Elasticsearch which gives you some visibility into what's going on under
the hood. It comes as a browser extension, which is easy to set up. To do this simply:
-
Visit elasticvue.com and scroll down
to the "Get elasticvue" section.
-
Click the button for the browser you want to add the extension to and install the extension.
-
Access the extension in your browser. You'll need the
UserName and
Password
from the steps in the prior section above. The "Uri" field should be populated,
but if it's not set it to
http://localhost:9200.
-
Click Test Connection
and if all goes well click Connect.
Multiple Environments
If you have an Elasticsearch server configured in different environments on separate VMs,
you’ll need to make some changes after refreshing from one environment from the other.
Generally, this applies when you’re refreshing a sandbox environment from a production
environment.
The settings in Rock must be changed to point the refreshed environment to the correct
Elasticsearch server.
To do this, go to
Admin Tools > System Settings > Universal Search Index Components
and click on Elasticsearch 8.x. Then, update the following fields according to your
Elasticsearch setup:
- Node URL
- UserName
- Password
- Certificate Fingerprint ("SHA Certificate" in Elasticsearch)
Note that you may not need to update the UserName if they’re the same in both environments.
Your sandbox environment will not be able to reach your production Elasticsearch
server until these updates are made. This can be confirmed by going to
Admin Tools > General Settings > Universal Search Control Panel.
If the node hasn’t been updated after a refresh, you’ll see a message indicating a
connection to the Elasticsearch server cannot be made.